This video complements the setup guide to show you how to configure and set up supported Trimble receivers (R12/R12i and R10/R10-2) for use with Emesent's Backpack or Vehicle RTK units, view the RTK status in Commander, and process your scan in Aura.
You must have NMEA activated on your Trimble receiver to use Vehicle / Backpack RTK. Please contact your local Trimble dealer to enable this functionality.
Overview
This document shows how to configure and set up supported Trimble receivers for use with Emesent's Backpack or Vehicle RTK units and then monitor and process the RTK data.
Backpack and Vehicle RTK automates high-accuracy georeferencing and drift correction for scans, allowing for rapid and precise scans without the need for ground control points.
The term "Trimble receiver", used throughout this guide, refers specifically to the devices supported by Vehicle RTK and Backpack RTK devices. Currently, these include the Trimble R12/R12i and R10/R10-2 receivers.
Always make sure to drive safely when operating a vehicle. Do not be distracted or use the phone/tablet to change settings while driving. Only check the GPS status when it is safe to do so.

Scope
Follow the instructions in this document once you have setup your Trimble device according to Leica documentation. This document does not cover how to perform an initial setup on a Trimble R12/R12i or R10/R10-2 receivers or how to connect to a base station or network corrections service.
To perform these actions, please refer to the official Trimble R12i Documentation (website) or R12i Tutorial: Complete Video Series (YouTube).
The Georeferencing articles and videos in Knowledge Base expand on the information and instructions presented in this document, including:
Requirements
Hardware
The following hardware is required to set up the Trimble receiver:
| Hardware | Details |
| Computer |
|
| Emesent RTK unit |
|
| Emesent accessories |
|
| Cable |
|
Emesent can supply vehicle or backpack RTK kits, please see the articles Backpack RTK Hardware or Vehicle RTK Hardware for details.
Software
|
Software |
Version / Download Link |
|---|---|
|
Emesent Aura |
version 1.9 or later |
|
Emesent Cortex |
version 3.3 or later |
|
Emesent Commander (optional) |
version 1.5 or later |
|
Leica Captivate simulator (optional) |
Leica Captivate |
Raw scan data from a Hovermap that uses Emesent Cortex version 3.3 (or later) can only be processed in Emesent Aura 1.7 (or later).
Configure the Trimble Receiver
It is recommended that the receiver be configured through the Trimble web interface rather than the Trimble controllers to avoid overriding the receiver's settings.
Connect to the Trimble Receiver
-
Turn on the Trimble receiver then connect to the receiver’s Wi-Fi network.
-
Once connected, enter 192.168.142.1 in the URL address bar on your Web browser.
-
Enter your credentials on the Login page.
-
The default username is admin
-
The default password is password
-

Settings Summary
|
Setting |
Location |
Value |
|---|---|---|
|
NMEA |
I/O Configuration → Port Summary → Type → Serial |
First field: Serial1/Lemo
Input/Output:
|
|
Tilt |
Receiver Configuration → INS |
INS Enable: unselect |
|
Antenna |
Receiver Configuration > Antenna |
Antenna Measurement Method: Antenna Phase Center Antenna Height = 0.000 |
Hovermap cannot detect an incorrectly set antenna height so ensure it is properly configured.
Check the NMEA Installation
To avoid issues, check if the NMEA option is properly installed.
-
Go to Receiver Status > Receiver Options from the panel on the left. From the panel on the right, click Option Detail located at the bottom.

-
In the Options column, find NMEA in the list. Then in the Installed column, ensure an "X" is marked next to NMEA.

Configure the NMEA Settings
Once connected, configure the NMEA settings to make sure the Trimble receiver can communicate properly with the Hovermap.
-
Go to I/O Configuration > Port Summary on the left panel. On the right panel, click Serial (under the Type column).
-
In the configuration window that appears, locate the two fields at the top of the page. Click on the drop-down arrow for the first field and select Serial1/Lemo from the list. Then for the second field, choose NMEA.
-
Under Serial Port Setup, configure the following settings:
-
Baud = 115200
-
Parity = N
-
Flow = Disabled
-
-
In the Input/Output section, you will see a list of NMEA messages. Click on the drop-down arrow beside each of the following messages and configure their settings:
-
GGA = 5 Hz
-
GSA = 5 Hz
-
GST = 5 Hz
-
ZDA = 5 Hz
-
GSV = 1 Hz

-
-
Click OK to save your settings. The screenshot below shows the Port Summary page after configuration.

Configure the Tilt and Antenna Height
-
Go to Receiver Configuration > Antenna on the left panel.
-
From the available options on the right panel, configure the following settings:
-
Antenna Measurement Method = Antenna Phase Center
-
Antenna Height = 0.000

-
Using Tilt Compensation
If the Antenna Height is set to 0.000, tilt compensation settings will not apply. However, it is still recommended to disable tilt compensation for optimal performance. To do this, go to Receiver Configuration > INS then unselect the INS Enable option, then press OK to save the settings.

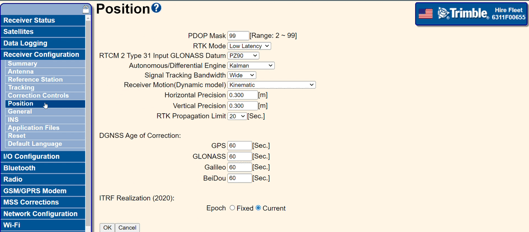
Receiver Motion Profile
If your Trimble receiver is mounted on a vehicle, to get the best results make sure that Receiver Motion is set to Kinematic or another appropriate model. This setting can be found under Receiver Configuration > Position. Click OK to save the setting.
Setup the RTK Mount and Receiver
Refer to these Knowledge Base articles for instructions for how to setup the Backpack or Vehicle RTK Mount and attach the GNSS receiver.
Setup the Backpack RTK Mount and Receiver
Setup the Vehicle RTK Mount and Receiver
Connect to Hovermap
-
The Hovermap and GNSS receiver should be connected to the Vehicle RTK or Backpack RTK mount.
When using the R12, use the Trimble 50mm quick-release spacer and the 100mm Emesent spacer to ensure the correct offset.

2. Plug the GNSS adaptor cable into the RTK mount and fasten the adaptor to the magnetic plate.


Monitoring RTK Status
The Emesent Commander application provides clear visibility of the RTK status before and during the mission. This enables you to monitor RTK quality without leaving the app to check for information via Trimble’s native application.

If the settings are configured correctly and the GNSS receiver is properly connected, Emesent Commander will display the Position and Accuracy without errors. Any communication errors are displayed in the app as a warning notification.
Refer to this article for more information on how you can Monitor RTK Status and the expected RTK accuracy.
Process RTK Scans in Aura
Once RTK scan data has been captured, you can process it using Emesent Aura to create a point cloud, colorize the scan, clean or reproject the point cloud, and view an RTK accuracy report.
See this article on how to Process RTK Scans in Aura.
Troubleshooting RTK
Please refer to our comprehensive guide for help resolving RTK issues: Troubleshooting RTK.