The minimum Aura version required to process RTK data from supported GNSS receivers:
- Emlid RS2, RS2+, RS3: Aura version 1.6 for vehicle RTK or 1.7 for backpack RTK
- Trimble R10/R10-2/R12/R12i: Aura version 1.8
- Leica GS18/GS18T/GS18I: Aura version 1.9
Raw scan data from a Hovermap that uses Emesent Cortex version 3.3 (or later) can only be processed in Emesent Aura 1.7 (or later).
After processing your scan in Aura, you can review the RTK Accuracy Report to understand the GPS signal quality throughout your scan.
However, if your scan only contains GPS-quality georeferencing data and not RTK data (RTK Fix or RTK Float), you will not receive an RTK accuracy report.
For more information, refer to the RTK Accuracy Report section below.
Because of Aura's processing requirements for generating a point cloud from Hovermap data, we recommend your laptop is connected to a power outlet once you start processing the RTK scan.
Process Scan in Emesent Aura
1. Open Emesent Aura and in the Process tab, click Process Scan.
2. In the Configure New Scan Job panel, select the Process workflow.
3. Click Add Dataset then browse for and select the folder containing the raw RTK data to be processed. The Profile is automatically updated depending on the detected payload used in the scan.
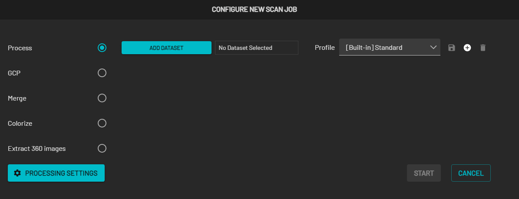
If the RTK data in the selected dataset is insufficient, you will be notified that georeferencing will be disabled.
4. You will be prompted once RTK data is detected in your dataset. Toggle on Use RTK data. The Profile changes to Custom and you will get a notification that georeferencing will be set to RTK.

5. In the Location field, enter the preferred name for the output folder. A subfolder is then created, which stores all the processed data and results.
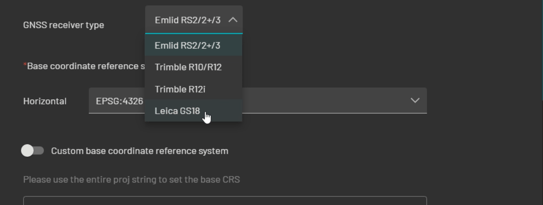
6. Click Processing Settings and in the General tab under Georeferencing, select the RTK device and GNSS receiver used to capture the RTK data.
7. Use Processing Settings to specify any additional configuration.
For optimal results, ensure that the Georeferencing mode and GNSS receiver type match the hardware used during data collection. Changing to another mode will result in a usable point cloud, although its accuracy may be affected.
8. Under Base coordinate reference system (CRS), set the Coordinate reference system in which the data was originally collected. If you are reprojecting the point cloud, this information is essential for accurate transformations and reprojections to the target CRS.

When processing Backpack RTK, Point Filtering is enabled by default while Moving Object Filtering is disabled.
9. For Vehicle RTK scans only: If you’re using a larger vehicle, you may need to change the Exclusion Zone to ensure your vehicle is not included in the point cloud. To do this, select the Bounding Box mode and adjust the values based on the size of your vehicle.

When conducting a Vehicle RTK scan it is not recommended to use Moving Object Filtering as the detected moving objects have a relative velocity compared to the payload, which can cause inaccuracies.
10. Click Save to apply the settings and return to the main screen. Then, click Start to process the scan. Once the scan is processed, all the relevant files will be in the “Output” folder.
Merge an RTK Scan
See the the Merge Workflow knowledge base article for instructions on merging any combination of georeferenced and non-georeferenced scans.
Drone RTK and GCP scans can be merged with other scans if their georeferencing mode is set to ‘none'.
Colorizing an RTK Scan
When colorizing an RTK scan, we recommend the following:
- Always use the GoPro Max 360 when colorizing RTK.
- Maintain all points in the cloud - including those not seen by the GoPro - by disabling the Remove Uncolored Points option in Processing Settings (Colorize tab).
- Remove irrelevant content from being colorized by enabling the Image Masking option in Processing Settings (Colorize tab) and using the [Built-in] GoProMax-backpack-RTK or GoProMax-generic-vehicle-RTK mask template.
Emesent Aura comes with several other pre-defined masks that you can use, but you can also create your custom mask in case none are suitable for your dataset. For more information on creating a custom mask, refer to the article: Creating a Custom Mask.
When scanning with Vehicle RTK, position the mount with colorization in mind. The Hovermap puck, GNSS receiver, and vehicle will block the view of the GoPro and these areas will not be colorized. If colorizing the road is crucial, consider positioning the mount rotated slightly towards the side of the road so that the camera is not blocked from viewing the road.
Improving Colorization Quality
The following changes to the Processing Settings (Colorize tab) in Emesent Aura may help you improve colorization quality if desired for your project. Note that higher quality settings will increase processing time.
-
Decrease Visibility Gamma to -.0001 to increase color richness.
-
Decrease Visibility Voxel Size to 0.01 to increase color resolution, particularly in detailed areas.
-
Increase Colorization Distance to colorize points that are further away.
Colorization quality is also affected by the number of points you have captured. Therefore, doing multiple passes of the site at an appropriate speed will typically improve colorization quality.
For more information on the recommended speed and number of passes, refer to the article Best Practice for RTK.
For more information on colorization generally, refer to the Colorization Workflow article.
Reprojection in Emesent Aura is an automated workflow that allows for RTK scans to be processed with the correct coordinates by simply selecting the target coordinate reference system (horizontal) and converting from ellipsoidal height to orthometric height using a GEOID model (vertical).
This can be done via Processing Settings when processing raw data or Export reprojection from the Project menu if exporting a georeferenced point cloud.
For more information on the reprojection workflow, refer to the article: Reproject your Point Cloud.
RTK Accuracy Report
A report is generated as part of the output to aid in understanding how well the GPS and SLAM were aligned during the scan. Click View beside the output CSV file to display the RTK Accuracy Report.
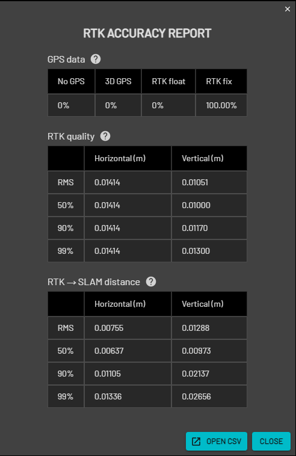
In Emesent Aura, only a summary of the report is provided, which is usually sufficient. Click Open CSV to view a more detailed report from your native CSV application. To view the accuracy report from a previously processed dataset, drag and drop the CSV file into the Viewport.
The report is categorized into the following sections:
-
GPS data: Percentage of the GNSS receiver's scan time in each GPS state.
-
RTK Quality: Accuracy of the GNSS position reported.
-
RTK → SLAM distance: Reported distance between the GNSS and SLAM trajectory after correction.
To view the accuracy report from a previously processed dataset, drag and drop the CSV file into the Viewport.