Contents
- Introduction
- Step 1: Collect your data
- Step 2: Configure your scan job
- Step 3: Start processing
- Step 4: View your final output
- Optional: How do I colorize a Merged Point Cloud?
Introduction
Emesent’s colorization feature adds true color to your point clouds by combining Emesent LiDAR data with video captured from a supported camera. This provides clearer visual context and makes it easier to understand and interpret your scans.
Before Starting
Ensure your scan was captured with camera footage recorded during the mission using a supported, calibrated and correctly configured camera. The video files associated with the scan should be stored in the corresponding scan folder to keep the data correctly paired.
Colorization in Aura is applied to the LAZ file produced by supported processing workflows. It cannot run on raw scan data. Before proceeding, ensure the raw scan has been processed using the appropriate workflow such as SLAM, RTK or GCP. If your project involves merged scans, note that these require a slightly different processing workflow.
Please review the resources below and ensure all items are complete before starting the colorization workflow in Aura.
-
Camera and Hovermap were set up correctly following the Colorization guidelines.
-
The scan has been pre processed successfully using the appropriate processing workflow.
How do I colorize a Point Cloud?
Step 1: Add scan data & Video
-
Open Emesent Aura. Ensuring you have an active Colorization license.
-
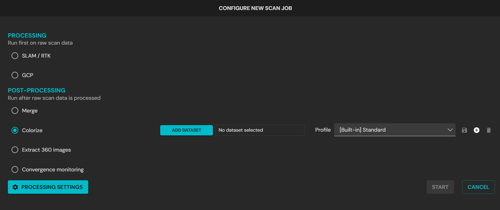
In the Process tab, click Process Scan+.
-
In the Configure New Scan Job panel, select the Colorize workflow.
-
Select Add Dataset.
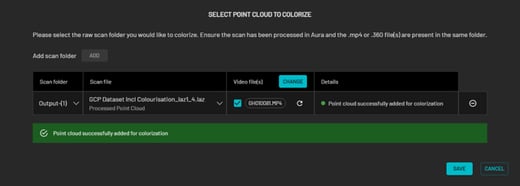
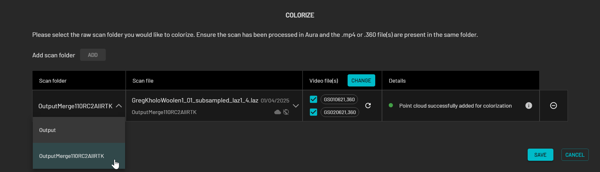
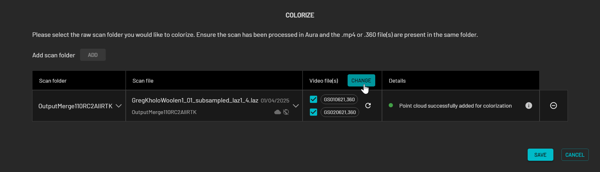
In the dialog box that displays, browse for the folder that contains the point cloud to be colorized. Ensure the scan has been processed and the .mp4 file or .360 file is in the same directory. If the video file is detected, it will appear in the Video file(s) column (multiple video files will appear if detected depending on the scan duration).
5. If there are multiple output folders in the selected scan folder, click the arrow beside the output folder then select from the list.
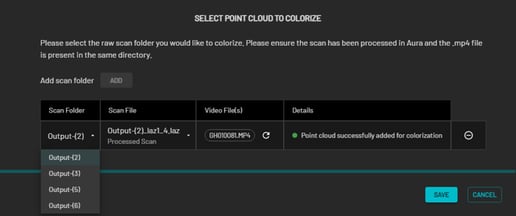
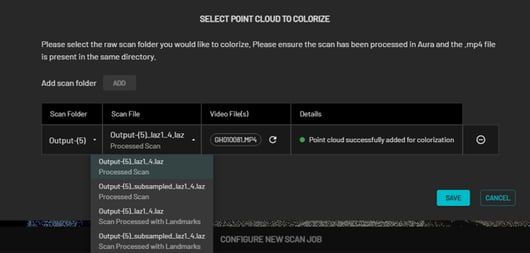
In addition, in the Scan File column, the non-georeferenced output is selected by default. If you want to colorize a georeferenced point cloud, click the arrow beside the scan file then select the file labelled Scan Processed with Landmarks.
6. Once you have selected the point cloud to colorize. click Save.
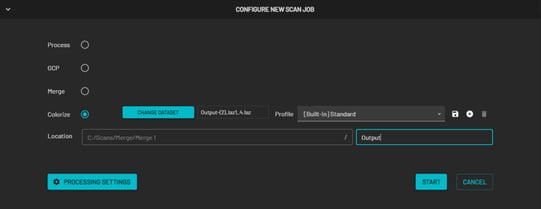
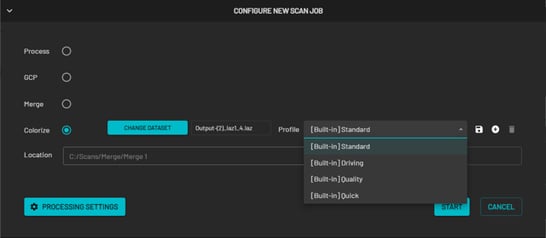
Step 2: Configure your scan job
-
In the Location field, enter the preferred name for the output folder. Emesent Aura will create this folder, which stores all the processed results and data, as a child directory within the raw point cloud folder.
-
Select the processing profile to use. Refer to the Processing Profiles section for more information about which profiles to use and how to create a custom profile.
-
Define colorization settings - refer to the Creating a Custom Mask section for instructions on creating your own image mask.
Step 3: Start processing
-
Click Start to begin processing. The panel will show a progress bar showing how far along you are in your processing job. In addition to the progress bar, the elapsed time of the processing job is shown to the right.

-
When prompted, click Review Frames.
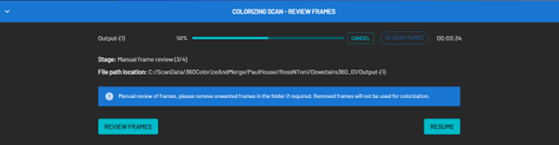
- In the file explorer window, manually delete any unwanted frames from your video.
- Once the unwanted frames are removed, return to Emesent Aura and click Resume.
Note
If a failure occurs during processing, the Retry button becomes available. Click this button to attempt to process the current job from the last successful stage.
Step 4: View your final output
-
Once processing has been completed, click Open folder to view the output folder or View to view your colorized point cloud in the viewport.
-
Click Close to remove the scan information from the processing space.
-
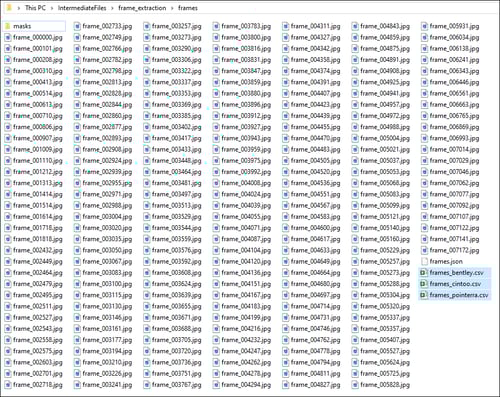
The image frames used during colorization can be exported with the colorized point cloud. These images are found in the Intermediate files > frame_extraction > frames folder. This folder also contains 3 CSV files with pose information in formats compatible with export to Pointerra, Cintoo, Bentley, and Prevu3D.
How do I colorize a Merged Point Cloud?
Colorizing a merged dataset involves merging the datasets first, then colorizing each individual scan as a separate Colorization processing job, as illustrated in the diagram below.
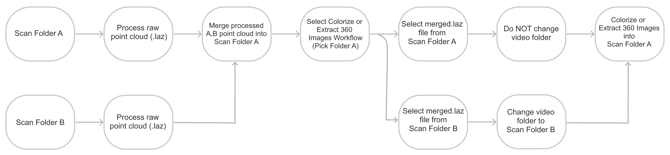
Below are the steps to colorize a Merged dataset:
1. Merge the dataset by following the Merge Workflow before starting colorization.
2. Select the Colorize workflow in the Processing Tray.
3. Add the scan folder that contains the merged dataset output.
4. Set the merge output folder as your scan folder.
5. Select the first scan file to colorize.

6. Select the video files that correspond to the selected scan file.
7. Save the configuration.
8. Adjust processing settings as required by following the Colorization Workflow Guide.
9. Start processing.
10. Repeat steps 5–9 for each additional scan file, selecting the appropriate scan and video files for each.