Contents
- Prepare for the Merge
- Step 1. Configure Your Merge Job
- Step 2: Choose an Alignment Base for Preview
- Step 3: Configure Apply Overrides (Optional)
- Step 4: Select a Reference Scan (Optional)
- Step 5: Configure Processing Settings
- Step 6: Proceed to Alignment
- Step 7. Review and Manually Align (If Required)
- Step 8. Start Processing
- Step 9. View and Combine Your Datasets
- View the Combined Accuracy Report (RTK Only)
- Colorize and/or Extract 360 images (Optional)
- Troubleshooting
Introduction to Merge
Aura’s Merge workflow uses a SLAM-based algorithm to non-rigidly align multiple datasets into a single, seamless point cloud output. Merging multiple point clouds improves efficiency, accuracy, and usability especially for complex, multi-scan projects. It also ensures consistent alignment of scan data, resulting in a high-quality deliverable.
Aura supports merging a combination of georeferenced and non-georeferenced scans. Each scan must be individually processed before merging.
The merge process outputs individual .laz files for each scan. These files are aligned using the SLAM algorithm and georeferenced if applicable. The individual .laz files can then be combined within Aura to produce a unified point cloud.
The following steps outline the merge workflow in Aura.
Prepare for the Merge
Ensure Overlap
During capture you need to include a reasonable amount of overlap between scans to provide sufficient information for alignment. A rough guide is to have one-third of each dataset overlap with the next.
You can merge vehicle RTK, backpack RTK, and non-RTK scans together. RTK scans will help improve the alignment of non-RTK scans in areas where they overlap.
Consider System Resources
Although there is no strict limit to the number of files you can align, processing demand will increase with each added dataset. Avoid merging point cloud files that add up to more than your available RAM. Use subsampled point clouds to reduce computational load.
Scan Requirements for Merging
Before merging, each scan must be processed in Aura:
- Georeferenced Scans (RTK):
-
-
Must be processed with the correct device under Georeferencing mode in Processing Settings.
- Set the base coordinate reference system to match the coordinate system used for RTK corrections.
-
Georeferencing must be Enabled in Processing Settings.
-
-
Non-georeferenced scans:
-
Must have Georeferencing mode set to None in the Processing Settings.
-
-
Drone RTK and GCP scans:
-
Can be merged, but georeferencing will not be retained. Set georeferencing to None before merging.
-
-
Scans processed in Aura versions earlier than 1.10:
-
May default to GPS for non-georeferenced scans. Reprocess these scans in Aura 1.10 or later with georeferencing set to None.
-
-
Mixed scanner models:
-
Merging scans captured using different Hovermap models (e.g. ST and ST-X) is supported, but ensure compatible firmware and Aura versions were used.
-
Step 1. Configure Your Merge Job
1. Open Emesent Aura and click Process Scan in the top-left corner.

2. Select the Merge workflow in the Configure New Scan Job panel.

3. Click Add Datasets, then click Add next to Add dataset folder. (e.g. ScanJob123)

ScanJob123/ |
Do not select the Output folder. Ensure you select the main scan folder.
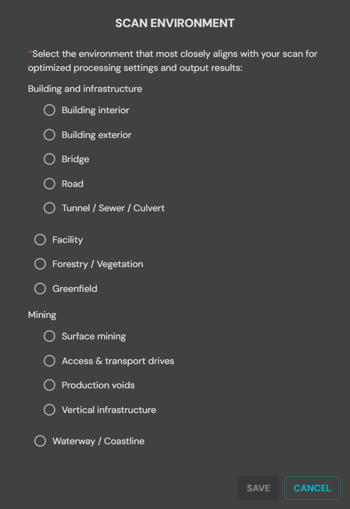
4. When prompted, select the Scan Environment. Choose the environment that most closely matches your scan.
5. Wait for Aura to automatically detect and list the available files.

6. Repeat steps 3–4 to add all scans you want to merge.

Step 2: Choose an Alignment Base for Preview
For all merge types (Non-georeferenced scans, RTK, RTK + Non-RTK):
-
In the Alignment Preview File column, select any scan to use as the alignment base.
-
This file is used for preview purposes only and does not affect the final output. If available, Aura will default to a subsampled version.

Step 3: Configure Apply Overrides (Optional)
For all merge types (Non-georeferenced scans, RTK, RTK + Non-RTK):
-
Configure scan-specific settings, such as defining exclusion zones or trim data.
For RTK Merges and RTK + Non-RTK Merges:
1. Verify that RTK scans have their georeferencing method and GNSS receiver type correctly assigned. Aura will apply these automatically.

Step 4: Select a Reference Scan (Optional)
For Non-georeferenced scans (Non-RTK) Merges:
-
You can choose one scan to act as the reference scan. This scan will be locked in place, and all other scans will align to it.
If a reference scan is not selected, Aura will perform pairwise alignment between all point clouds. This increases computational complexity and may extend processing time.
For RTK Merges and RTK + Non-RTK Merges:
-
Reference scans are supported for merges involving RTK scans. Proceed to Step 5.
Step 5: Configure Processing Settings
For all merge types (Non-georeferenced scans, RTK, RTK + Non-RTK):
1. Define the location and name for the merged output.

2. Adjust any desired settings using the general merge or output options, as outlined in the Aura User Manual, Section 3.3 – Process Tab.

For RTK Merges and RTK + Non-RTK Merges:
1. Set processing settings:
-
-
-
Set the Base Coordinate Reference System to match the original horizontal CRS used during scan acquisition (e.g. EPSG:4326 – WGS 84).
-
To manually enter a full PROJ string, enable Custom base CRS.
-
Enable Reprojection (optional) if you want to transform the output into a different coordinate system. Define the Target Coordinate Reference System by selecting the desired horizontal and vertical CRS values.
-
-

Step 6: Proceed to Alignment
For Non-georeferenced scans (Non-RTK) Merges:
-
Proceed to Step 7: Review and Manually Align.
For RTK Merges and RTK + Non-RTK Merges:
-
Proceed to Step 7: Review and Manually Align.
For RTK Merges
-
If setup is correct, Aura will notify you that no manual alignment is necessary and you can skip manual alignment and start processing.
![]()
Step 7. Review and Manually Align (If Required)
Aura’s SLAM algorithm relies on overlapping features between scans to perform a merge. When georeferencing is unavailable or inconsistent across datasets, manual alignment is required to provide an initial position estimate. This reduces drift and improves the overall quality of the merged point cloud.
Manual alignment is required in the following scenarios:
-
Merging scans without georeferencing (e.g. Non-RTK)
-
Merging georeferenced and non-georeferenced scans together (e.g. RTK + Non-RTK)
Aura will attempt to merge scans even if they are misaligned, either horizontally or vertically. This can result in a skewed or inaccurate final output. Always verify alignment before continuing.
1. Click Load Scans to load all selected point clouds into the viewer.
-
-
-
Each scan is automatically assigned a unique colour to assist with differentiation and alignment.
-
To add or remove datasets from the current merge job you can click Edit Point Clouds Selected
-
-

2. Align scans manually using the Translate and Rotate tools. Start with Top View to position and rotate scans horizontally, then switch to Front View to adjust them vertically.

|
Align all scans horizontally using the Translate and Rotate tools.
|
Align all scans vertically using the Translate tool.
|
|---|


Click Reload Scans in the Configure New Scan Job panel to reset a scan’s position.
Step 8. Start Processing
You are now ready to begin processing.
1. Click Start to begin the merge.

Start button not visible?
If the Start button is hidden, click the Configure New Scan Job panel at the bottom of the window to reopen the Processing Scan panel and access the Start button.
Step 9. View and Combine Your Datasets
Once processing is complete, Aura outputs a .laz file for each scan. These files are stored in the directory specified in Step 1. They are aligned using the SLAM algorithm and georeferenced, if applicable.
You can now combine these individual .laz files within Aura to produce a unified point cloud. The outputs are grouped and displayed in the Merge Complete panel.
1. Click View under the Merge Complete panel to inspect each output dataset individually.

2. Minimize the Merge Complete panel to access the Visualize tab.

3. (Optional) Adjust the colour of each point cloud in the Visualize tab to compare and validate the alignment and quality of the merged scans.
4. Select multiple datasets by holding Shift and clicking on each desired dataset.

5. Open the Project menu and select Save As to save the combined dataset as a single point cloud.

To combine datasets at a later time:
1. Navigate to the Visualize tab.
2. Click Add to load previously processed .laz files.

3. Repeat steps 3–5 above to compare, validate, and save the combined dataset.
View the Combined Accuracy Report (RTK Only)
After processing an RTK merge, each scan generates a .csv accuracy report. These reports are stored in the output folder of each individual scan. To load multiple reports into Aura and generate a combined accuracy report, follow the steps below.
1. Open the Merge Complete menu in Aura.
-
-
-
This appears automatically after processing, or can be accessed by clicking the Merge Complete bar.
-

-
2. Click View on the right-hand side of any metrics.csv accuracy report to open it.

3. Click + CSV in the report window to open Windows Explorer, then navigate to and select any additional .csv accuracy reports to include.

4. Select the Combined Report tab to view the merged accuracy data.

Colorize and/or Extract 360 images (Optional)
After merging, you can colorize your point clouds using camera imagery by following the instructions in the Aura User Manual, Section 4.7 – Colorization Workflow.
Merge Compatibility Summary
|
Scan Type |
Merge Supported |
Georeferencing Retained After Merge |
|---|---|---|
|
Vehicle and Backpack RTK |
✅ |
✅ |
|
Drone RTK |
✅ |
❌ |
|
GCP |
✅ |
❌ |
Troubleshooting
|
Issue |
Cause |
Solution |
|---|---|---|
|
Merged RTK scans aren’t georeferenced |
Apply Overrides wasn’t used |
Select a georeferencing mode using Apply Overrides before merging scans. |
|
RTK scans still require manual alignment |
Georeferenced scan not set as the preview file |
Select the RTK scan as the Alignment Preview File (satellite icon). |
|
Aura isn't detecting my scan files |
Wrong folder selected or scans not processed |
Select the offload folder with |