Reprojection in Emesent Aura is an automated workflow that allows for RTK scans to be processed with the correct coordinates by simply selecting the target coordinate reference system (horizontal) and converting from ellipsoidal height to orthometric height using a GEOID model (vertical). This can be done via Processing Settings when processing raw data or Export reprojection from the Project menu if exporting a georeferenced point cloud.
The following video shows how to use Emesent Aura to easily reproject your raw RTK scan during processing and reproject your older scan during export.
Configure a Scan for Reprojection
Processing raw RTK scan data in Aura allows you to generate an accurately georeferenced point cloud while applying the correct coordinate reference systems for your project. During setup, you can specify the base CRS used during capture, apply reprojection to a new horizontal and vertical CRS, and incorporate custom geoid models where required. The steps below guide you through configuring and processing an RTK dataset from start to finish.
Step 1: Create a New Processing Job
- Open Emesent Aura and go to the Process tab.
- Select + Process Scan to create a new scan job.
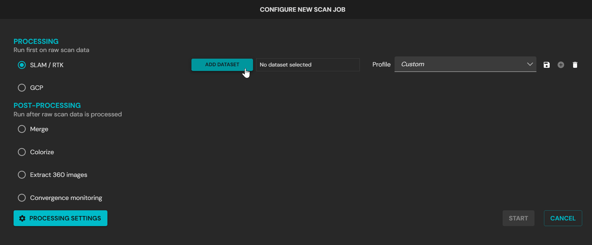
- In the Configure New Scan Job panel, select the SLAM/RTK workflow.
- Click Add Dataset, browse to the folder containing the scan data.
-
When Aura detects RTK data in the dataset, toggle on Use RTK data.

Step 2: Configure Output Location
-
In the Location field, enter a name for the output folder.
-
Aura creates a subfolder with this name, which stores all processed outputs.
Step 3: Set Georeferencing Options
-
Click Processing Settings.
-
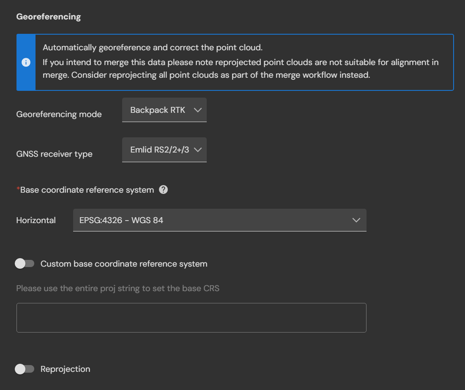
Under Georeferencing in the General tab, select the RTK device and GNSS receiver used during data capture.
For optimal results, ensure that the Georeferencing mode and GNSS receiver type match the hardware used during data collection. While the resulting point cloud remains usable, the accuracy may be affected.
Step 4: Define the Base CRS
-
Under Base coordinate reference system, select the CRS in which the data was originally collected.

-
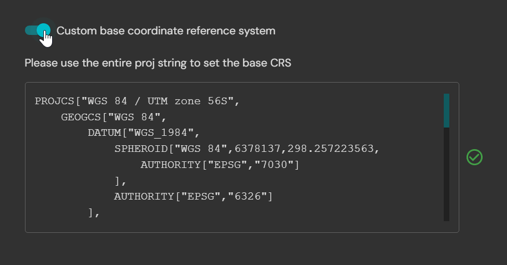
Alternatively, toggle on Custom base coordinate reference system to manually enter a PROJ string describing the geodetic CRS.
Step 5: Enable and Configure Reprojection
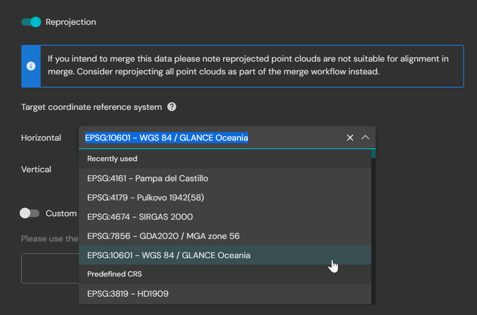
- Toggle on Reprojection to enable CRS transformation for the processed output.

- From the Horizontal dropdown, select a predefined CRS for horizontal reprojection.
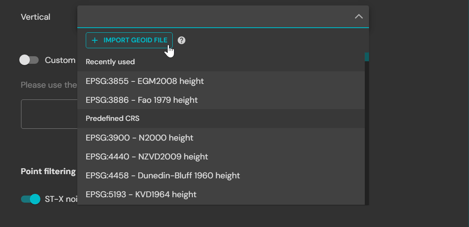
- Once a Horizontal CRS is selected, the Vertical dropdown becomes active. From the Vertical dropdown, select a predefined vertical CRS, or click Import geoid file to upload a your own geoid file (GTX or TIF).
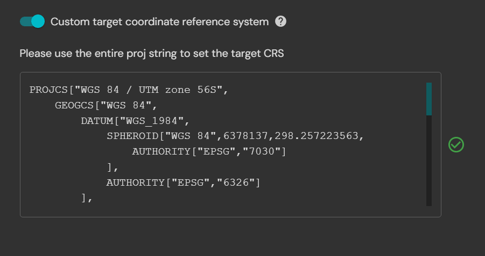
- Alternatively, toggle on Custom target coordinate reference system to manually enter a PROJ string describing the target CRS.
Step 6: Save Settings and Prepare for Processing
-
Click Save to apply all settings. Aura will return to the Configure New Scan Job panel, where the processing job is ready to be Started.
Reprojecting a Processed Point Cloud
Reprojecting an existing processed point cloud allows you to transform the dataset into a new horizontal and vertical coordinate reference system (CRS) without reprocessing the raw scan data. This is useful for correcting projection metadata, aligning data from multiple sources, or converting ellipsoidal heights to orthometric heights using standard or your own geoid models. Follow the steps below to reproject a processed point cloud in Aura.
Step 1: Open Aura Export Reprojection
-
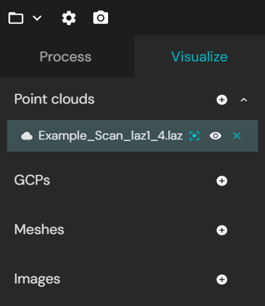
Open Emesent Aura and go to the Visualize tab.
-
Load the processed point cloud or trajectory you want to reproject.
-
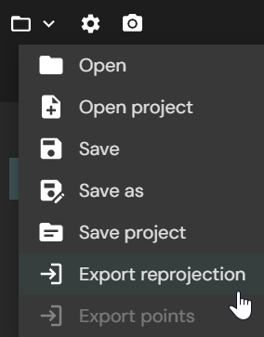
Click the Project menu icon, then select Export reprojection.
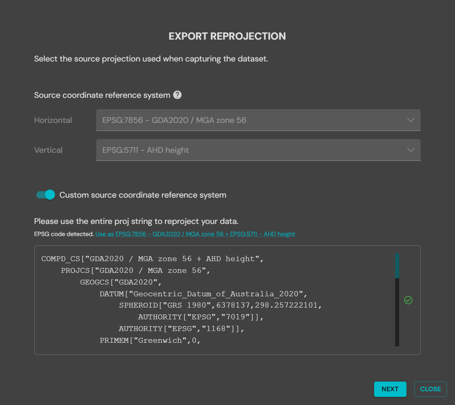
Step 2: Review or Edit the Source CRS
Aura automatically detects the CRS, but editing may be necessary if the CRS is incorrect or the dataset includes multiple sources. To edit the source CRS.
-
In the Export Reprojection dialog box, click Edit Source CRS.

-
Refer to the Context Panel on the right to view the projection information of the current point cloud.
.png?width=368&height=537&name=image-20251202-060345%20(1).png)
-
Alternatively, toggle on Custom target coordinate reference system to manually enter a PROJ string describing the desired CRS.
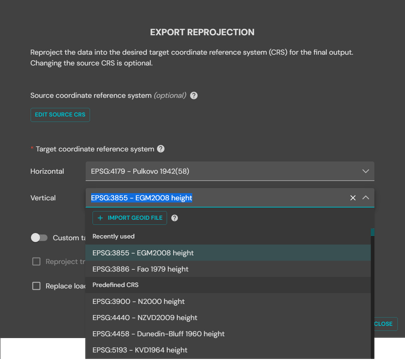
Step 3: Select the Target CRS
-
From the Horizontal dropdown, select a predefined coordinate reference system (CRS) from the list.
-
Once the Horizontal CRS is selected, the Vertical CRS dropdown becomes active.
-
From the Vertical dropdown, select a predefined vertical CRS, or click Import geoid file to upload a your own geoid file (GTX or TIF).
-
Alternatively, toggle on Custom target coordinate reference system to manually enter a PROJ string describing the target CRS.

Step 4: Apply Optional Reprojection Settings
-
Enable Reproject trajectory to apply reprojection to the associated trajectory data.
-
Enable Replace loaded point cloud with exported reprojection to automatically load the newly reprojected point cloud into the Visualize tab.
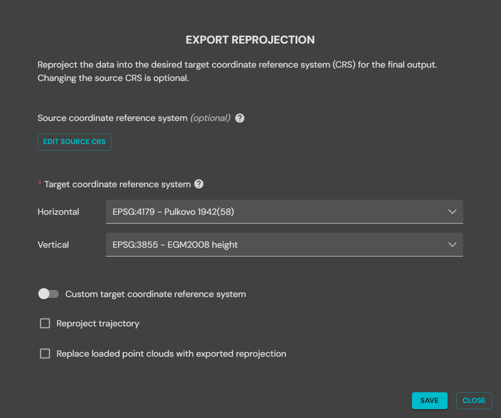
Step 5: Export the Reprojected Point Cloud
-
Click Save to export the reprojected point cloud.
-
The results are good saved in the same output folder as the original point cloud.
Frequently Asked Questions
Why are there two trajectories in the Output folder when reprojecting as part of the processing workflow?
- Two trajectories are provided in the output for different purposes:
- The SLAM projection trajectory is necessary for accurate colorization. It will be automatically selected when colorizing a reprojected dataset. The colorized output will maintain the target CRS that was applied to the selected SLAM output folder for colorization.
- The user's Target projection trajectory (with “_projected” suffix) is needed for the following purposes:
- Viewing the trajectory alongside the reprojected point cloud in the same CRS.
- Extracting 360 images, which are also reprojected to a target CRS.
How can I colorize a reprojected point cloud?
Ensure the RTK dataset is processed with reprojection before colorizing it as usual. The colorization process will use the default SLAM projection trajectory to ensure accurate results. The point cloud output after colorization will be in the user's Target projection.
How do I extract 360 images from a reprojected point cloud?
To use 360 Image Extract, the trajectory in the Output folder should have the default naming convention (e.g, scan_folder_name_traj.xyz).
To use a reprojected trajectory, rename the reprojected TRAJ and PRJ files in the Output folder to the default naming convention. For example:
| Reprojected Filename | Rename To |
| scan_folder_name_traj_projected.xyz | scan_folder_name_traj.xyz |
| scan_folder_name_traj_projected.prj | scan_folder_name_traj.prj |
Also, rename the original TRAJ and PRJ files. For example:
| Original Scan Filename | Rename To |
| scan_folder_name_traj.xyz | scan_folder_name_traj_nonreprojected.xyz |
| scan_folder_name_traj.prj | scan_folder_name_traj_nonreprojected.prj |
Once the filenames have been renamed, run 360 Image Extract as normal.
My point cloud was reprojected into a target horizontal CRS using a previous version of Emesent Aura (1.7 or earlier). Is it possible to only reproject it into a target vertical CRS to apply a GEOID to my data?
- Yes, load the point cloud or trajectory in Emesent Aura then perform the following:
- Select Export reprojection from the Projects menu.
- Keep the source horizontal CRS as is and leave the vertical CRS blank.
- Use the source horizontal CRS as the target CRS and specify a vertical CRS to apply the GEOID.