This video complements the setup guide to show you how to configure and set up supported Leica receivers (GS18/GS18T/GS18I) for use with Emesent's Backpack or Vehicle RTK units, view the RTK status in Commander, and process your scan in Aura.
Overview
This document shows you how to configure and connect supported Leica GS18 receivers with Emesent's Backpack or Vehicle RTK units and then monitor and process the RTK data.
Backpack and Vehicle RTK automates high-accuracy georeferencing and drift correction for scans, allowing for rapid and precise scans without the need for ground control points.
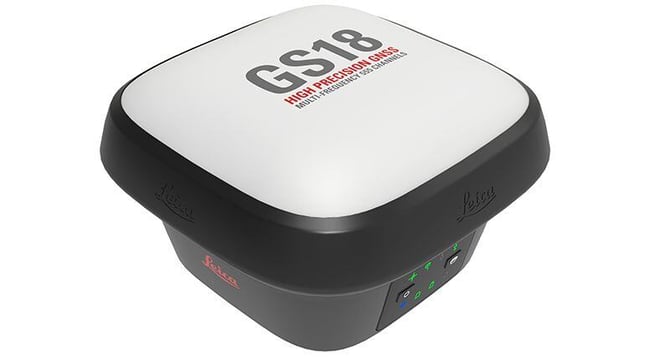
The term "Leica receiver", used throughout this guide, refers specifically to the Leica devices supported by Emesent’s Vehicle RTK and Backpack RTK solutions. Currently, these include the Leica GS18, GS18T, and GS18I receivers.
Always make sure to drive safely when operating a vehicle. Do not be distracted or use the phone/tablet to change settings while driving. Only check the GPS status when it is safe to do so.
Scope
Follow the instructions in this document once you have setup your Leica device according to Leica documentation. This document does not cover how to perform an initial setup on a Leica GS18 or how to connect to a base station or network corrections service.
To perform these actions, please refer to Leica’s official documentation for the GS18/GS18T: How to use the Leica GS18 T GNSS RTK rover (Leica YouTube channel) and Leica GS18 T GNSS RTK Rover (Leica website).
The Georeferencing articles and videos in Knowledge Base expand on the information and instructions presented in this document, including:
Requirements
Hardware
The following hardware is required to set up the Leica receiver:
| Hardware | Details |
| Computer or Leica CS |
|
|
Emesent RTK unit |
|
| Emesent accessories |
|
|
Cable |
|
Emesent can supply vehicle or backpack RTK kits, please see the articles Backpack RTK Hardware or Vehicle RTK Hardware for details.
Software
|
Software |
Version / Download Link |
|---|---|
|
Emesent Aura |
version 1.9 or later |
|
Emesent Cortex |
version 3.3 or later |
|
Emesent Commander (optional) |
version 1.5 or later |
|
Leica Captivate simulator (optional) |
Leica Captivate |
Raw scan data from a Hovermap that uses Emesent Cortex version 3.3 (or later) can only be processed in Emesent Aura 1.7 (or later).
Connect to the Leica receiver with Leica Captivate Simulator
If you don’t have a Leica CS20 field controller or similar to be able to configure the receiver, or prefer to use a computer, then follow these steps:
-
Download and install Leica Captivate simulator from Leica website.
-
Connect to the Leica GS18 open WiFi connection.
-
Launch Leica Captivate simulator and it should automatically connect to the receiver.
Settings Summary
|
Setting |
Location |
Value |
|---|---|---|
|
NMEA |
Settings → Connections → All other connections → NMEA 1 |
Stream NEMA: On Messages: GSV: Rate 1.0 |
|
Tilt |
Settings → GS Sensor → Tilt Compensation |
Use tilt compensation: Off |
|
Antenna |
Settings → GS Sensor → Antenna Heights |
Rover antenna: ADVNULLANTANNA Height: 0.00m |
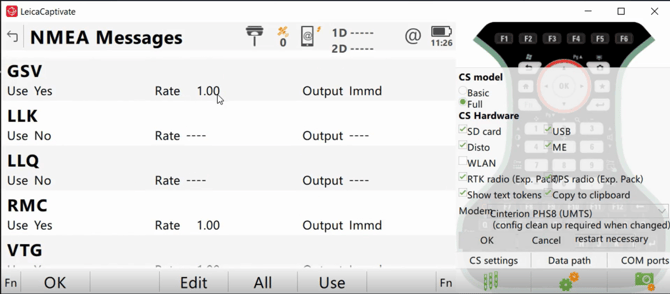
Configure the NMEA Settings
Once connected, configure the NMEA settings to make sure the Leica receiver can communicate properly with the Hovermap.
-
Go to (1) Settings → (1) Connections → (5) All other connections → NMEA 1.
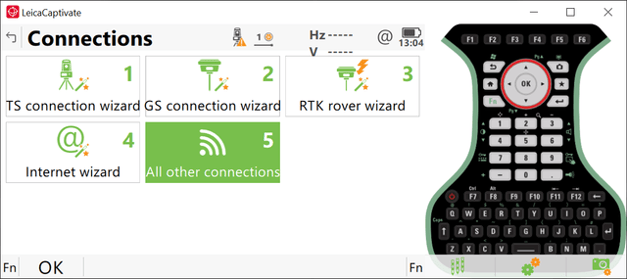
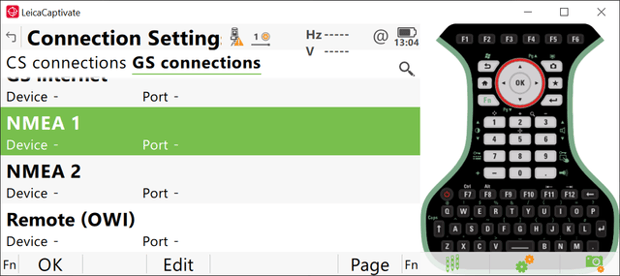
2. Open the NMEA settings panel and turn on “Stream NEMA”.
3. Set the Connect using to: GS Port 1.
4. Set the NMEA Version to: 4.0 (extended).
5. Use a defined talker ID can be left unchecked (turned off).

Output Rate 0.20, Immediate
- GGA, GSA, GST, ZDA
Output Rate 1.00, Immediate
- GSV

Configure the Tilt and Antenna Height
-
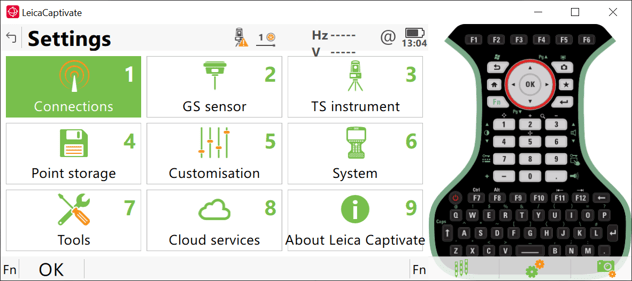
Navigate to: Settings → GS Sensor.

2. Make sure that Tilt Compensation is left unchecked (turned off).

3. Make sure that Rover antenna is set to ADVNULLANTENNA and Antenna height is set to 0.00m.
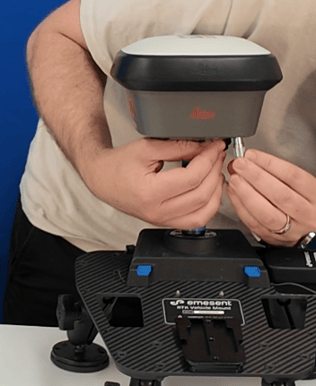
Setup the RTK Mount and Receiver
Refer to these Knowledge Base articles for instructions for how to setup the Backpack or Vehicle RTK Mount and attach the GNSS receiver.
Setup the Backpack RTK Mount and Receiver
Setup the Vehicle RTK Mount and Receiver
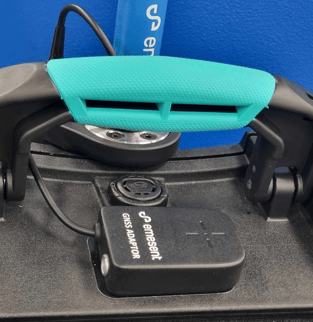
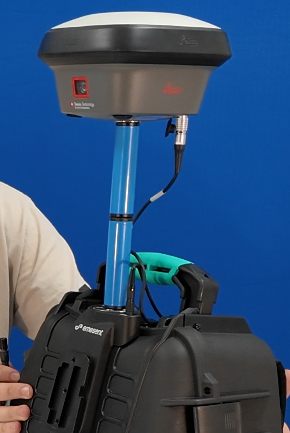
Connecting to Hovermap
-
The Hovermap and GNSS receiver should be attached to the Vehicle RTK or Backpack RTK mount.


When using the Leica GS18 with the Backpack unit, please use both 100mm spacers (200mm total offset) to ensure the correct offset in Aura.
Monitoring RTK Status
The Emesent Commander application provides clear visibility of the RTK status before and during the mission. This enables you to monitor RTK quality without leaving Commander to reference Leica’s field controller.
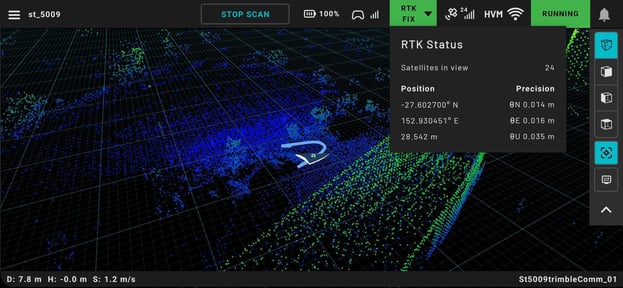
If the settings are configured correctly and the GNSS receiver is properly connected, Emesent Commander will display the Position and Accuracy without errors. Any communication errors are displayed in the app as a warning notification.
Refer to this article for more information on how you can Monitor RTK Status and the expected RTK accuracy.
Once RTK scan data has been captured, you can process it using Emesent Aura to create a point cloud, colorize the scan, clean or reproject the point cloud, and view an RTK accuracy report.
See this article on how to Process RTK Scans in Aura.
Troubleshooting
You can also refer to the more extensive article: Troubleshooting RTK.
|
Issue |
Potential cause(s) |
Potential solutions |
|---|---|---|
|
RTK fix is not maintained while driving |
The RTK receiver is set to a profile that's assuming it’s being handheld |
If using the “GS18 pillar” or “GS18 pole” antenna setting, try changing the setting to ADVNULLANTENNA |
|
Hovermap is not showing RTK status |
Hovermap has not detected that it’s connected to a Leica receiver, as the Leica does not output data until it has GPS lock |
Restart Hovermap while the Leica receiver has GPS lock |