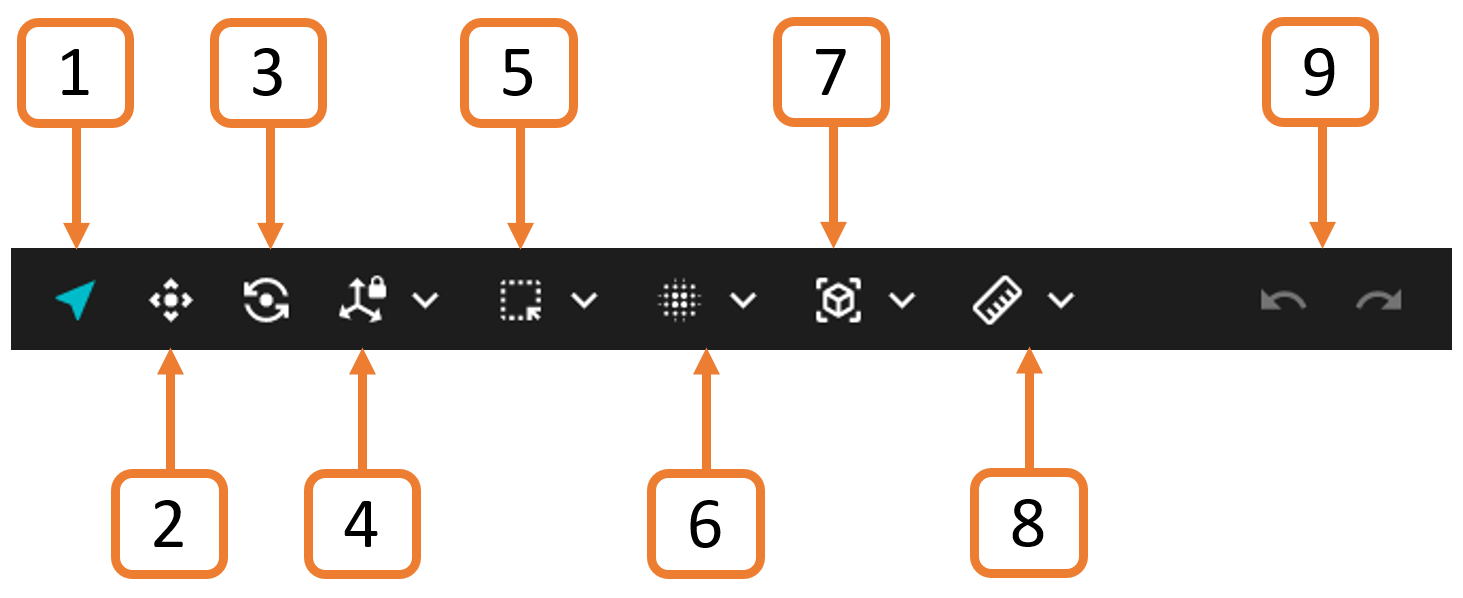
The Main Toolbar contains several tools for navigating and interacting with your point cloud. It can be docked to the top or bottom of the viewport (or it can be a floating panel). These tools are grouped based on usage. The icon displayed in the toolbar indicates the tool that has been selected for that group.
The Undo/Redo function is only currently available for certain tools. If you need to make any major changes, we recommend that you first save your file using the Save or Save as options in the Project Menu.
1. Navigate
Button | Action |
|---|---|
| Navigate: Move around the point cloud, as opposed to shifting it. Left-click your mouse to choose the center of rotation. This point will be shown by a white ball. Double-click your mouse to lock the rotation on an exact point. The ball will turn orange. Double-click again to unlock. |

2. Translate
Button | Action |
|---|---|
| Translate: Move your point cloud along different axes. Click on the arrow to choose which axis. Select the square to translate along multiple axes. |
3. Rotate
Button | Action |
|---|---|
| Rotate: Click on the desired axis to rotate your point cloud around that axis. |

4. Axis Lock
Rotates your point cloud around the selected axis.
Right-click and drag to translate along the locked axis.
Double-click your mouse to lock the axis on an exact point. The ball will turn orange. You can change the axis while the ball is orange, and the new axis will rotate around the same point.
Double-click again to release.
Button | Action |
|---|---|
| X Axis Lock: Locks the point cloud rotation to the X axis, which is represented by a red line. |
| Y Axis Lock: Locks the point cloud rotation to the Y axis, which is represented by a green line. |
| Z Axis Lock: Locks the point cloud rotation to the Z axis, which is represented by a blue line. |


5. Selection tools
Button | Action |
|---|---|
| Select Points: Select and deselect points within the square selection box. This function is good for point cloud cleaning, as well as for selecting targets in the GCP workflow. Right-click your mouse, or press the Esc key to remove the selection. Not available when working with meshes. |
| Select Area: Select a 2D region (often represented as a polygon) in the point cloud to encompass multiple points within that defined area. Right-click your mouse, or press the Esc key, to remove the selection. Not available when working with meshes. |
| Select Volume: Define a 3D region or volume in the point cloud and select all points falling within that defined volume. When this tool is selected, the color of the point cloud changes to grayscale and a 3D bounding box becomes available. Drag the arrows in the bounding box to select all points within that volume. This selection tool is useful for tasks such as object extraction or isolating specific structures in the point cloud. |
| Delete selection: Deletes any points you have selected.
|


6. Cleaning Filters
Button | Action |
|---|---|
| Decimate by distance filter: Subsamples the point cloud by specifying the minimum distance allowed between points (measured in meters). You can either select or delete the points. This tool is useful when you want to thin out your point cloud to make it easier to navigate. The smaller the point cloud, the more responsive it will be. You may have to experiment with the settings to achieve the desired result. There are three input parameters:
Not available when working with meshes. |
| Classic SOR: Removes stray points in a dense point cloud. This filter works out the average distance of each point from its neighboring points. It then rejects the points that are farther than the average distance. All points outside of this distance are considered outliers and can be removed from the dataset. You may have to experiment with the settings to achieve the desired result. Denoise SOR: Removes noise in a dense point cloud. This filter analyzes the point cloud to identify points that are likely to be noise or outliers. Points that significantly deviate from the expected parameters are considered outliers and are removed from the dataset. Adaptive SOR: Adaptively removes outliers while considering variations in point density and noise levels across different regions of the point cloud dataset. This filter can be particularly useful in cases where the point cloud has varying levels of detail. The available parameters vary depending on the SOR type.
|
| Moving object filter: Removes points over 5 second intervals and keeps fixed points in the environment. Refer to the Moving Object Filtering section for more information.
|
7. 3D view menu
Button | Action |
|---|---|
| Focus: Fits the point cloud to your screen. |
| Front: Shows the front view of the point cloud. |
| Top: Shows the top view of the point cloud. |
| Right: Shows the view from the right of the point cloud. |
| Left: Shows the view from the left of the point cloud. |
| Back: Shows the back view of the point cloud. |
| Bottom: Shows the view from the bottom of the point cloud. |


8. Measurement tools
Button | Action |
|---|---|
| Point measurement: Click anywhere in your point cloud to show coordinates for a single point. Click again to clear your selection. |
| Line measurement: Select any two points to show the distance between them and the coordinates for each point. Click a third point to reset the tool and take another measurement. |
| Angle measurement: Select three points to measure the angle between them. Shows coordinates for each point. |


9. Undo / Redo
Button | Action |
|---|---|
| The undo/redo actions are currently limited to the following actions:
|