The Moving Object filter identifies and removes dynamic elements from a point cloud by scoring points based on how consistently the scanner detects them over time. If a point is seen in one scan interval but not the next, it is classified as a moving object.
The Moving Object Filter does not strictly detect motion. Static objects with low detection consistency can also be affected, so care should be taken when applying aggressive settings in complex environments.
The filter can be applied to the entire point cloud or to a selected subset, and can be run as a cleaning filter in the Viewport or enabled in Processing Settings.
Process
Step 1: Load a point cloud.
In the top-left menu, click the Project Menu icon then select Open.
Drag and drop a file directly into the Viewport.
Go to the Visualize tab then click Add next to the Point Clouds section.
Step 2: Select a subset of points to filter (recommended).
Use the Point Select tool to select the area of the point cloud to apply the filter to.
Applying the filter to a subset rather than the whole cloud is faster, more accurate, and reduces the risk of removing points that should be retained.
If no points are selected, the filter is applied to the entire point cloud.
Step 3: Open the moving object filter.
From the Main Toolbar, click the Cleaning Filters icon then select Moving object filter.

Step 4: Configure the filter parameters.
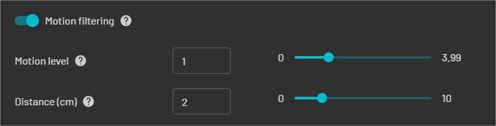
Motion level: Detects movement over 5-second intervals. The higher the value, the fewer moving points are selected.
Distance (cm): The maximum distance for recovering fixed points. The higher the value, the more points are retained. A value of 1 to 2 cm is recommended for most scans.
Point outlying: Choose whether outlying points will be deleted or selected. If Select is chosen, selected points display in sepia/gray.
Invert: Inverts the selection, retaining moving points and removing static points instead.
Setting Point outlying to Select is recommended to review the results before permanently removing points.

Step 5: Review the results in the Viewport.
If the results are not satisfactory, adjust the filter parameters or point selection and run the filter again.
.png)
If points are selected in the Viewport, the filter will only apply to those selected points, not the whole cloud. Press ESC to clear the selection before running the filter again.
Step 6: Press DELETE to remove the selected points.
This step is only required if Point outlying was set to Select. If Delete was chosen, points are removed automatically.
Apply from Processing Settings
Step 1: Open Processing Settings.
Go to the General tab in Processing Settings.
Step 2: Enable motion filtering.
Enable Motion filtering. The filter defaults to settings based on the profile and detected hardware in the raw scan directory.
The filter is disabled by default to avoid accidentally removing important features, including GCP disks that are not scanned well. An aggressive setting may result in holes on object surfaces in the processed point cloud.