
The Context Panel enables you to make further modifications to your processed point cloud or GCP data. The available settings vary depending on the selected file in the Visualize tab. The Context panel can be docked to the left or right of the screen or made as a floating panel. Refer to the docking instructions found in the Visualize Tab section for more information.
There is no associated Context panel for meshes.
Point Clouds
There are two panels available when you select a point cloud. These panels can either be docked together or displayed separately.
Point Cloud Visualization
These settings help customize the point cloud’s appearance to suit specific analysis requirements or highlight crucial details for better understanding and interpretation of the dataset.
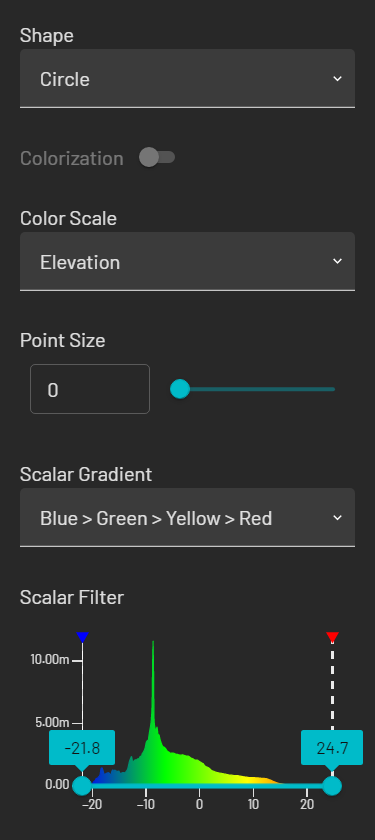
Context Panel - Point Clouds
Field | Data |
|---|---|
Shape |
|
Colorization | If toggled on, no Color Scale or Scalar Gradient is available, as colorization overrides these options. If you can’t toggle on colorization, this means that you have a file that hasn’t been colorized. |
Color Scale | The color scale specifies filtering settings for the following scalar fields:
|
Emesent Aura can detect the contents of the point cloud file and apply the appropriate color scale filter. Only the appropriate filters will appear in the dropdown list. For example, the Ring option will only be available for Emesent scans, as it detects information from Hovermap. If you have imported a third-party scan, the Ring option will not be available. | |
Point Scale | Controls the size of each point. If the point size is set to 0, the points will appear as pixels (instead of the shape chosen in the Shape field). |
Scalar Gradient | This option gives you a range of color ramps to choose from. It is available on all attributes except when Classification, Position, or Solid color scale is selected. |
Scalar Filter | The option is available when the Intensity, Time, Elevation, Return, or Range color scale is selected. A histogram chart allows you to visualize the intensity, time, or range distribution of your data. You can move the stops at each end of the graph to control how the color is presented and specify histogram min. and max. values with an input value. |
Scalar Range | The Scalar Range is the slider that sits below the graph. You can adjust the upper and lower stops to show a specific range of data. For example, if you only want to see points with an intensity between 100 and 200, you can adjust the stops to show only that range of data. |
Point cloud properties
If the selected point cloud is georeferenced, this panel displays the number of points and other important information such as transformations, scaling, and offsets applied to ensure accurate spatial representation.
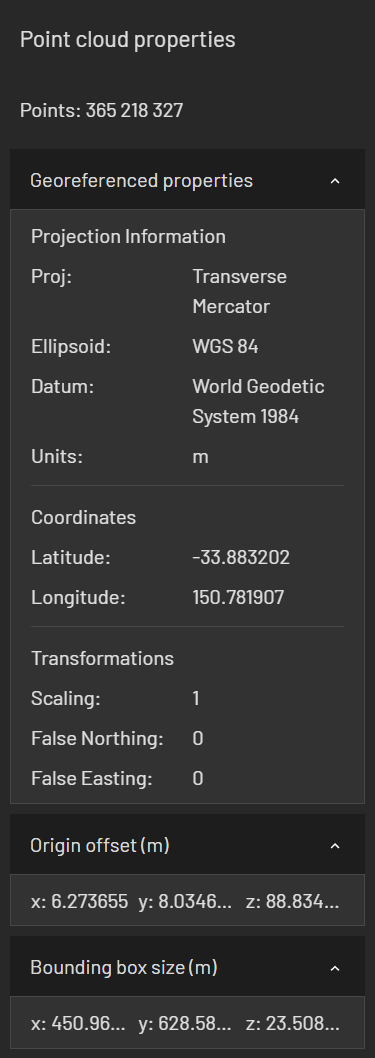
Context Panel - Point Clouds
Information | Description |
|---|---|
Points | The number of points in the point cloud dataset (total number of points if multiple point clouds are selected). |
Projection Information | Provides details about how the point cloud data is represented spatially. |
Coordinates | The geographic coordinates indicating its global position. |
Transformations | Shows the scaling factor and the offsets applied to coordinates. |
Origin offset | The translation or displacement applied to the point cloud data's origin. |
Bounding box | The dimensions of the bounding box around the point cloud data in each direction (X, Y, Z axis). |
Ground Control Points
The Context panel for GCPs contains tools to help you georeference your point cloud.
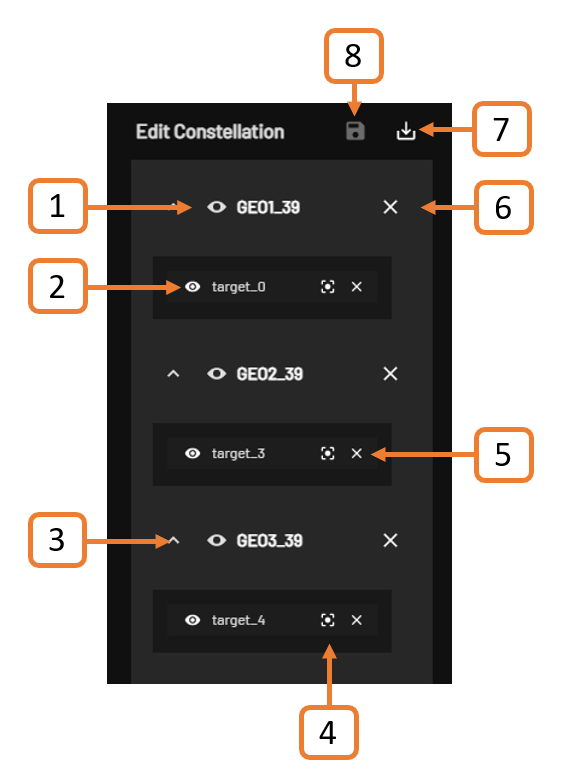
Edit Constellation
A constellation is a set of coordinates that represent the real-world locations of the targets that were used during scanning. Emesent Aura attempts to automatically match targets of the appropriate size and intensity to locations within this constellation. This list allows you to choose which potential target identified in the point cloud is associated with which landmark in your constellation.
A landmark can have multiple GCP targets associated with it to provide redundancy and improve accuracy.
Setting | Description |
|---|---|
| Toggles between showing or hiding the selected landmark from the Viewport. |
| Toggles between showing or hiding the selected target from the Viewport. |
| Toggles between showing just the landmark or the landmark and its associated targets. This is useful if you have a long list of coordinates. |
| Zooms in on the selected target on the Viewport. |
| Removes the selected target from the constellation and moves it to the Inactive Targets list. This can be useful in situations where the target was incorrectly identified during the initial georeferencing process. Refer to the GCP Workflow section for more information on matching targets to the correct landmark. |
| Removes the selected landmark and its associated target(s) from the constellation. It is important to exercise caution when using this function to ensure that you are removing the correct landmark and that it will not adversely affect the overall accuracy and alignment of the point cloud. When prompted, click Deactivate to confirm the removal. |
| Saves the changes you made to the constellation file. |
| This option is only available when running the GCP processing workflow. If you use the Quick Save option, the saved file will overwrite the constellation.yaml file that was originally produced during processing. This is important, as Emesent Aura will look for this file to run the next steps in the process.
|
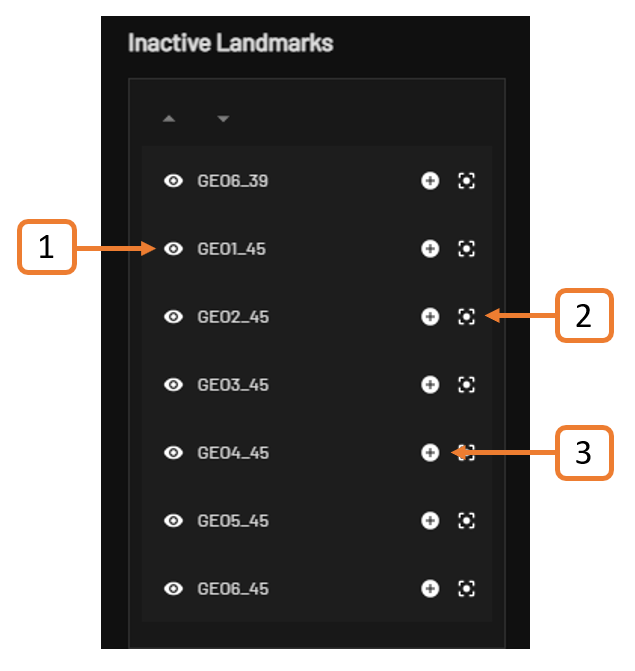
Inactive Landmarks
This list contains identified landmarks that have not yet been matched to any target in the constellation. When aligning point cloud data to a known coordinate system using GCPs, Aura will detect landmarks within the point cloud but they may not be suitable as GCP targets. You can choose to delete these landmarks before GCP data processing. If not, these will be listed as inactive landmarks in the Context panel so you can add them to the constellation if required.
Setting | Description |
|---|---|
| Toggles between showing or hiding the selected landmark from the Viewport. |
| Toggles between showing or hiding the selected inactive landmark from the Viewport. |
| Moves the selected inactive landmark to the Edit Constellation list. You can then assign a target to the newly added landmark by dragging the target to the field below it. |
Inactive Targets
This list contains identified targets that have not yet been matched to any landmark in the constellation. Any targets left in the Inactive targets list will be disregarded when reprocessing the point cloud.
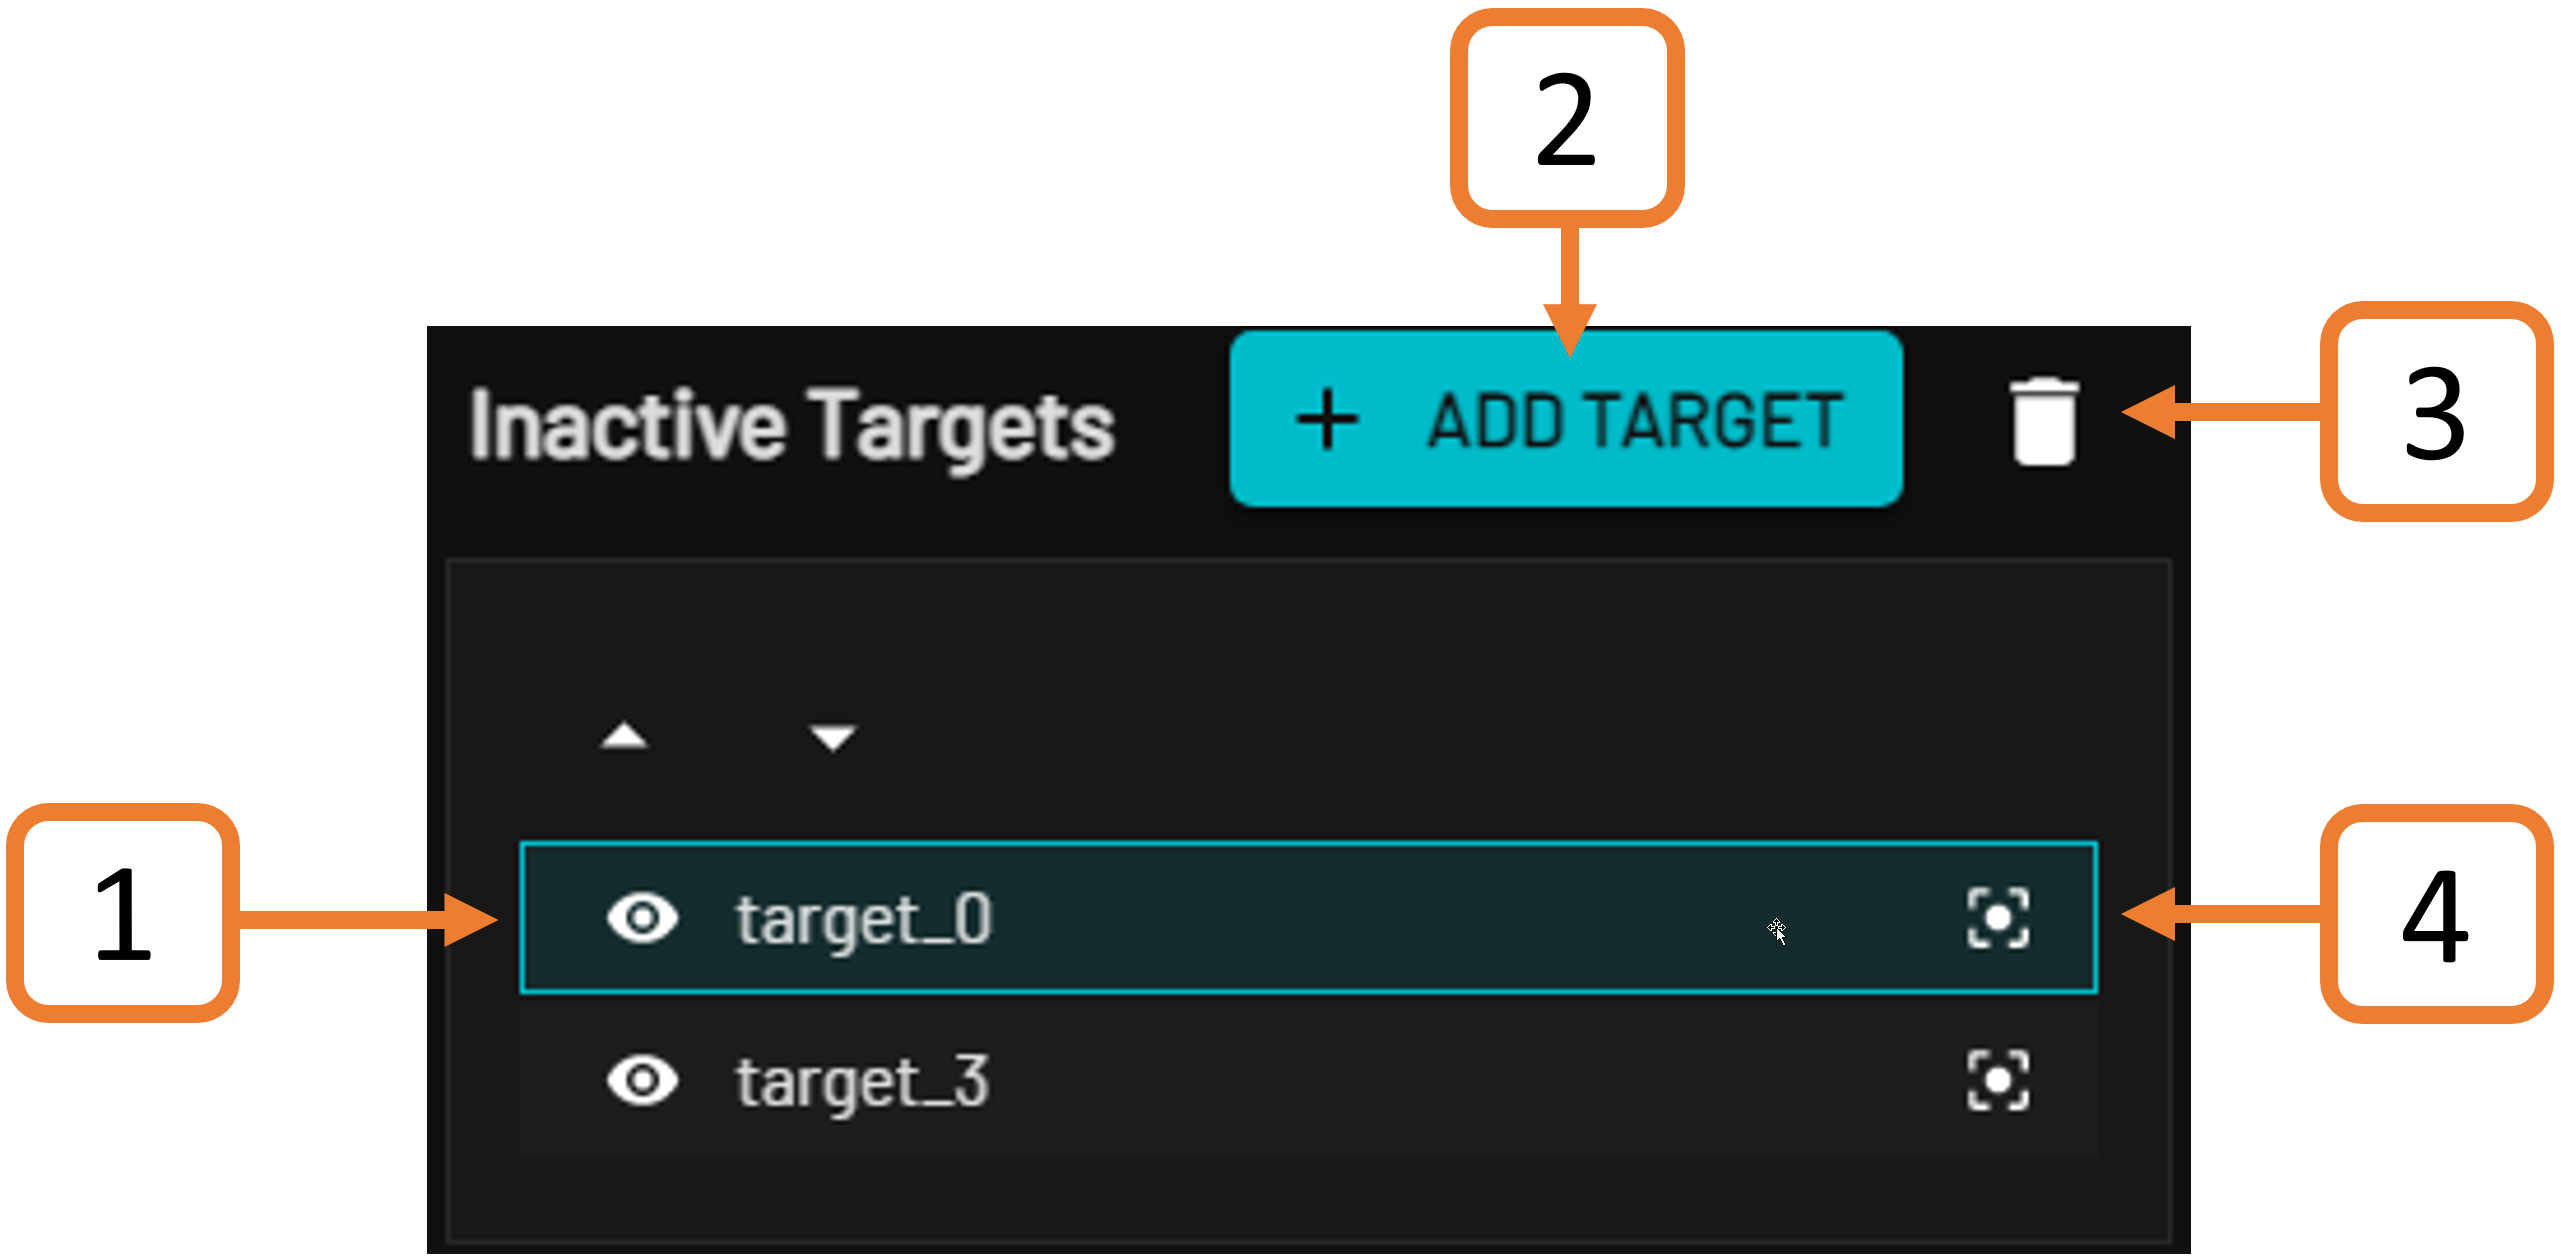
Setting | Description |
|---|---|
| Toggles between showing or hiding the selected inactive target from the Viewport. |
| Creates a new target. Select an area of points and click the Add Target button to create a new target. |
| Deletes the selected inactive target. It is important to exercise caution when deleting a target as you will not be able to recover it once deleted. When prompted, click Delete to confirm deletion. |