
These settings allow you to open and save files, open and save projects, set global preferences for viewing your point clouds, and capture screenshots. The following options are available.
Project Menu

Click the Project Menu icon on the top-left portion to access the following menu options.
Project Menu Settings
Menu | Description |
|---|---|
Open | Opens a file and displays it in the viewport. |
Open project | Opens a previously saved .aura project file. |
Save | Saves the changes made to the current file. |
Save as | Creates a copy of your current file with a different name, location, or file format. |
Save project | Saves your current work for future modifications. The .aura project file serves as a starting point that can be reopened and edited whenever needed, allowing you to continue working on the project from where you left off. |
Export reprojection | Reprojects a previously processed/reprojected point cloud into a new coordinate reference system and GEOID model. |
Preferences
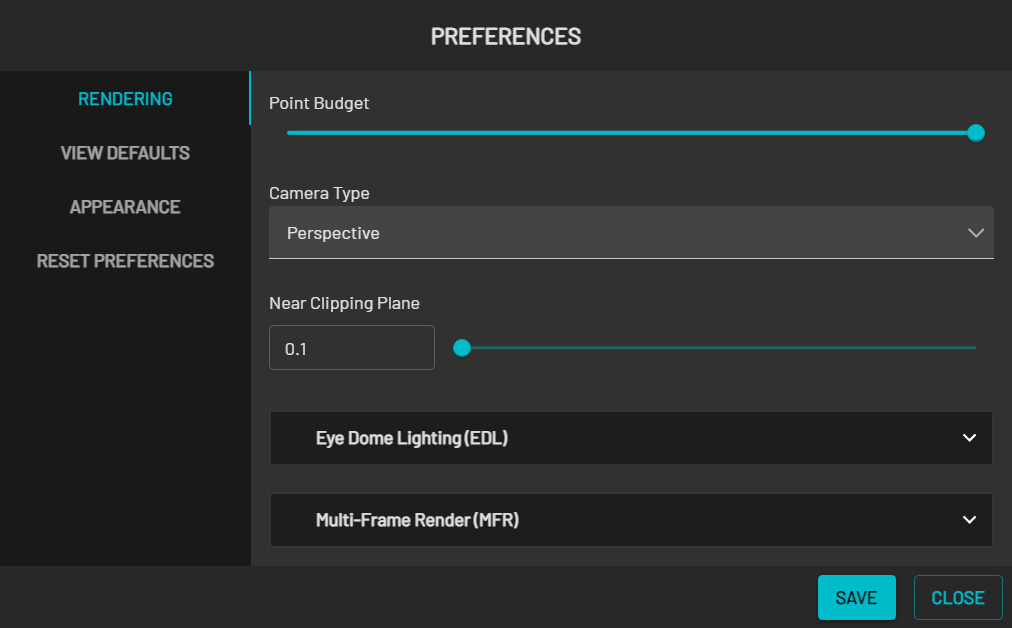
Click Preferences to see the global settings. Once you have configured the settings, click Save to apply the settings or Close to exit without saving. You can also click Reset Preferences to restore your preferences to their default settings.

Click Preferences to see the global settings. Once you have configured the settings, click Save to apply the settings or Close to exit without saving. You can also click Reset Preferences to restore your preferences to their default settings.
The following options are available.
Preferences Settings
Field | Data |
|---|---|
Rendering | |
Point Budget | The total number of points allowed in the Viewport. The upper limit can change, depending on the number of points available in your point cloud. With a large point cloud, you may not see every point on your screen unless you expand this setting to its upper limit. |
Camera Type |
|
Near Clipping Plane | Removes points from the Viewport that are closest to the camera. These points are not deleted, just not visible. This distance is configurable. This feature is useful if you want to look at a cross-section of your point cloud or look through a wall. |
Eye Dome Lighting (EDL) |
|
Multi-Frame Rendering (MFR) |
It will take a few seconds to create the screenshot with multi-frame rendering enabled.
|
| |
View Defaults | |
Zoom Speed |
|
Selection Outline Color | Allows you to choose the color of the selection box using either the color picker or RGBA/HEX color codes. |
Appearance | |
Background | Allows you to configure the background color of the viewport. The standard black background means that you can miss a lot of detail, especially when viewing colorized point clouds. You can now change the background color to make this detail more visible.
|
Reset Preferences | Reset all settings to the default. |
Capture Screenshot
Select Capture Screenshot to generate a screenshot of your current view. Your screenshot will be automatically saved in the Documents\Emesent\Aura\Screenshots folder.
If you have Multi-Frame Rendering enabled, a high-quality screenshot will be produced. All settings, such as GCP landmarks, will appear in the screenshot.
Click Open to open the folder containing your screenshot.