This article provides guidance on resolving synchronization errors between the video and Hovermap data during colorization, including identifying the correct video and adjusting sync thresholds.
Error Message
Processing Failed:
Synchronization error between video and Hovermap IMUs exceeds limit for acceptable colorization results.


Why does this occur?
This error occurs when Aura detects a high synchronization error between the Hovermap’s IMU data and the camera’s IMU.
Aura relies on time-aligned data from the IMU and camera to accurately project video frames onto the point cloud. If synchronization is inaccurate, the resulting colorization may appear distorted or misaligned. Successful synchronization depends on accurate timestamps and consistent sensor data throughout the scan.
Common Causes
Cause 1: Mismatched videos
The most common cause of poor synchronization is using footage that does not correspond to the Hovermap scan.
Resolution
-
Locate the video file that matches the scan being colorized.
-
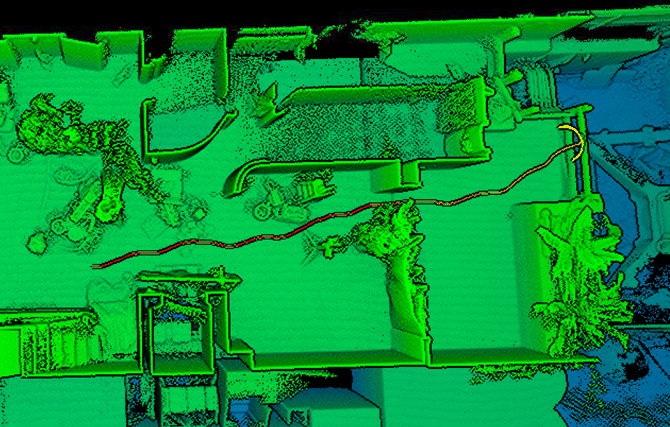
Use the trajectory file in Aura to visually confirm the correct video.
-
Alternatively, compare the timestamps in the video and scan file names to identify a match.
Resolution Steps
If the synchronization error is due to mismatched video files, identify the correct video using metadata or the trajectory file and reprocess using that video.
If the issue stems from vibration or low IMU event density, and a correct video is already in use, consider adjusting the sync error threshold if the score is only slightly below the recommended limit.
Option 1: Identify the correct video using trajectory context
When this error occurs, the most effective method to identify the correct video is by visually checking the trajectory file against your video content inside Aura.
Step 1: Open the trajectory file in Aura
-
Open a processed scan in Aura that includes the trajectory data.
-
Load the trajectory to view the flight or movement path of the Hovermap.
Step 2: Use visual context to check your video
-
Play the video alongside the scan in Aura.
-
Compare the start and end of the trajectory to what’s shown in the video.
-
Pay attention to landmarks, movement direction, and duration.
-
Check whether the video footage aligns with the scan path — both in terms of start/end points and general positioning over time.
This method helps confirm if the video matches the scan spatially and temporally.
Option 2: (Alternative) Use timestamps to match the video
If you cannot confidently identify the correct video through visual comparison, you can use file timestamps to narrow down the match.
File creation dates can be misleading. For example, a video downloaded later may show the wrong date. Always cross-check timestamps with known scan dates.
Step 1: Compare video file metadata
-
Locate the video(s) captured during the scan session.
-
Right-click the file and select Properties, or open it in a tool like VLC.
-
Note the creation time and duration of each video file.
Step 2: Compare with Hovermap scan timing
-
Open the scan folder and locate the
.bag.zstfiles — these contain UTC timestamps in their filenames. -
Compare the video creation time to the scan start and end times.
-
Keep in mind that:
-
Video timestamps are recorded in local time.
-
Timestamps depend on the camera’s internal clock being set correctly.
-
There may be time zone offsets or incorrect camera time settings.
-
Video file creation times are in local time, and they depend on the camera’s internal clock being set correctly. Watch for time zone offsets or incorrect camera time settings when comparing. Emesent recommends keeping your GoPro clock set to UTC.
Step 3: Assess the overlap
-
If the video’s time range does not overlap with the scan's timestamps, it is likely the wrong file.
-
Continue testing other videos from the same session until you find one with a matching timeframe.
Cause 2: High vibration
In some scenarios, high vibration in the capture environment, such as drone flights using long range radio, can result in poor synchronization between the Hovermap’s sensors and the camera.
Resolution
There are currently no specific mitigation steps for high-vibration environments. However, you may still be able to process the data by referring to the Can I still process this data? section below. Depending on the severity of the sync issue, the output may still be usable.
Cause 3: Insufficient IMU events
In some cases, the operating environment or the way the system is handled may result in too few IMU events being recorded. This can make it difficult for Aura to achieve good synchronization between the video and the scan data.
Resolution
To help ensure good synchronization between the Hovermap and camera data, we recommend following the steps outlined in our Working with Colorization guide when capturing new scans. These practices are designed to improve sync accuracy and reduce the likelihood of processing issues:
-
Keep the Hovermap stationary for approximately 10 seconds after the LiDAR begins spinning
-
Then perform at least three strong side-to-side rotations to generate clear IMU signals for alignment
These actions allow Aura to better detect motion patterns and align the video with scan data more accurately.
If you are working with a scan that was not captured using this method and are experiencing a synchronization error, please refer to the Can I still process this data? section below for guidance on processing scans with reduced sync quality.
Can I still process this data?
In most cases, poor synchronization results in unusable colorization. However, if the synchronization error is only slightly above the recommended processing threshold, it may be acceptable to continue processing by adjusting the threshold.
To do this, the user must manually modify the processing profile in Aura by increasing the errorThreshold parameter. This requires the creation of a custom colorization profile. This workaround is only recommended when the synchronization score is marginally below the minimum requirement and data re-capture is not feasible.
Step 1: Select and edit the colorization profile
- Open Aura and select the color profile you want to use.
- Open the processing settings and make any required changes.
- Save the processing settings.
- Save the profile.
Step 2: Manually update the profile
- Navigate to:
Documents\Emesent\Aura\Profiles\colourise - Open the relevant profile file in a text editor.
- Search for the setting:
errorThreshold - Increase the value to between
0.02and0.03. - Save the file.
Step 3: Reprocess with updated profile
- Restart Aura.
- Select the modified profile and reprocess the scan.
Increasing errorThreshold beyond 0.03 may allow processing to succeed but will likely degrade colorization quality. If you continue to receive poor sync scores, refer to the Scanning Tips and Techniques in Working with Colorization or raise a support ticket for further investigation.
Related Documentation and Support
For further guidance, see:
If you are unsure or need assistance, please contact your regional reseller or reach out to the Emesent Client Support team.