
This article explains how to process raw 360 scan data and extract the panoramic images in Aura. The result is a registered point cloud and a set of 360 images aligned to it, ready for viewing in Aura or export to third-party software.
What you will need
Raw scan data and .360 video file(s) captured with Hovermap and the GoPro MAX (see Capture a 360 scan with Hovermap).
Aura version 1.9 or higher with a valid Colorization licence.
A Windows device with sufficient storage for the processed outputs.
(Optional) A custom PNG image mask, if the built-in masking profiles do not fit the capture configuration.
Procedure
Step 1: Prepare the source files
Download the raw scan data from Hovermap to your hard drive.
Copy the .360 video file(s) from your GoPro MAX into the same folder as the raw point cloud data (where the .bag and calibration files are located).
Step 2: Configure the processing job
Launch Emesent Aura.
Go to the Process tab then click Process Scan.
Select the Process workflow then click Add Dataset.
In the Location field, enter the preferred name for the output folder. Emesent Aura will create this folder, which stores all the processed results and data, as a child directory within the raw scan folder.
Browse for the folder that contains the raw point cloud dataset to be processed. Select that folder.
Step 3: Select a processing profile
Select the processing profile to use.
You can use the built-in profile that is automatically detected for the Hovermap hardware. Follow standard support escalation procedures for any issues.
If you are exporting to Cintoo, go the the Output tab in the Processing Settings panel then in Point Cloud - output file types, select the E57 format.
Step 4: Start processing
Click Start to begin processing.
Wait for the raw data to finish processing and the point cloud to be generated.
Step 5: Configure the extract job
Go to the Process Tab and select Process Scan.
In the Configure New Scan Job panel, select the Extract 360 images workflow.
Click Add Dataset.
In the panel that displays, navigate to the same folder used in processing the raw point cloud data.
To reiterate, the .360 video file(s) should also be contained in the scan folder. If not, copy the video then click the Refresh Video button.
.png)
In the Location field, enter the preferred name for the output folder. Emesent Aura will create this folder, which stores all the processed results and data, as a child directory within the raw scan folder.
Click Save to return to the main panel.
Step 6: Select an extraction profile
Select one of the three built-in processing profiles for extracting 360 Images: Telescopic mount extended, Telescopic mount retracted, or 360-camera mount calibrated.
Step 7: Configure extraction settings
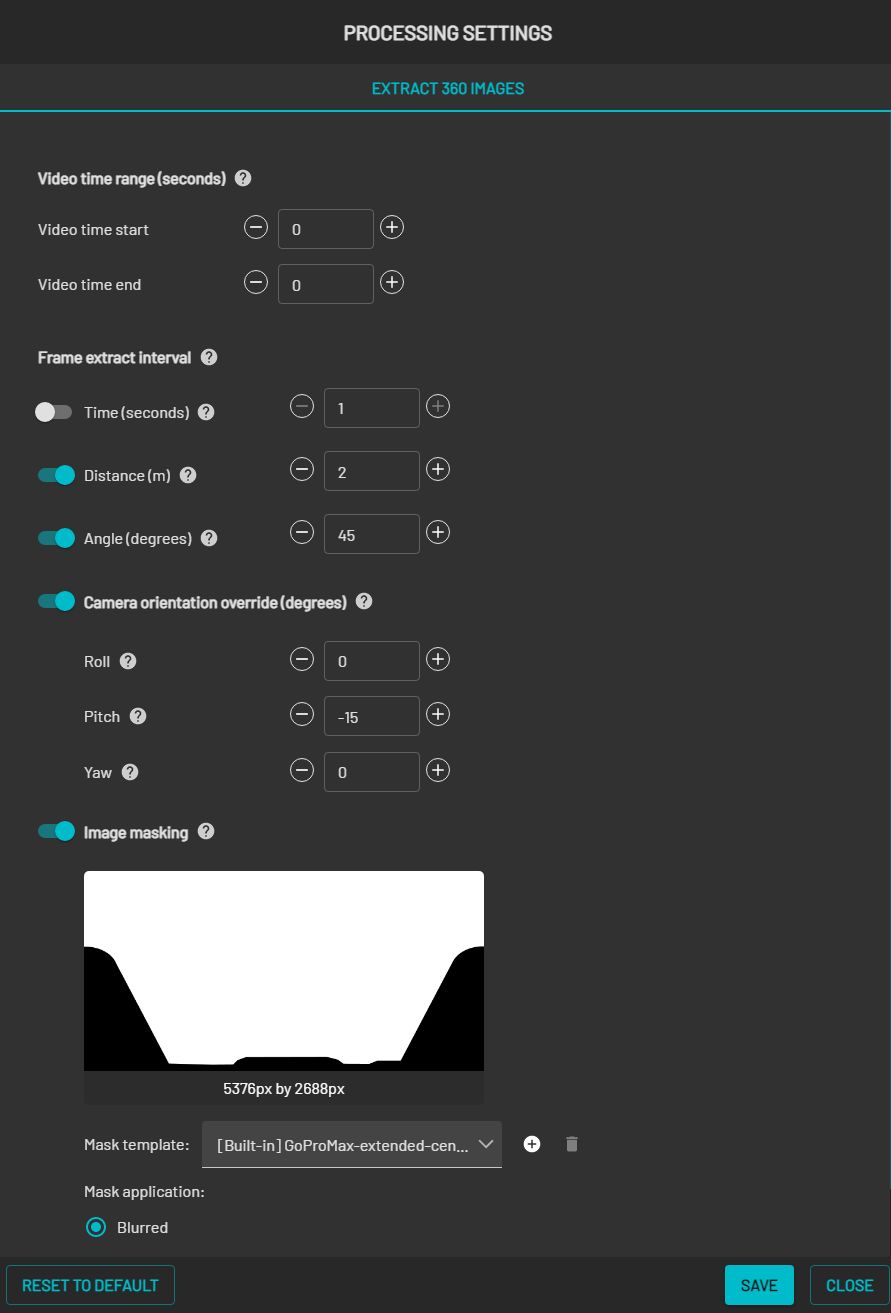
Click Processing Settings. Configure the start and end time of when the frames are to be extracted from the video, the camera orientation, and image masking settings as needed. Then, click Save.
The settings available in the Processing Settings panel are described in the Extraction settings reference section below.
Step 8: Start extraction
Click Start to begin processing. The Configure New Scan Job panel is replaced with the Starting Processing Job panel and shows a progress bar showing how far along you are in your processing job. In addition to the progress bar, the elapsed time of the processing job is shown to the right.
.png)
The directory file path below the progress bar provides a way to identify the dataset source. This is useful if multiple jobs are simultaneously processed with the same output folder name. Copying the file path and pasting it on your computer's file explorer allows you to access the completed files without waiting for the processing job to be completed.
Wait for processing to complete. An indication appears once the extraction has been completed so you can view your extracted 360 images. A button will also appear to take you to the output folder containing the extracted 360 images and four CSV reference files that can be uploaded to supported third-party applications.
Step 9: View the extracted 360 images
Open 360 images in Aura either by:
Clicking View after the 360 image extract processing job is complete.
.png)
Or by opening an existing frames.json file by either dragging and dropping it into Aura, or by opening the file from inside Aura. This file will be in the \Output\frames folder for 360 image extract jobs, or in \IntermediateFiles\frame_extraction\frames for 360 colorization jobs.
Outcome
The raw scan has been processed into a registered point cloud, and the 360 images have been extracted and aligned to the point cloud. The output folder contains the panoramic images and four CSV reference files for use with supported third-party applications.
Additional information
Extraction settings reference
Video time range
Setting | Description |
|---|---|
Video time start | The number of seconds from the beginning of the video and serves as the actual start time for frame extraction. |
Video time end | The number of seconds from the start of the video at which the frame extraction ends. Setting the value to 0 means the frame extraction will end at the end of the video. |
Frame step | A frame will be extracted whenever either the time, distance or angle relative to the last extracted frame exceeds the set threshold. Lowering the thresholds will generate more images that are spaced closer together. However, this will also increase the amount of data to be processed and managed. It is recommended to use a combination of distance and angle only, to avoid extraction of repetitive, redundant frames when the camera is not moving. |
Camera orientation override (degrees)
If you are extracting 360 images from a video captured using a color-calibrated 360 color mount, the Camera orientation override setting is not required and should be disabled in Processing Settings.
To capture panoramic images from a 360 video, the camera orientation needs to be set to align the camera virtually with the Hovermap to ensure the camera is facing forward along the x-axis. To do this, enable the Camera orientation override setting then input the angles (in degrees) for yaw, pitch, and roll.
.png)
Hovermap Orientation
The required yaw, pitch, and roll values depend on the camera mount configuration:
Mount configuration | Camera position | Roll | Pitch | Yaw |
|---|---|---|---|---|
Hovermap ST-X via telescopic handheld mount | Faces roughly the same direction as the Hovermap, tilted down by 15 degrees. The camera should be virtually pitched upwards by 15 degrees. | 0 | -15 | 0 |
Hovermap 100 via standard camera mount | Attached to the bottom side of the Hovermap facing forward. | 180 | 0 | 0 |
Hovermap ST/ST-X via angled bracket (GoPro Hero colorization bracket) | Attached upside down to the bottom side of the Hovermap, facing forward and downward. | 180 | -20 | 0 |
The angles provided above are precise for extracting images intended for export to third-party software. However, for colorization, greater precision is required beyond these specified angles. This feature is currently not supported in Emesent Aura.
Image masking
This feature is essential for blurring or blacking out the operator from 360 images when they are imported into third-party tools. Three pre-built templates are available specifically designed for use with the fully extended handheld telescopic mount.
Operator use | Masking result | Profile |
|---|---|---|
Scanning using the right hand | The left portion of the image is masked. | [Built-in] GoProMax-extended-righthanded |
Scanning using the left hand | The right portion of the image is masked. | [Built-in] GoProMax-extended-lefthanded |
Scanning while holding the device close to, or in front of the operator | The left and right edges of the image are masked. | [Built-in] GoProMax-extended-centre |
Custom mask is supplied | Custom | Custom profile created |
Mask template
You can apply a black or blurred (default selection) portion to the mask. For a customized mask, click the "+" button to define a mask using any third-party software (e.g., Photoshop). Assign a name to the custom template and load the PNG file generated externally. The following image lists the requirements for the mask file.
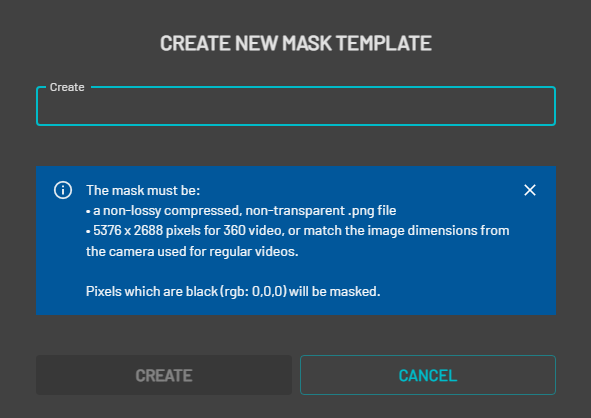
Failure to adhere to mask file requirements will result in the mask not being applied correctly.
People masking
People masking automatically detects and blurs people from extracted 360 images, including the operator and other people in the scene. This setting is enabled by default, with blur applied as the default masking style.
For more information, see Automatic people masking.
Create a custom mask
To create a custom mask, the following process is recommended:
Run image extraction once on a small subset of data. You can achieve this by setting a high Frame Extract Interval (e.g. Distance: 20 and Angle: 90) or specifying a low Video time end setting (e.g. 10 seconds). For Aura 1.5 and earlier versions, you can also use a Frame Interval of 250.
Open the folder that contains the extracted images, select a representative image, and open it using a third-party image editing software.
In the editing software select the areas you want to mask out, and fill them with black (RGB: 0,0,0).
It is recommended to check for any black pixels in the unmasked parts of your image or to ensure that your image is properly masked, select all areas that are not meant to be masked and fill them with white.
If layers were used during editing, flatten the image.
Save the image as a PNG file with non-lossy compression, typically the default option. Ideally, use the 8-bit RGB format.
If using Emesent Aura version 1.6 or earlier, ensure transparency is disabled and avoid using software that saves the image with transparency (e.g. MS Paint).
Related articles
Previous: Capture a 360 scan with Hovermap covers the field capture procedure.
Next: Upload 360 images and point clouds to third-party software covers exporting the extracted images and point cloud to Pointerra3D, Cintoo Cloud, Bentley iTwin, or Prevu3D.