This article outlines how to resolve colorization issues where the Hovermap or mounting platform is visible in the point cloud by applying the correct mask in Aura.
Error Message
Processing output
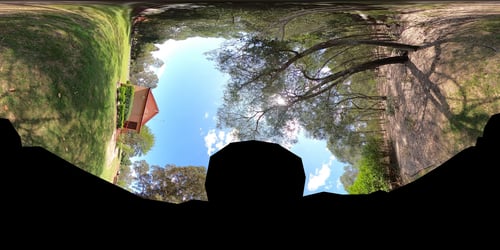
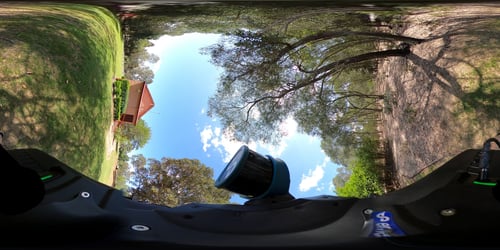
Observation: Hovermap is visible in the colorized point cloud

Why does this occur?
This issue occurs when image masking is either missing, incorrectly selected, or does not accurately exclude all visible components during colorization.
If no mask is applied, or if the selected mask does not fully cover the Hovermap or its mounting platform (such as a drone, backpack, or vehicle), these elements may appear in the colorized output. This reduces both visual quality and interpretability of the point cloud.
Common Causes
Cause: No mask or incorrect mask applied
During colorization, a mask is required to remove parts of the capture platform such as a drone, backpack, or vehicle from the 360-degree video. If not applied correctly, parts of the Hovermap or mounting platform may appear in the colorized point cloud, reducing visual quality and accuracy.
Resolution
To resolve this issue, complete the following:
-
Identify the correct mask for the scan based on the mounting method and camera type
-
Apply the appropriate built-in mask in Aura
-
Verify the mask using the Review Extracted Frames tool in Aura
-
(Optional) Create a custom mask if no built-in option matches the setup
Resolution Steps
Step 1: Identify the Appropriate Mask
Use the mounting method and camera type to determine which mask to apply.
Vehicle scans almost always require a custom mask to achieve proper masking and visual output. Refer to the Creating a Custom Mask guide if no suitable built-in option provides the required result.
|
Mount Type |
Simplified Mask Name |
|---|---|
|
Backpack |
Backpack RTK – LRR (All Antennas) |
| Backpack RTK – LRR (Flat Antennas) | |
| Backpack RTK | |
| Backpack STX | |
|
Vehicle |
Car Mount (No RTK, STX) |
| Generic Vehicle RTK | |
| Vehicle – Leica GS18 (Device Only) | |
| Vehicle – Leica GS18 (Generic) | |
| Vehicle RTK (Device Only) | |
| Vehicle RTK – LRR (All Antennas, Device Only) | |
| Vehicle RTK – LRR (Flat Antennas, Device Only) | |
| Vehicle – Trimble R10/R12 (Device Only) | |
|
Handheld |
Handheld (Device Only, STX) |
| Handheld – Left Handed (Narrow, STX) | |
| Handheld – Left Handed (Wide, STX) | |
| Handheld – Right Handed (Narrow, STX) | |
| Handheld – Right Handed (Wide, STX) | |
|
Drone (M300) |
M300 – Hero HVM100 |
| M300 – Hero ST |
Step 2: Apply the Mask in Aura
With the dataset already loaded and colorization in progress:
-
Open the Processing Settings panel.
-
Enable Image Masking.
-
From the dropdown list, select the appropriate built-in or custom mask based on your hardware configuration.
Step 3: Confirm the Mask Using Review Extracted Frames
Before continuing with colorization:
-
In the Processing Settings panel, select Review Extracted Frames.
-
Proceed with the standard colorization workflow. For full instructions, see the Emesent Aura Colorization Workflow
-
Start processing the scan. Once the image extraction is complete, a Review Frames button will appear. Click this to continue.
-
Open multiple frames distributed across the duration of the scan.
-
Check each frame for any visible platform components. The goal is to ensure that no static objects remain in view of the camera. This typically includes the Hovermap, mounting hardware, backpack, or vehicle, but may also include elements that appear regularly in the frame, such as an arm holding the Hovermap.
If any part of the platform is visible, the selected mask may be incorrect or incomplete.
If the frames are clean, the mask is acceptable. If not, return to Processing Settings, select a different built-in mask, or proceed to create a custom mask as required.
Step 4: (Optional) Create a Custom Mask
If no built-in mask is suitable for your mounting configuration, create a custom mask.
-
For detailed instructions, see:
Creating a Custom Mask – Emesent Knowledge Base
Can I still process this data?
Yes. If the issue is related only to masking, reprocess the dataset using the correct mask. This should eliminate visible platform artefacts in the colorized output.
Related Documentation and Support
For further guidance, see:
If you are unsure or need assistance, please contact your regional reseller or reach out to the Emesent Client Support team.