Understanding Hovermap
To get the best results out of your Hovermap, it is important that you have a good understanding of the concepts outlined in this article. As intelligent as Hovermap may seem, it’s important to remember that it is still a tool. And, being a tool, it is only as good as its operator! Hovermap still relies on you to guide it correctly, and to save it if it gets into trouble.
The concepts in this article will help you to become familiar with the way Hovermap works. This will help you to get the most out of your system and have the confidence to step in when Hovermap reaches the limits of its intelligence.
Contents
- What can Hovermap see?
- What is SLAM?
- What is drift?
- What is a slip?
- What is Shield?
- How does Hovermap navigate?
How does Hovermap work?
What can Hovermap see?
LiDAR performance
Hovermap ST and Hovermap ST-X use different LiDAR types. The performances of each are described below.
| Hovermap ST | Hovermap ST-X | |
| Number of lasers | 16 | 32 |
| Number of laser returns | 2 | 3 |
| Laser range | 100m | 300m |
| LiDAR field of view | 30° | 30° |
| Number of points per seconds | up to 300,000 (single return mode) | up to 640,000 (single return mode) |
| Hovermap field of view | 360° | 360° |
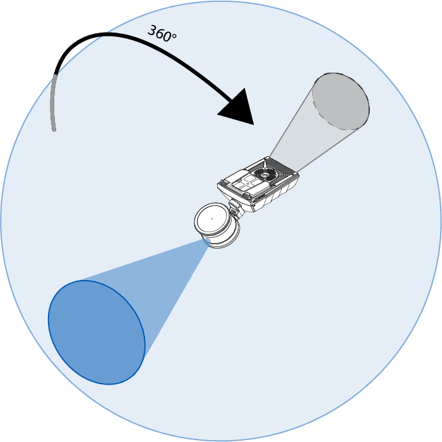
There is a small blind spot behind the body of Hovermap (shown in gray in the following image). This is because the body of Hovermap itself blocks the field of view in that direction. When scanning, you will also need to account for any platform (or human) holding Hovermap.
Point density
Point density refers to the number of points in an area. To achieve a quality scan, it is important for you to understand which areas will receive the greatest point density.
While Hovermap does have 360° coverage, it spends more time focused on some areas than others. The area of greatest point density is directly in front of the LiDAR sensor (shown as a dark blue cone in the following image). This is because a number of lasers will always be facing this direction, even while the sensor head is rotating.
The rest of the sphere will still have good coverage, but the point cloud in these areas will be less dense. This is because the remainder of the lasers are in constant motion, due to the rotation of the scanning head.

In practice
All of this has implications when using Hovermap. In practice, it can help to visualize the cone of denser points as a flashlight. When scanning, make sure that you focus this cone of higher point density on any important features that you wish to capture. If you do this, the SLAM process will be able to create a denser, more accurate point cloud, and the possibility of a SLAM slip will be reduced.
Hovermap is also constantly recording points, so simply spending more time in your targeted areas will increase your point density, even if you can't focus Hovermap directly on your area of interest.
Tips to improve point density
-
Move slowly.
-
Sweep the cone in all directions to ensure a denser point coverage.
-
When attaching Hovermap to a drone or vehicle, face it so that the cone can see the largest number of features.
Resolution
The closer Hovermap is to its target, the greater the accuracy of the points it produces (beyond the minimum scan distance of 0.5 m). If you are close to your target, you are more likely to produce a clean point cloud the first time, without the need for a lot of cleaning in the postprocessing stage. We recommend that you stay within 40 m of your target.
Captured data
The data captured by Hovermap includes characteristics such as range, intensity, and the time that the data was captured.
Mounting Hovermap onto your platform of choice also allows the system to embed GPS data into the collected LiDAR data. This embedded data can then be used in the postprocessing stages.
What is SLAM?
SLAM stands for simultaneous localization and mapping. SLAM technology runs in real-time to allow Hovermap to create a map of its environment, while at the same time working out its position, orientation, and speed within that environment.
Hovermap uses this technology for a variety of tasks, including mapping, autonomous navigation, collision avoidance, and position hold in GPS-denied environments.
SLAM relies on distinct geometric features to work effectively. Using these features, Hovermap can build a map of its surroundings and track them as it moves around. This means that there is no need for external infrastructure, such as GPS. As a result, Hovermap can work outdoors, indoors, and underground.

Just as you need many GPS satellites to have a good GPS location, SLAM needs recognizable features to calculate a good position.
Why are features important?
For SLAM to work, it requires features to be present in its surroundings. Features are distinct geometric objects that do not move. Hovermap uses these features to determine its position in space and to build a point cloud around itself.
Feature-rich environments are ideal for SLAM, but smooth, featureless environments can present a challenge. If you use Hovermap in a featureless environment, you run the risk of a SLAM slip. This means that Hovermap will completely lose track of its surroundings, which will affect autonomous functionality, ruin your scan, and potentially damage your Hovermap (for more information, go to What is a slip?). This is why an understanding of how Hovermap sees the world is so important.
The concept of features can be one of the most difficult to grasp when it comes to working with Hovermap, as there is no absolute definition of what makes a feature-rich environment. It depends on your specific situation.
Feature-rich environments
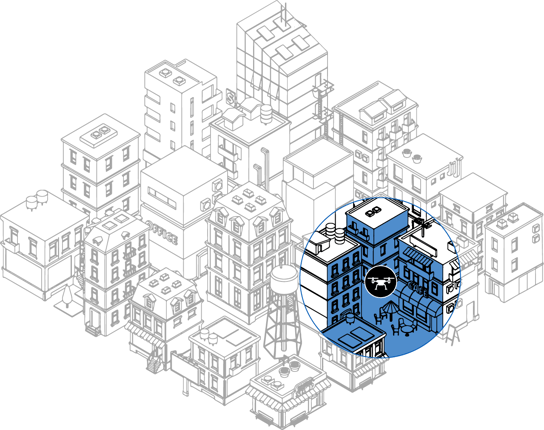
Feature-rich environments contain many distinct, geometric features that do not move. These environments are ideal for Hovermap. A good example is a city center, with large, distinct buildings that can help Hovermap track itself. In this environment, Hovermap is able to operate both more effectively, and at a greater height, than it would be able to in a sparser environment.

Challenging environments
Environments without distinct geometric features can be more challenging for Hovermap to navigate. There are certain techniques available to help you produce more reliable scans in these environments, but you will need to be mindful of your surroundings and plan your scan carefully in order to avoid a SLAM slip.
Examples of challenging environments include:
-
Flat and smooth areas without features, such as large outdoor parking lots, sports fields, and lakes.
-
Smooth tunnels or passageways with featureless walls, such as inside concrete water pipes.
-
Areas with very similar and repetitive features and patterns.
-
Areas dominated by vegetation, such as forest canopies, gardens, and parkland (where the features all look the same, forming a homogenous surface).
-
Environments with many moving objects, such as cars, trucks, and plant machinery.
-
Environments with many features that can absorb or reflect LiDAR beams, such as water or dark, matt paints.
-
Environments that require you to transition through very narrow passages.
It is best to avoid scanning in completely featureless environments, as Hovermap will not be able to track itself. However, you can introduce your own features (such as pylons and parked vehicles) to these environments to make them more SLAM-friendly. These introduced features should be geometric if possible, and not able to move. Bear in mind that markings and colors aren’t features. Features are objects.

Somewhere in between
Sometimes an object can be a distinct feature in one context, or the exact opposite in another context. For example, vegetation can either be a distinctive feature or relatively featureless, depending on the density of foliage in an area. A single tree could be a distinct feature to Hovermap, but a dense canopy can appear as a homogenous surface. In this case, it is not much better than an open field.
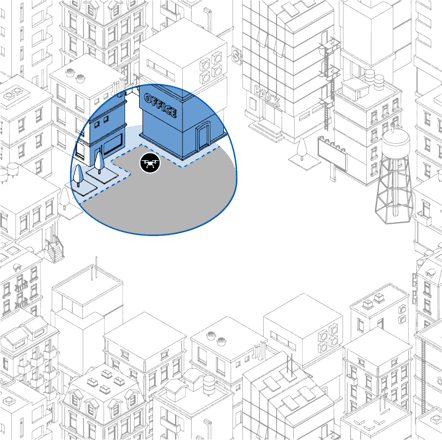
The following image shows a more challenging scenario. This environment has some features (highlighted in blue), but also plenty of open space with no features at all (shown in gray). Hovermap can use the buildings, and possibly the trees, to keep track of its surroundings. But to avoid a SLAM slip in this situation, you will have to be to make sure that there are some features present throughout the duration of your scan. You should avoid venturing out too far into the open square.
When working in these kinds of environments, it is essential that you understand how Hovermap works and that you plan your mission carefully. Go to Mission planning for more information.

Tips for working with features
-
Make sure that there are always enough features within 40 m of Hovermap. The closer they are, the better.
-
Keep any features in front of Hovermap as much as possible.
-
Where possible, add features to smooth environments.
-
Fly as low and as slow as possible.
-
Avoid scanning in areas with lots of moving objects.
-
Move Hovermap so that it can continuously see where it has been and where it is going. This is especially important when you move through narrow passages and doorways.
What is drift?
Drift is the stretching or warping of the point cloud that can happen as SLAM pieces together its surroundings.
Why does drift happen?
Hovermap uses LiDAR to determine its position within its environment. It emits laser pulses and then measures how long it takes for the light to return. Based on the time this takes, Hovermap knows how far away an object is from the sensor. Drift occurs as a result of tolerances in measuring these light return times. The longer a scan takes, and the further the scan travels, the more drift is accumulated.
Some environments, such as those with a lot of vegetation, or long scans that only go in one direction (such as a tunnel or a road), can lead to more drift accumulating in your final scan. Go to the Mission planning section for more specific information on best practices for scanning in these situations.
Tips to avoid drift
-
Limit your scans to the smallest area possible. Long scans can cause significant drift.
-
“Close the loop” or scan in a grid pattern to average out drift. For more information, go to Scanning techniques.
What is a slip?
A slip occurs when Hovermap completely loses track of its location. This happens when Hovermap can’t detect any features in its environment, or if there is not enough overlap between features. If a slip does occur, the following can happen:
- The resulting scan will look nothing like the real-world environment. It will most likely resemble a scrambled line.
- The system will lose all autonomous functionality. If this happens, it will lose its ability to hold position.
- The system will not be able to return to home, as it has lost its ability to know where home is.
Why do slips happen?
Slips can happen for a number of reasons, such as:
- Flying too high above the ground. In this situation, the LiDAR points will not be able to reach the ground with adequate density to build a suitable map. For this reason, we recommend a flight height of 40 m.
- Flying above bodies of water. Water can’t reflect the light back, so Hovermap can’t map its environment effectively.
- Flying across open land (such as open farmland) that has no distinct geometric features.
- Moving through doorways too quickly without looking back over features that have already been scanned. Hovermap can’t stitch the old and new environments together if the transition between the two “worlds” happens too quickly.
- Operating Hovermap in a smooth tunnel or shaft with no features. In this scenario, Hovermap won’t be able to work out its position, as everything looks the same to Hovermap when no features are present.
Tips
-
To avoid a slip, we recommend that you have features present in all directions (on the X, Y, and Z axes) so that Hovermap can more easily determine its position.
-
If a slip occurs, switch to drone control mode and bring the drone home safely. For more information, go to the Emergency flight recovery guide.
-
It may be possible to salvage a scan in the Emesent Aura by changing the processing parameters. But be aware that the processing time will increase significantly.
What is Shield?
Shield is a virtual safety bubble that Hovermap creates around both itself and the drone. It is available in both Pilot Assist mode and Autonomous mode. Hovermap will not allow the drone to move any closer to obstacles than the distances defined by Shield.
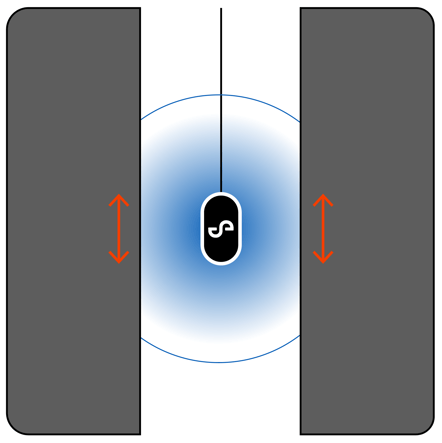
In Pilot Assist mode, Shield distances can be set manually. You will be able to create a larger safe space around the drone, but bear in mind that a larger Shield area will also prevent the drone from flying through narrow gaps.
In Autonomous mode, Shield settings are predetermined and cannot be changed. The settings depend on the type of drone you are using. They will always be slightly larger than the minimum Shield settings for Pilot Assist mode. Shield sizes will also change with speed in the direction of travel.
Note
It is important to know that Shield is a passive system. It will not protect against objects that are actively moving towards the drone, such as birds, moving ropes or falling rocks.
Hovermap can navigate using three methods: SLAM, GPS, or INS (a backup navigation system that relies on the IMU to work). The system automatically determines the type of environment it is in and selects a suitable navigation method.
| Navigation Method | Usage | Effect on mission if lost |
| SLAM | Primary navigation source |
Robot will Return To Home as the map quality will degrade if the drone continues to fly into areas with poor SLAM performance. Depending on GPS signal availability, the system will use either GPS or INS as navigation method. |
| GPS | Used when SLAM is lost and GPS signal is available | Mission will run in a degraded state. The system drops to Hovermap INS. |
| INS | Used when SLAM is lost and GPS signal is not available |
Mission will run in a degraded state. Warning: Using INS as a navigation method is prone to errors, and only works until SLAM is recovered. If SLAM is not recovered within 10 seconds, attempting to continue hovering will result in a crash due to the accumulation of errors in the INS. Therefore, it is crucial to attempt an emergency landing in such a situation. |
