Scanning a building
Note
Please bear in mind that every situation is unique. These practices are a guideline only, and may need to be adjusted for your specific environment.
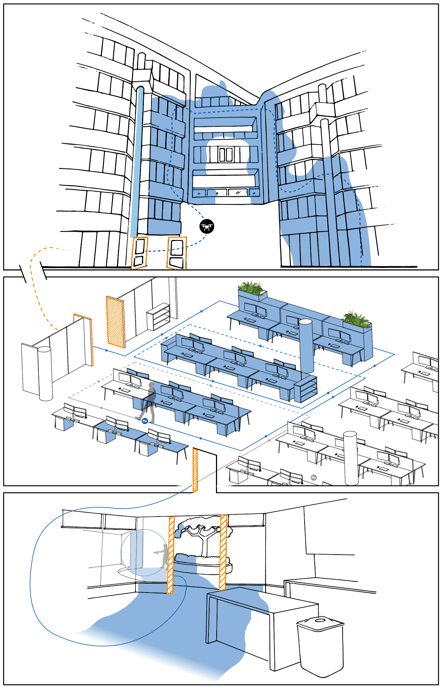
Buildings are a great use case for Hovermap. However, they do require careful planning, as there are many factors to consider. We recommend that you start your scan on the outside of the building. Once that is complete, you can then start scanning inside. Depending on the size of the building and the number of floors, we also recommend that you break up your scan into a number of smaller scans, with plenty of overlap between each scan.

Outside the building
The outside scan is the most straightforward part of the building scan. We recommend that you follow this process for the best results.
Step 1: Pre-mission checks
Set your navigation methods as follows:
- Good GPS signal: If you are likely to have a good GPS signal for your entire mission, set GPS as your primary navigation method and SLAM as your secondary method.
- Partial GPS signal: Set SLAM as your primary navigation method and GPS as your secondary method.
Go to Understanding Hovermap for more information on choosing the best navigation method.
Step 2: Perform your mission
-
Fly in Pilot Assist mode, and keep the drone within line of sight.
-
Fly so that Hovermap is facing the building at all times. Make sure that you thoroughly capture the outside of the building all the way around.
-
While scanning, check the live point cloud to ensure that your data is being collected correctly. Do this in the Hovermap App or the Waypoint UI (go to The Hovermap App for more information). You can also do this by connecting to the Hovermap’s Wi-Fi, opening a web browser (on any laptop or Android device), and then navigating to hover.map:8082.
-
Don’t fly too high, as this may cause a SLAM slip. Fly as close to the building as possible, and try to stay within 20 m of the roof. The distance will be determined by the size of the building. With a smaller building, you could fly at 15 m, but a larger building might require more distance above to finish the scan in one flight (20 m to 30 m is a reasonable distance for a larger building). Anything further away is likely to reduce accuracy, especially if you want to colorize the scan.
Inside the building
Once you have completed the outdoor scan, you can then move indoors. This is the more complex part of a building scan. Indoor environments can present certain issues for SLAM-based scanners, as they contain many small apertures, such as doorways, that can cause issues if you don’t know how to navigate them correctly.
We recommend that you follow this process for the best results.
Step 1: Pre-mission checks
Set SLAM as your primary navigation method and INS as your secondary method. (Go to Understanding Hovermap for more information on choosing the best navigation method.)
Step 2: Plan your mission path
-
Break your inside scan down into small, practical sections, such as one room or floor at a time. It is best practice to keep your scan time short. We recommend 20 to 25 minutes. Make sure that your scan time doesn’t exceed 35 minutes.
-
If you are breaking your scan down into multiple sections, such as rooms or levels, make sure that you have a significant area of overlap between each scan so that they can be aligned during processing. If you are scanning multiple levels, make sure that you capture the stairwell between each level in every scan.
Step 3: Prepare your environment
-
Before you start the scan, make sure that all doors to rooms are open.
-
Make sure that there are no other people moving through the area. People moving through your scan can cause drift, slips, and “ghosting”, which can ruin your dataset. Ghosting also means that you will have to do additional postprocessing of your point cloud to clean out the false points.
-
If you are georeferencing your scan, place GCPs around the scan area. Place four GCPs around the corners of your study area, and one in the center. Make sure that the square is slightly off-kilter (not perfectly square) so that, during processing, it is easier to identify which GCP is which.
Step 4: Perform your mission
-
Perform your scan according to the mission path that you have already planned. Make sure that you have plenty of overlap between each scan.
-
When moving through doorways or around corners, make sure that Hovermap can see both where it has been and where it is going. Do this by slowly moving sideways or backward through a doorway to introduce the new environment. When going around a corner, take the widest path possible and give Hovermap some time at the apex to see both the old and new environments together before proceeding. By doing this, Hovermap won’t lose track of where it is, and you will avoid a SLAM slip.
-
While scanning, check the live point cloud to ensure that your data is being collected correctly. Do this in the Hovermap App or the Waypoint UI (go to The Hovermap App for more information). You can also do this by connecting to the Hovermap’s Wi-Fi, opening a web browser (on any laptop or Android device), and then navigating to hover.map:8082.
-
Finalize your inside scan by going outside and capturing the front of the building. This serves as an area of overlap between the inside and outside scans. Capture as much as possible of the front of the building. Ensure that you scan around the two corners to the left and right of the entrance.
Step 5: Process your data
Process your scan data using the Emesent Aura Software.
