Web UI
Overview
Hovermap provides a user interface, known as the Web UI. You can use the Web UI to:
- Remotely start and stop a scan. This is useful when physical access to the unit is inconvenient (for instance, if Hovermap is mounted on a backpack, or on a vehicle bonnet while driving).
- Set the scan name.
- Set the time on Hovermap.
- Find out how much storage space is available on the internal solid-state drive.
- Update firmware.
- Download files.
Contents
Access the Web UI
To access the Web UI:
-
Connect Hovermap to a power source (14 to 54 VDC, 60W).
-
Press the power button on the back of the Hovermap to power on the unit.
-
On your tablet or smartphone, open the Wi-Fi settings and connect to Hovermap’s Wi-Fi. Hovermap creates a Wi-Fi network with the name of the serial number of the unit.
For example, for Hovermap ST0035 the network name will be st_0035. -
Enter the network password: hovermap
-
Once you have accessed Hovermap’s Wi-Fi, open an internet browser:
-
To access the Web UI, type hover.map into the address bar.
-
Tip
-
If the Web UI doesn’t load, type 10.9.0.1.
-
Save this page as a shortcut on the home screen for easy access in the future.
Web UI layout
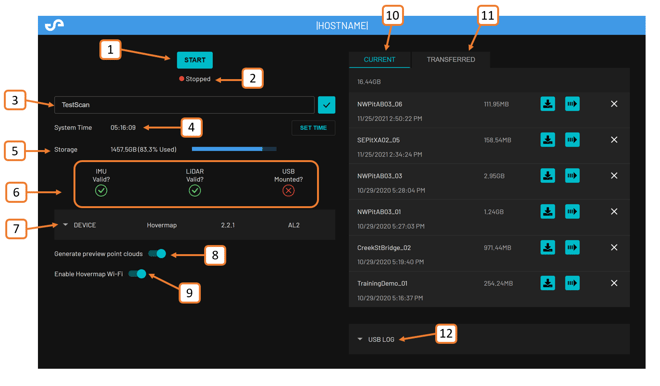
-
Start button
-
System state
-
Scan name
-
System Time
-
Storage
-
Hovermap status icons
-
Device details
-
Generate preview point clouds
-
Enable Hovermap Wi-Fi
-
Current tab
-
Transferred tab
-
USB Log
|
Button |
Action |
|---|---|

|
When Hovermap is ready to scan, the teal Start button appears. |

|
While Hovermap is scanning, the button will change to a red Stop button. |

|
When Hovermap is in a transition or transfer state, the button will change to a gray Wait button. |
System state
This indicator shows the current state of Hovermap. It is located just beneath the Start button. The text will tell you exactly what Hovermap is doing.
-
Green: A green dot indicates that Hovermap is active.
-
Red: A red dot indicates that Hovermap is stopped.
Scan name

Type your scan name into the Scan name field. The text will turn orange to indicate that it has changed. Press the tick button to confirm, and the text will return to white to indicate it has been saved.
System time

The system time is shown in UTC format.
If Hovermap’s internal system time differs from that of the connected platform, the text will turn orange and a Set Time button will appear. You will be prompted to set the time so that it is the same as that of the connected platform. Once set, the time will return to white and the Set Time button will disappear.
Storage

This indicator shows the amount of free space available on the internal solid-state drive.
If Hovermap is more than 50% full, the text will change to orange. If Hovermap is more than 90% full, the text will change to red.
Hovermap status icons

The Hovermap status icons show the status of the IMU, the LiDAR, and the USB connection.
-
IMU and LiDAR: If the icon is green, go ahead with the scan. If it is red or orange for an extended period, contact Emesent Client Support Team.
-
USB: The USB icon will remain red unless the USB is mounted and actively processing. The icon will only be green during the processing period. Once it has stopped, it will turn red again.
-
GPS/RTK: These icons are present when connected to a supported GPS or RTK module.
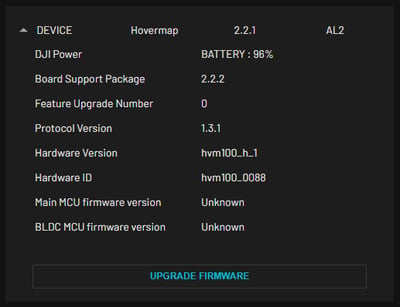
In this section, you will find:
- The current Emesent Cortex version (top row).
- The supported autonomy level (top row).
- The unique identifier for your particular Hovermap (Hardware ID field).
You can also press the Upgrade Firmware button to access the update page. From there, you can update the operating system, change your autonomy entitlement, and upload/update colorization calibration files. Refer to the Upgrading Emesent Cortex instruction guide for more information.
Scan details
While Hovermap is scanning, the scan details appear in the Device section. These will disappear when the scan is stopped.
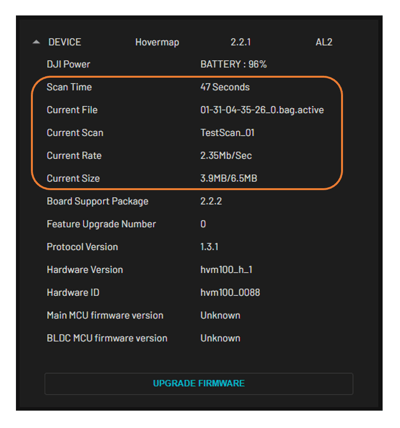
The following scan details are available.
|
Field |
Data |
|---|---|
|
Scan Time |
Shows the length of time that the scan has been running. |
|
Current File |
Shows the active file that the data is being currently being stored to. This information can be used for investigation purposes. |
|
Current Scan |
Shows the name of the current scan. |
|
Current Rate |
Shows the rate that data is being saved to your scan file. This is useful to know, as it can tell you how quickly you are likely to run out of space on your Hovermap.
|
|
Current Size |
Shows the size of the current scan file. |
Scan details
Generate preview point clouds
When the Generate preview point clouds toggle is on, a point cloud preview will be generated. Be aware that turning this on will increase both your file size and the time it takes to transfer to the USB flash drive.
This function has been removed in Cortex Versions 4.0 and above. As an alternative, Onboard Processing can be used to achieve the a similar outcome.
High density mode
High Density Mode is a legacy feature that has been removed in Cortex versions 3.2 and later.
This setting was only available when using the Hovermap ST-X. When toggled on, the ST-X used 32 lasers instead of 16, enabling faster capture of more points.
This function has been removed in Cortex Versions 3.2 and above.
Scan File Management
The Web UI allows you to manage and download your scan files to the connected device.
Enable Hovermap Wi-Fi
This toggle allows you to enable or disable Hovermap’s Wi-Fi. To disable the Wi-Fi:
-
Click the Enable Hovermap Wi-Fi toggle.
A message will appear asking if you wish to proceed. -
Click Yes to turn off Hovermap’s Wi-Fi.
-
Turn Hovermap off and on again for the change to take effect.
-
If you are turning off the Wi-Fi for security reasons, we recommend that you scan for Hovermap’s SSID to confirm that it is no longer advertised.
Warning
If you disable the Wi-Fi, it can’t be turned back on using your smartphone or tablet. You will have to go through the following process to turn it back on:
-
Plug a USB-Ethernet adapter into the back of your Hovermap.
Hovermap will configure the adapter with the static address 192.168.2.115, netmask 255.255.255.0.
The Web UI is available at http://192.168.2.115 -
Connect the USB-Ethernet adapter to a computer.
-
Configure this adapter to use a static address in the same subnet as the Hovermap address.
(For example: 192.168.2.2, netmask 255.255.255.0) -
Go to the Web UI and turn the Enable Hovermap Wi-Fi toggle on.
-
Turn Hovermap off and on again.
Note
The Enable Hovermap Wi-Fi feature is not currently available for Hovermap ST.
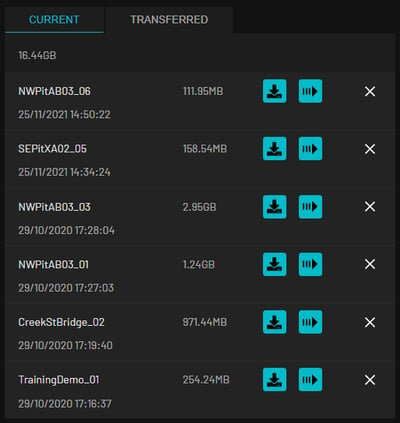
Current tab
The following options are available for each scan.
|
Button |
Action |
|---|---|
|
Download: When you press the download button, a message will appear asking you to confirm that you would like to continue with the download. The download may take a few minutes. Make sure that you don’t navigate away from the page until it is complete. |
|
Move: When you press the move button, the scan data will be moved from the Current tab to the Transferred tab. |
|
Delete: When you press the delete button, a confirmation message will appear. Press OK to delete the scan from Hovermap. Be aware that the scan may not have been downloaded or copied off the device, and will be unrecoverable once it has been deleted. |
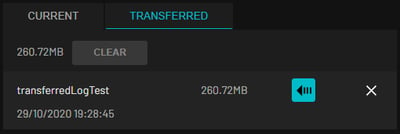
Transferred tab
The following options are available for each scan.
|
Button |
Action |
|---|---|
|
Move: When you press the move button, the scan data will be moved from the Transferred tab back to the Current tab. |
|
Delete: When you press the delete button, a confirmation message will appear (unless you have turned off this option on your tablet or smartphone). Press OK to delete the scan from Hovermap. Be aware that the scan may not have been downloaded or copied off the device, and will be unrecoverable once it has been deleted. |
Clear data
The Clear button at the top of the Transferred tab allows you to bulk delete your files. You can free up space by entering the amount of space that you require. Hovermap will then delete data until the space requirement is met.
You can also delete all data from the Transferred folder by entering ALL (note the capitalization). Scan data located in the Current tab will remain unchanged.
Note
The Clear button will only be enabled if Hovermap is not scanning. You can’t clear data if a scan is in progress.
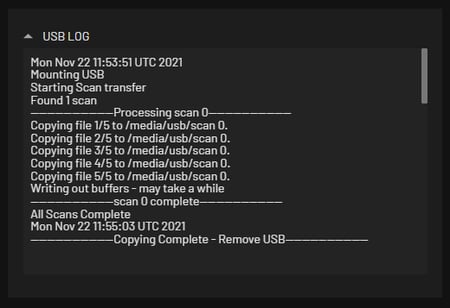
The USB log is an expandable area located beneath the scan file management tabs. This section will automatically expand when a USB flash drive is inserted into Hovermap. It will show the log output as it updates and as scans are transferred.
Note
If you have a lot of scans on Hovermap, this section may have moved off the bottom of your screen.
