This guide outlines how to prepare a Freefly Astro or Astro Max drone to carry the Hovermap ST or Hovermap ST-X. Once set up, the Hovermap and drone will be able to share autonomy command data and receive GPS through the electrical interface cable.
The key steps shown in this guide are:
Download the complete Freefly Astro & Astro Max setup guide as a PDF.
Pre-flight checklist
- Hovermap is running the latest release of Cortex and Commander, or a minimum of Cortex version 3.4.
- Freefly Pilot Pro controller is fully charged.
- Freefly Astro/Astro Max batteries are fully charged.
- Freefly Astro/Astro Max parameters are set for Hovermap (section 2 below).
Set Astro/Astro Max parameters
If your Astro/Astro Max has firmware 1.6.14 or later installed, the following Astro parameters need to be set for it to operate with Hovermap:
-
Set MAV_2_MODE = Custom
-
Set COM_RC_IN_MODE = RC Transmitter Only
-
Set SER_EXT2_BAUD = 500000
This Freefly video tutorial (from 5:39) explains how to set the Astro parameters.
You can refer to the Freefly Wiki page for more detailed information on the Astro drones and Pilot Pro controller as well as Astro integration with Emesent Hovermap.
Mount the Hovermap on the Freefly Astro
Emesent’s Hovermap ST and Hovermap ST-X can support the Freefly Astro Max drone, while the Freefly Astro drone is supported by Hovermap ST-X.
The Astro Max has different mounts for attaching to the Hovermap ST or ST-X, and the Astro has a mount for the Hovermap ST-X:
- The different mounts are named and colour-coded so you can tell at a glance which drone and which Hovermap they belong to.
- The set up instructions shown below are the same for the Astro and Astro Max drones and Hovermap ST and Hovermap ST-X , it’s just the mounts that are different.
Hovermap ST-X mount for the Freefly Astro
The Hovermap ST-X mount for the Astro is grey and unlabelled, and it has two ‘arms’.
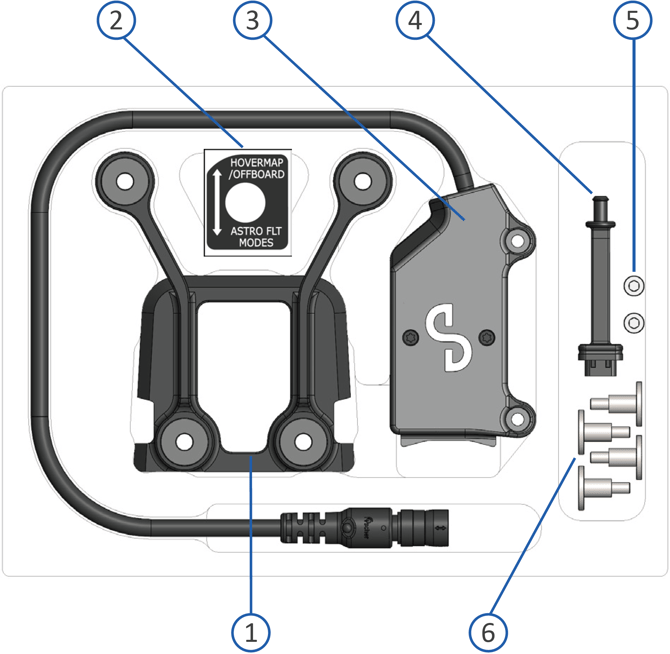
What’s in the Astro interface kit
- Hovermap-Astro dovetail mount for ST-X
- Hovermap-Pilot Pro mode sticker
- Electrical interface
- USB-C dust cover
- 2 x Electrical interface attachment screws (M3 x 6 - 2.5 mm hex drive)
- 4 x Dovetail mount attachment screws (flanged - 2.5 mm hex drive)
Required tool (provided)
- 5mm Hex Driver
Hovermap ST-X and ST mounts for the Freefly Astro Max
The Hovermap ST-X mount for the Astro Max mount is blue to match the ST-X bumpers and labelled “For ST-X only” (shown on the left) and it has two ‘arms’, while the Hovermap ST mount for the Astro Max is grey and labelled “For ST only” (shown on the right).
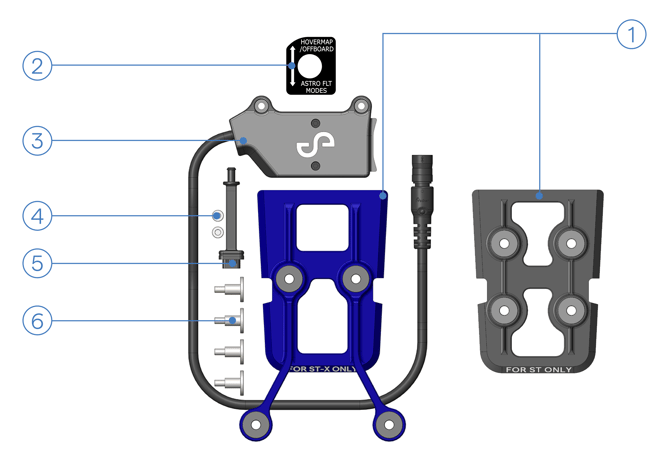
What’s in the Astro Max interface kit
- Hovermap-Astro Max dovetail mount for ST-X (blue) or ST (grey)
- Hovermap-Pilot Pro mode sticker
- Electrical interface
- 2 x Electrical interface attachment screws (M3 x 6 - 2.5 mm hex drive)
- USB-C dust cover
- 4 x Dovetail mount attachment screws (flanged - 2.5 mm hex drive)
Required tool (provided)
- 5mm Hex Driver
Installing the Hovermap-Astro Dovetail Mount
The set up instructions in this section are the same whether you’re using the Astro or Astro Max drones with the Hovermap ST or ST-X – the descriptions of Hovermap, Astro and Mount are generic.
1. Remove the Hovermap dovetail mount from the box and install the provided mounting screws. There will be grommets already in place. If the grommets have come loose, it may help to use an cylindrical object like the base of a pen to push the grommets into the mount.


Dovetail mounts L-R: ST-X for Astro; ST for Astro Max; ST-X for Astro Max.
2. Remove the Freefly Astro from its box and flip the aircraft. Remove the existing plastic shield from the I/O panel on the underside of the aircraft.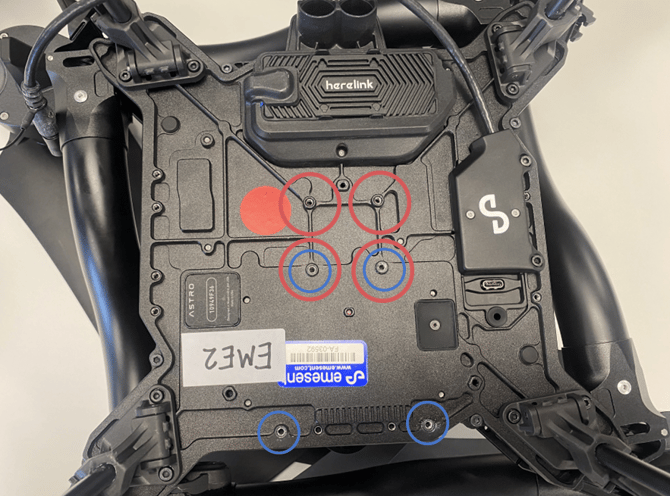
Blue circles show the Hovermap ST-X mounting hole locations
Red circles show the Hovermap ST mounting hole locations
4. Make sure to align the four attachment screws with the mounting holes and screw them in using the provided 2.5mm hex driver.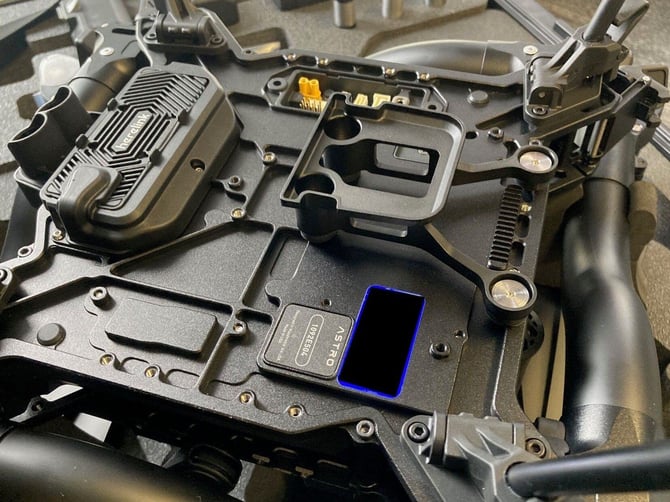
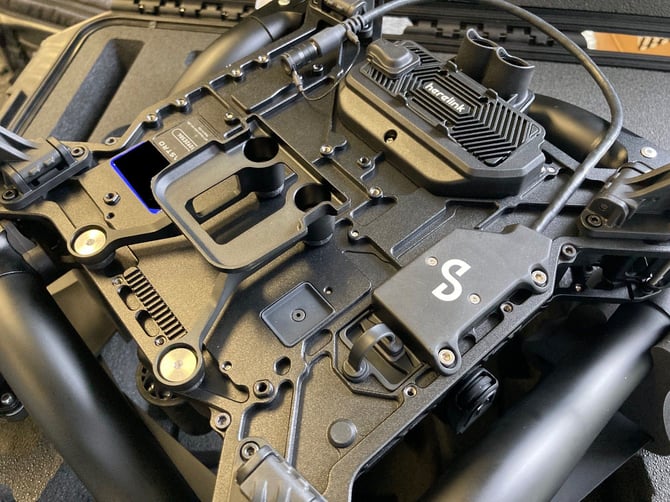
The Hovermap ST-X mount on the Freefly Astro
It is important to securely fasten screws until they stop rotating. If available, use a thread-locking fluid such as Loctite 222.
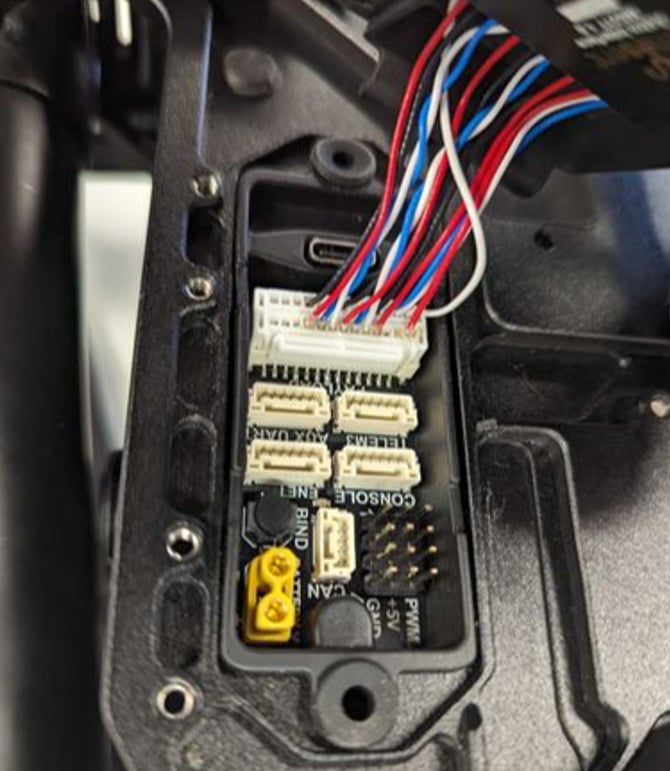
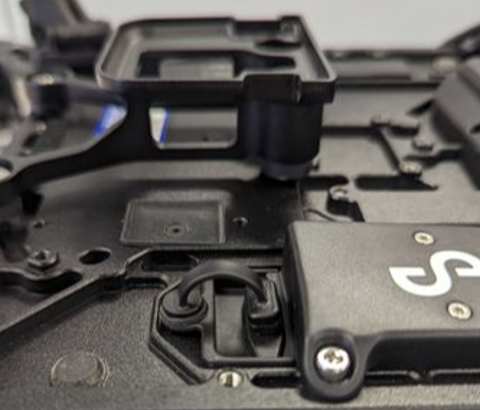
6. Gently tuck the cables towards the rear of the Astro (directed towards the yellow connector in the payload bay), then position the plastic cover over the Astro I/O panel, making sure to leave the USB-C port accessible.
Be careful not to crush the cables between Astro and the lip of the plastic cover.
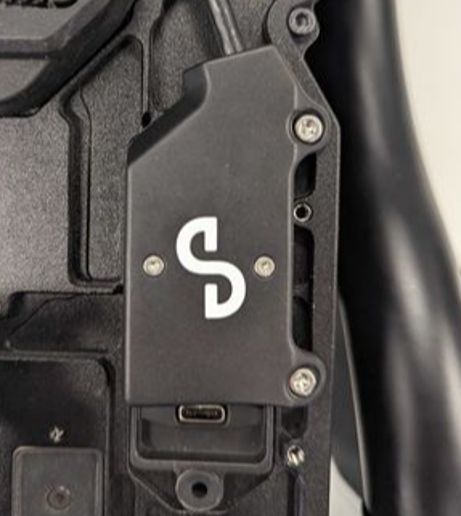
8. Insert the round end of the dust cover into the rubber grommet next to the USB-C port, and then connect the opposite end of the cover to the USB-C port.
9. The following image shows the I/O shield properly secured and the USB-C dust cover in place. You can now proceed to turn the aircraft upright.
Installing Hovermap on the Astro
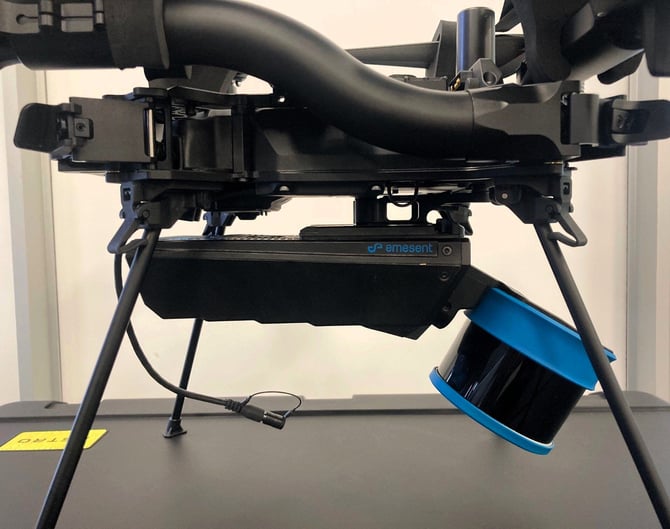
1. Gently slide the Hovermap onto the Hovermap dovetail mount, positioning it from the front of Astro, ensuring it locks into place. A clicking sound indicates the bracket has locked into the dovetail mount.
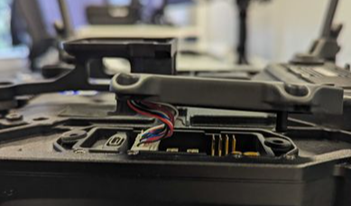
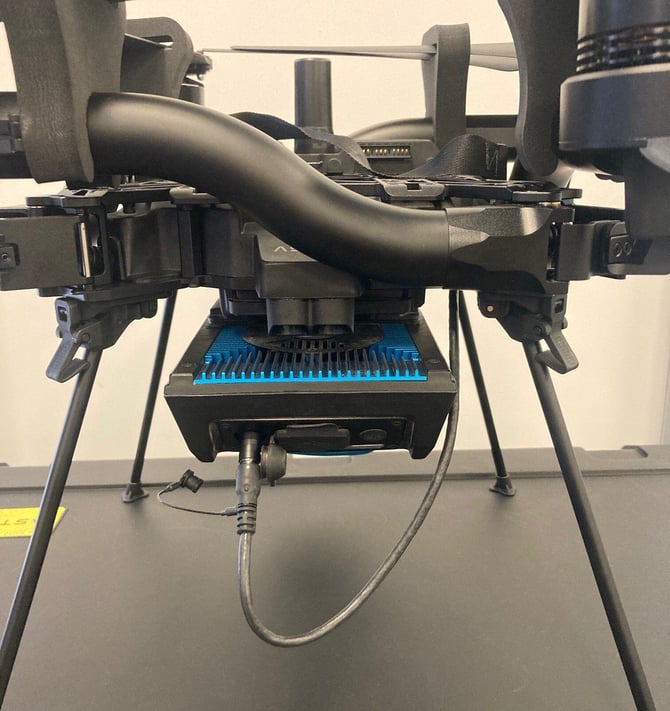
2. Align the white dot on the electrical interface with the white dot on the port on the Hovermap. Press firmly to connect the electrical interface, making sure it locks into place. A clicking sound indicates the cable has been successfully attached to the Hovermap.
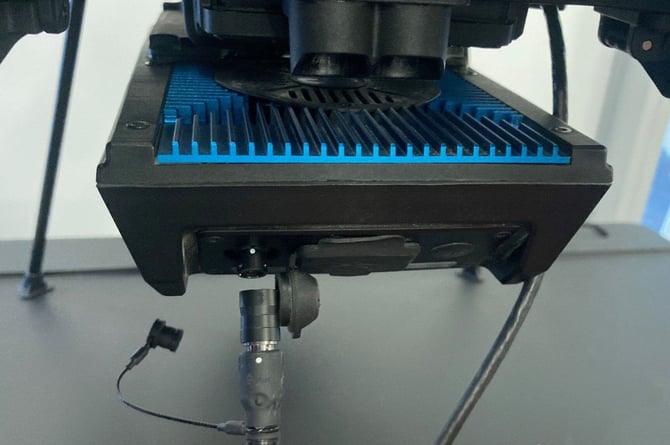
3. Test the cable connection by gently tugging on the cable to ensure it is positively retained on the Hovermap.
If the cable fails to keep connected during this test, it is recommended to get in touch with Emesent support.
Placing the Hovermap Mode Sticker on the Pilot Pro Controller
Follow these steps to install the custom sticker label for switch modes on the Freefly Pilot Pro controller. This sticker is included in the Hovermap-Astro Interface Kit.
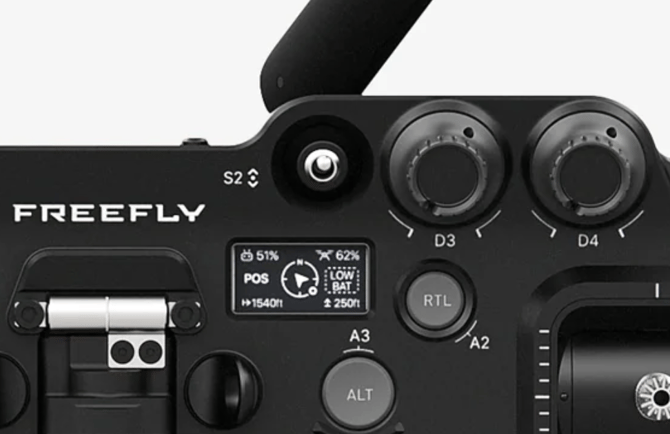
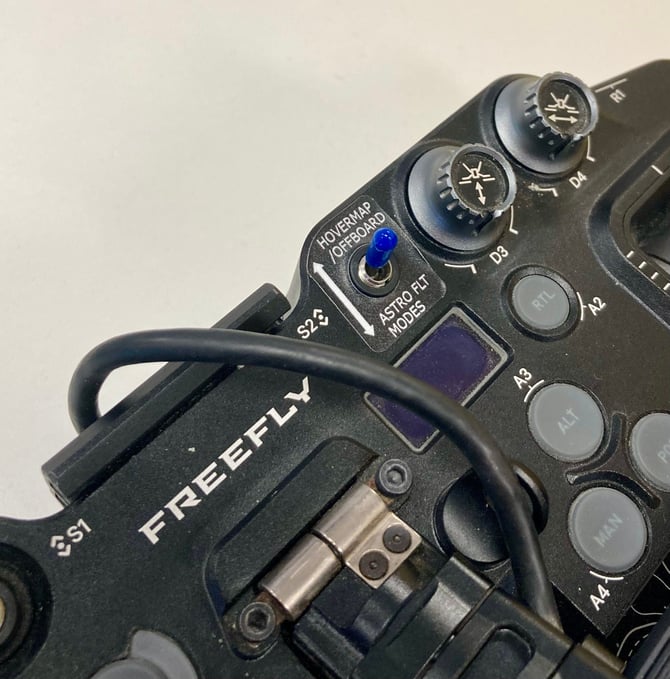
1. Locate the S2 toggle switch in the upper-right area of the Freefly Pilot Pro controller.
2. Peel the sticker from its backing sheet and place it as shown below.
Install Emesent Commander on the Freefly Pilot Pro controller
Emesent Commander can be installed either from an external storage device or via the Freefly updater app. If you do not have the latest version of the Commander .apk file on external storage, skip to the section below: Install Commander with the Freefly Updater App.
When using Astro or Astro Max, if you enable the FPV feed via Commander settings while the Freefly Auterion software platform is being run, it may result in FPV feed stuttering. For that reason, when Commander detects a Freefly Astro or Astro Max, the FPV feed is hidden by default and the point cloud is displayed in the Main View. The FPV feed can be manually enabled in Commander settings when Auterion is closed.
Installing via External USB storage
If you don’t have the latest Commander version installed, you will first need to uninstall the earlier version.
1. Go to the Emesent Software Downloads
2. Download the software application package to your external USB storage device.
3. Press the power button on the Pilot Pro twice to turn on the controller and the tablet (with the current Freefly firmware). This will power on both the tablet and the controller.
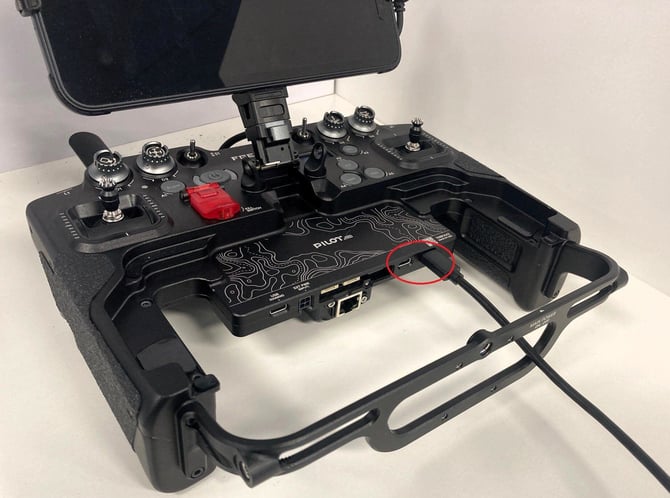
4. Connect the external storage device containing the downloaded .apk file to one of the USB-C ports on the controller.
5. Copy the APK file to the Pilot Pro tablet.
6. Open the My Files app on your tablet then go to the Internal storage section to access the external USB device that contains the APK file.
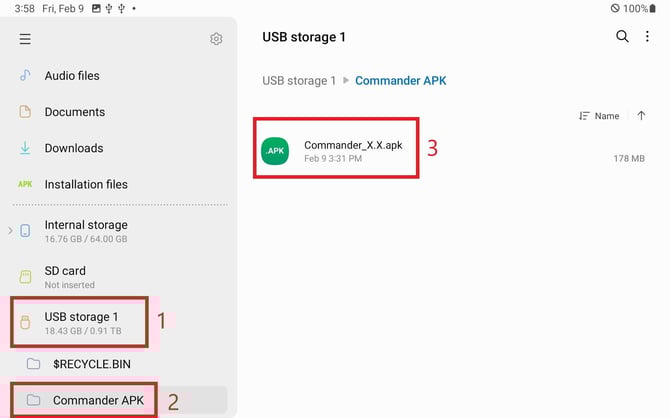
7. Locate and tap on the .apk file then tap Install to begin.
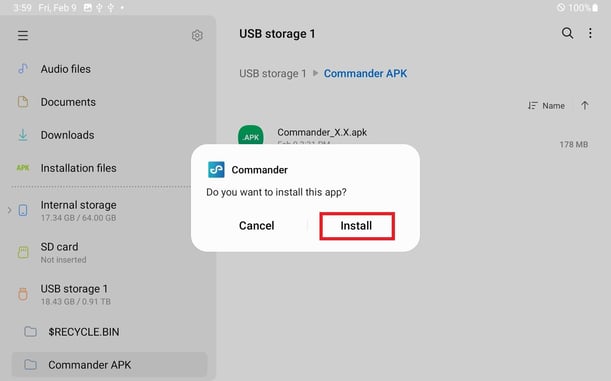
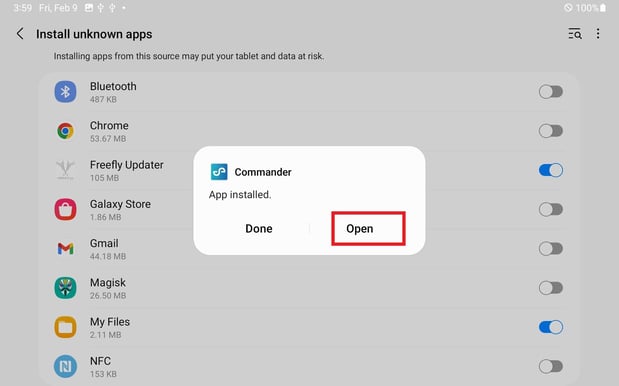
8. Follow the installation steps. If necessary, grant the file browser permission to install apps.
9. Wait for the installation to complete.
Install Commander with the Freefly Updater App
1. Hold the power button on the Pilot Pro tablet for four seconds. This will power on both the tablet and the controller. Press again when prompted on the controller to complete powering on.
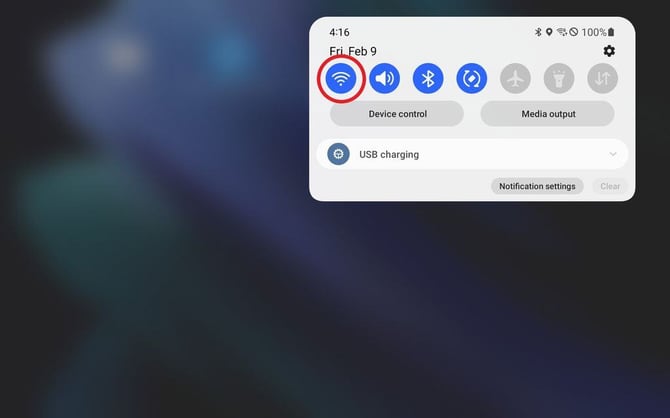
2. Enable Wi-Fi on the tablet and connect to a nearby wireless network or hotspot that has internet access.
3. Open the Freefly Updater app.
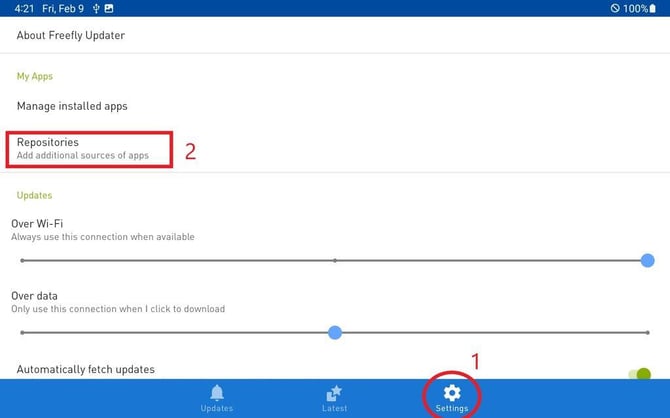
4. Tap the Settings icon then go to the Repositories
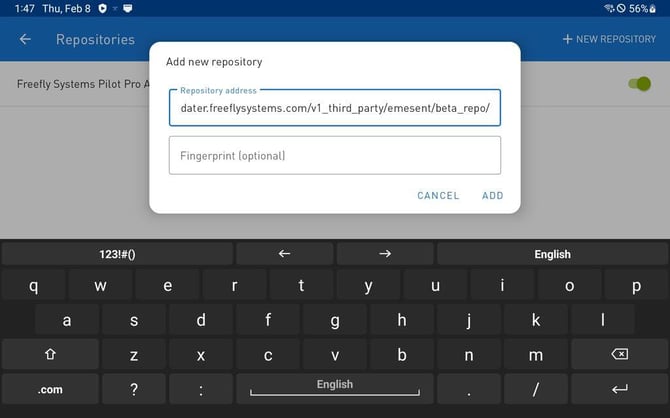
5. Tap New Repository on the top right.
6. In the repository address, enter the following address and click ADD:
http://freefly-updater.freeflysystems.com/v1_third_party/emesent/stable_repo/
The above address begins with http:// not https:// - you will need to clear out the pre-entered text entirely and enter the one above.
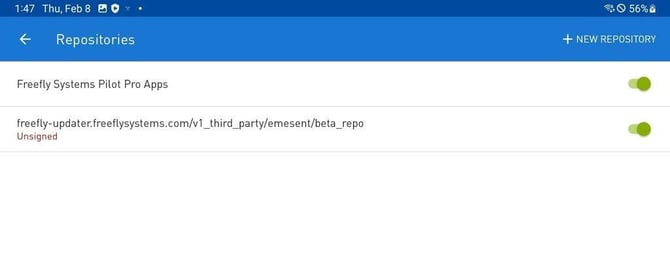
7. Once the new repository has been added, it is marked as “Unsigned” in red. Ignore this and continue with the installation process. Make sure the toggle for the repository is enabled.
8. Tap the back arrow and go to the Latest menu. Pull down to refresh the list of apps.
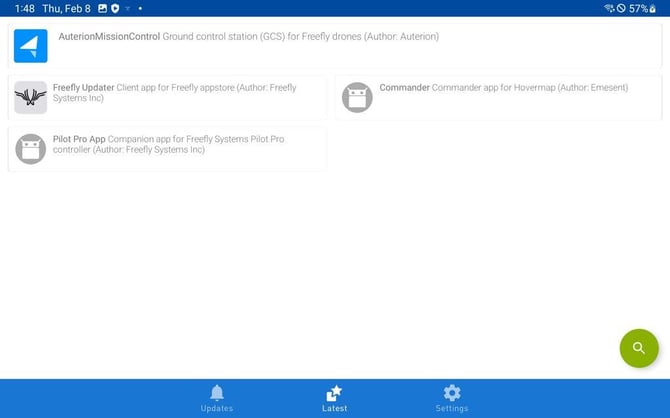
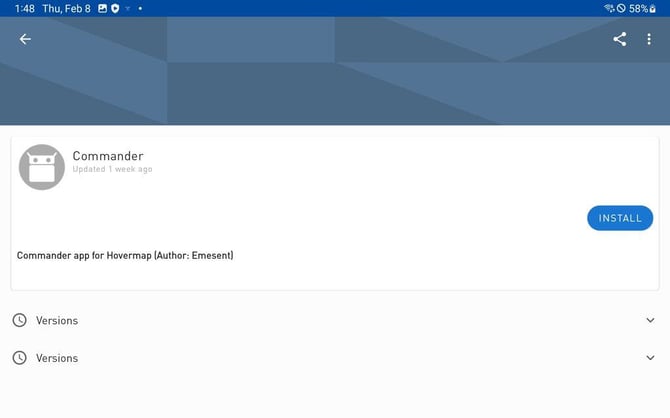
9. Tap the Commander app entry to open it then tap Install.
10. Follow the installation steps and wait for the process to complete.
Disabling USBHID Mode
This step is not necessary if you have Commander 2.0 as a minimum.
To prevent Emesent Commander from being minimized when using the Hovermap switch (S2) on the Pilot Pro controller, follow these steps:
1. Open the Pilot Pro.
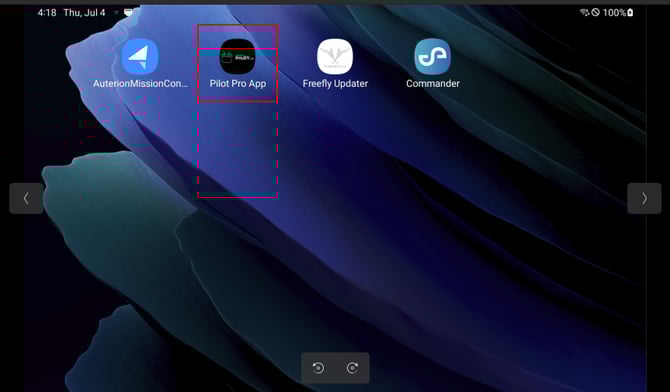
2. Tap the Hamburger button the select Advanced.
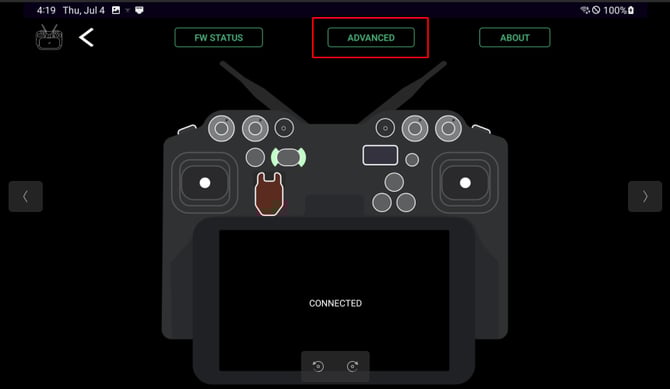
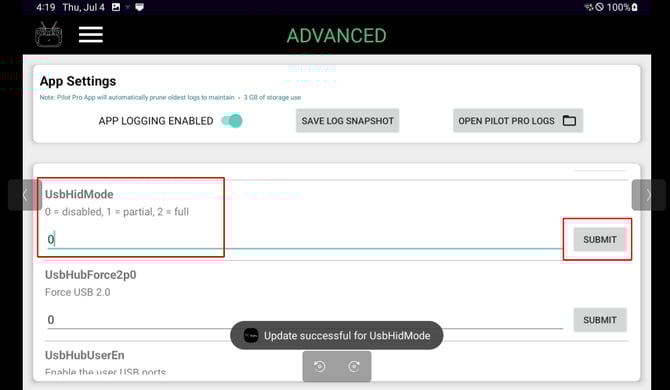
3. Set UsbHidMode to 0 (zero) then tap Submit.
Setup Hovermap and Freefly Astro for basic operations
The instructions in this section are the same whether you’re using the Astro or Astro Max drones and the Hovermap ST or ST-X, and the descriptions of Hovermap, Astro and Mount are generic.
Powering on the Hovermap
1. Press the power button on the Pilot Pro twice to turn on the controller and the tablet (with the current Freefly firmware).
2. Power on the Astro. See the section below: Powering on the Astro.
3. Power on the Hovermap
You can configure Hovermap through the Web UI to power on automatically as soon as power is supplied.
4. Wait as the Hovermap cycles through several stages. The status LEDs at the back of the Hovermap will flash red for approximately 30 seconds as the system boots. Hovermap is ready when the status LEDs show a breathing blue pattern, which can take about 60 seconds.
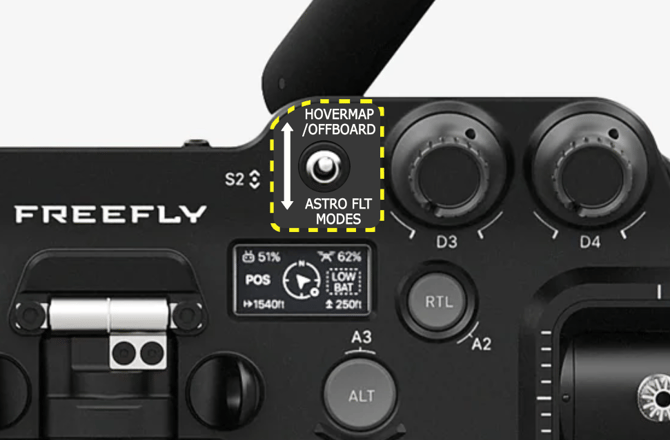
Setting the Pilot Pro to Hovermap Mode
1. Set Switch 2 (S2) on the Pilot Pro controller to Hovermap/Offboard mode (highest position away from the pilot).
2. Check that the status screen shows Position or Pending.
The status will change to Offboard once the Astro is armed.
Connecting to the Hovermap
Emesent Commander communicates directly with the Hovermap via the Freefly Pilot Pro controller. Connection to the Hovermap’s Wi-Fi network is not required.
1. Ensure Hovermap is powered and ready.
2. Turn off the Wi-Fi on the Pilot Pro tablet.
As stated above, communication with the Hovermap is done via the controller. The Wi-Fi on the Pilot Pro tablet MUST BE DISABLED.
3. Launch Emesent Commander then tap Connect at the top of the landing page.
4. On the page that displays, set Hostname/IP address to 192.168.144.101
5. Tap the Tick icon then tap Close.
6. Once the connection is established, you will hear an audio message indicating that you are “Connected” and the mission tiles are enabled.
Due to interference caused by the Pilot Pro controller to nearby Wi-Fi connections, the Observer Mode feature is only available via an Ethernet connection when using the Freefly Astro. For more information on using the Observer Mode, refer to the Hovermap user manual.
Initial Hovermap and Astro Setup for Assisted or Autonomous Missions
1. Now the Hovermap is powered and a connection is established, select the tile: Assisted or Autonomous Mission.
2. Progress through the mission workflow until you reach the Scan setup
3. Start a scan to allow Hovermap to initialize settings on Astro.
This initial scan will fail as indicated in the image below. You will also be notified via an audio alert consisting of three beeps. This will only need to be performed on the initial setup.

4. Turn off the Astro.
5. Repeat the steps in this guide you have just performed, from Powering on the Hovermap back to step 2 above: Progress through the mission workflow.
6. Start a scan.
7. Wait until pre-mission checks have passed - you’ll hear the "Hovermap Ready" alert sound indicating you are ready to fly.
8. Then select Continue to progress to the main screen and you are ready to fly.
Powering on the Astro
1. Extend the arms of the Freefly Astro to allow you to access the battery bays. Each arm must be extended and locked into place.

2. Place both batteries on top of the Freefly Astro and slide them into place. Firmly press to ensure proper connection. Each battery will make two clicks when installed.
The Freefly Astro will not arm if only one battery is installed.

3. Press the power button on either of the batteries twice to power the aircraft.

4. The battery display should read “Hotswap” after the second press.

5. The second battery automatically powers up (and also shows “Hotswap” on the display) when the first battery is turned on. The green and red LEDs should light up at the end of the aircraft arms.

If Freefly Astro motors (or batteries) become too hot, the Astro will enter one of two warning states. First, a warning will be displayed in Auterion – Freefly recommend moving the Astro around slowly to get airflow into the motors. If the warning is critical, the boom LEDs will flash – Freefly recommend landing the Astro immediately.
Arming the Freefly Astro
1. Push the left control stick downwards and towards the center of the controller for three seconds.
For safety reasons, the Astro will disarm 10 seconds after arming if no input is detected.
2. Wait until the status LEDs at the end of each arm of the Astro increase in brightness and the motors start to spin. The status screen on the Freefly Pilot Pro changes from Position or Pending to Offboard. This indicates that the Hovermap has control of the Freefly Astro and they’re ready to fly.

To learn more about Hovermap operations, refer to the Hovermap user manual.
Disarming the Freefly Astro
- Hold the throttle down for two seconds.
- Wait until the status LEDs at the end of each arm dim and the motors stop.
Powering down the Freefly Astro and Hovermap
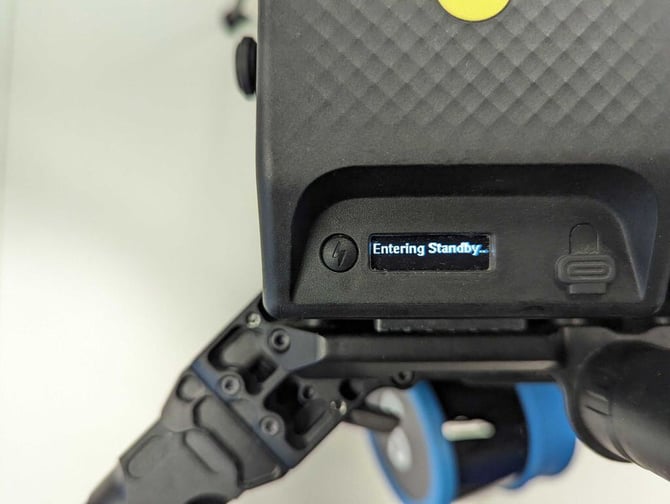
- Hold down the power button on either of the batteries for approximately 5 seconds
- Wait until Entering Standby is shown on the battery status screen.
- The Hovermap will automatically shut off when the Freefly Astro is powered down.
Powering Down the Pilot Pro Controller
Holding down and the releasing the power button (a long press) will power down the Pilot Pro and the tablet together.
Recovering Astro flight logs
If your Freefly Astro or Astro Max aircraft has been involved in a hazardous incident or displayed unexpected flight behavior, please report the incident to us and share your flight log files through the Client Support form online.
If the aircraft is registered in the Auterion Suite, Astro will automatically upload flight log files to the Suite when a WiFi or LTE connection is available.
The flight log files are stored to the onboard SD card and can be downloaded to a PC. You can access the Freefly flight logs using a USB connection between the tablet and the remote control.
For instructions to recover flight logs from your Freefly Astro or Astro Max, refer to the Pilot’s Operating Handbook section on Auterion Suite / Flight Logs.
Resetting the Astro
If the Hovermap is disconnected from the Astro, reset the aircraft to its default parameters.
1. Open Auterion Mission Control (AMC).
2. Activate Advanced Mode by tapping the AMC icon six times and confirming at the pop-up screen.
The icon will change to an outline when Advanced Mode is active.
6. Connect AMC to the Astro.
7. Go to Vehicle setup > Parameters > Tools then tap Reset to vehicle's configuration defaults.
8. After resetting, go to Vehicle setup > Parameters > Tools then tap Reboot Vehicle.
9. Calibrate sensors as required.