Hovermap ST/STX Cortex Recovery Guide
The Cortex recovery mechanism is used to remotely recover Hovermap ST & STX payloads (Hovermap 100 not supported) that are unable to boot (status LEDs remain on red flashing) due to file system issues or a failed Cortex upgrade attempt.
This recovery process is only available for payloads already running Cortex 4.0.3 or later.
This recovery process will update your Hovermap to the latest version of Cortex. You will also need to update Commander to ensure compatibility.
Running recovery will delete all scans in the ‘transferred’ directory of the Hovermap. Scans that have not yet been offloaded will remain.
Equipment Required
|
QTY |
Item |
Details |
|---|---|---|
|
1 |
USB drive |
At least 8 GB of free space. ⚠️ The USB drive must not be a solid state drive. See troubleshooting section for instructions on validating USB. The majority of USB devices supplied with Hovermaps are solid-state drives enclosed in a USB form factor, even though they may appear to be standard USB drives. |
|
1 |
Hovermap |
Must be in a state of red flashing light. Running Cortex 4.0.3+ |
|
1 |
Power source |
|
|
1 |
Supported mobile or tablet device |
Supported device, with latest Commander version installed. |
|
1 |
Cortex Recovery Package |
To receive the recovery package, please complete the Technical Support form selecting:
|
Recovery Process
Step 1: Prepare the USB drive
- Validate the USB drive is not be a solid state drive. See troubleshooting section for instructions on validating USB.
-
Copy the following files to the top level of the USB drive:
-
cortex_recovery.gpg(supplied by Emesent for your Hovermap version) -
BSP install image (e.g.
bsp_st_2.4.0.img) -
Hovermap install image (e.g.
hvm_st_4.0.3.img)
-
-
Safely remove the USB drive from your computer before continuing.
Step 2: Insert the USB drive
-
Power off the Hovermap payload completely.
-
Insert the prepared USB drive into the Hovermap.
Leave the USB drive in place and do not remove it until the recovery process has finished.
Removing the USB drive early can result in an unrecoverable state that cannot be fixed remotely and will require returning the Hovermap to Emesent for repair.
Step 3: Start the recovery process
-
Connect the Hovermap to a reliable power source.
-
Power on the Hovermap.
-
Wait approximately one minute for the recovery process to begin.
-
Confirm that the status LEDs show a fast blue swipe to indicate that recovery has started.
Step 4: Wait for completion
-
Allow the recovery process to continue without interruption.
-
Once the recovery process finishes, the fast blue swipe will stop.
-
The Hovermap will then power off and reboot automatically.
-
When it restarts, the LEDs will show a red flashing pattern for about one minute.
-
Wait until the LEDs change to a breathing blue pattern before removing the USB drive. This confirms the recovery is complete.
If the LEDs do not return to breathing blue, or show a different indicator after a reasonable amount of time (up to one hour), proceed to the Troubleshooting section.
Step 5: Finalize recovery
-
Remove the USB drive from the Hovermap.
-
Open the USB drive on your computer and locate the new folder named cortex_recovery.
-
Send the contents of this folder to Emesent Client Support so the original cause of the issue can be analysed.
Step 6: Confirm recovery
-
Open Commander on your tablet or supported mobile device
-
Connect to the Hovermap
-
Verify that the connection is successful to confirm the issue has been resolved.
Troubleshooting
If the recovery process does not complete as expected, Hovermap will provide feedback through the status LEDs. Use the table below to identify the issue and next steps.
|
LED Pattern |
Meaning |
|---|---|
|
Slow flashing – Red |
Hovermap is still booting, recovery has not started |
|
Fast flashing – Red |
A critical error has occurred. This is most likely caused by a corrupted recovery file or install image (bad download). Check the cortex_recovery_feedback.log file in the cortex_recovery folder on the USB for more feedback. |
|
Fast flashing – Yellow |
A file needed for the recovery process has not been found. Check the cortex_recovery_feedback.log file in the cortex_recovery folder on the USB for more feedback. |
|
Fast swiping – Yellow |
Hovermap is unable to write to the USB drive. Make sure there is space on the drive and that it is formatted correctly. |
|
Fast swiping – Blue |
The recovery process is in progress. |
If the recovery process does not succeed, check the feedback log before contacting Emesent Support.
-
During recovery, Hovermap writes a log file to the USB drive.
-
The file is called cortex_recovery_feedback.log and is located in the cortex_recovery folder.
-
This log provides details on why the process failed.
Example:
Install file hvm_st_4.0.3.img not found on USB. Aborting.
If the error is correctable
-
Remedy the issue (e.g. copy the missing file to the USB drive).
-
Remove the cortex_recovery folder from the USB drive and store it in a safe location for later submission to Emesent.
-
Restart the recovery process.
The cortex_recovery folder must be removed from the USB drive before you can attempt the recovery process again.
If the issue persists
-
If recovery has not completed after 1 hour, remove the USB drive.
-
Send the contents of the cortex_recovery folder to Emesent Client Support for analysis.
How to Validate the USB Drive
-
Connect the USB drive to your Windows computer.
-
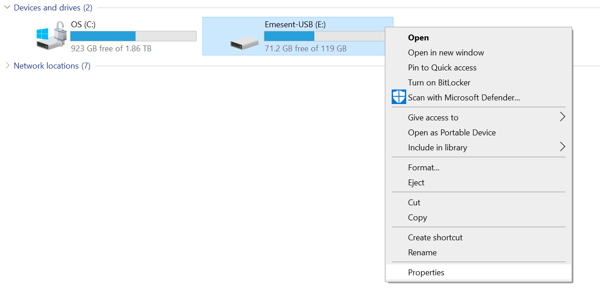
Open This PC in Windows Explorer.
-
Right-click on the USB device and select Properties.

4. Check the Device type field:
- If it shows Removable Disk or USB Drive the device is appropriate.
- If it shows Local Disk, the device is not appropriate for this task.

