This video companion to the Hovermap 360 Image Guide shows you how to capture and process 360 Panoramic images with your Hovermap scan.
Introduction
The plug-and-play 360-degree camera accessory for Hovermap, combined with seamless processing in Aura, enables the easy capture, registration, and export of 360 panoramic images. Your 360 images are automatically registered and exported in Aura, ready for visualization, so you can highlight areas of interest in your point cloud and enhance understanding for remote stakeholders or data users.
You can perform the end-to-end 360-images workflow entirely in Aura, although Aura also integrates with third-party applications – see below – to display and share visualizations through a simple streamlined workflow.
Prerequisites
Hardware
- Emesent Hovermap (ST-X/ST/HVM100 are all supported)
- Telescopic handheld mount or Hovermap GoPro mount
- GoPro MAX (including SD storage card preconfigured) and quick mount swap adaptor
- Hovermap handle
- Hovermap battery
- USB stick (for scan and 360 video transfer)
- Fischer cable
Software
-
Aura version 1.9 or higher with a valid Colorization licence.
- Optional: the following third-party software for exporting point cloud 360 image data has been officially tested to work with Aura:
-
Pointerra3D: Pointerra3D - The world's fastest true end-to-end 3D data solution
-
Cintoo Cloud: Homepage - Cintoo
-
Bentley iTwin:
 iTwin Platform | Bentley Systems | Infrastructure Software
 -
Prevu3D: https://www.prevu3d.com/
-
- Optional: the GoPro Quik app can be used for photo and video editing: Quik App: Video + Photo Editor | GoPro
GoPro MAX settings to support Image Extraction
The GoPro MAX camera comes preconfigured straight from the box. However, it is advisable to double-check the settings before initial use. Any adjustments will be saved for subsequent usage.
For more guidance on navigating the GoPro MAX menu and understanding its settings, refer to the official GoPro MAX documentation (PDF).
To check the GoPro MAX settings:
-
Power on the GoPro MAX.
-
Swipe down from the top to access the dashboard then select Preferences. Ensure the following settings are correct:
-
Preferences > General
-
Default Mode = Last 360 video
-
Anti-Flicker = 50 Hz
-
-
Preferences > Touch Screen
-
Orientation = Landscape
-
-
-
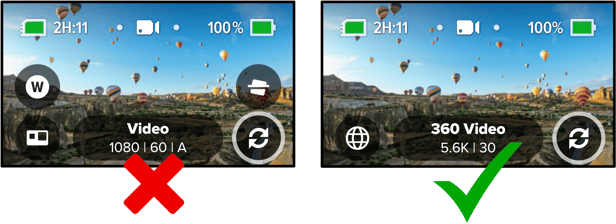
Press the Mode button on the side of the camera until 360 Video is highlighted. Doing this will set the camera to Hero AXde (indicated by the GoPro icon on the bottom left) by default. Click the icon to change the mode to 360 Video (indicated by a Sphere icon).
-
Swipe down to access the dashboard then select the bottom right icon to set orientation lock to UP.
-
From the home screen, access the 360 Video capture settings by selecting the bottom middle icon and then the Pencil icon. Ensure the following settings are correct:
-
Mode: 360 Video
-
RES | FPS = 5.6k | 25
-
On-Screen Shortcuts:
-
Upper Left = Off
-
Upper Right = Off
-
-
-
-
From the home screen, access the Hero mode capture settings by selecting the bottom left icon and then the Pencil icon. Ensure the following settings are correct:
-
Mode: Video
-
RES | FPS | Lens = 1080 | 50 | L
-
Bitrate = High
-
Shutter = Auto
-
MaxHypersmooth = Off
-
Lens = Linear 19mm
-
-
The GoPro MAX configuration settings are complete, and the camera is ready to be attached to the Hovermap.
Attach the GoPro MAX to the Hovermap
This section describes the method for connecting the GoPro MAX to the telescopic mount provided with the 360 camera kit for handheld scanning purposes. It is also possible to connect the 360 camera to an existing fixed camera mount. However, the orientation settings will need to be customized (refer below to section 6.2 Extract 360 images).
To attach the GoPro MAX to Hovermap:
1. Attach the provided telescopic 360 camera mount to the Hovermap handle using the supplied thumb screw and plate.


2. Attach the GoPro MAX to the top mounting location using the blue locking lever.

3. Ensure that the telescopic mount is fully extended.

During the 360 image extraction process in Emesent Aura, a mask file blurs the operator from the images. However, it is important to note that the mask files provided are designed to work only when the mount is fully extended.
4. Attach the Hovermap handle to the Hovermap.
5. Power on the Hovermap by connecting it to the battery using the Fischer cable provided, then pressing the power button. The belt clip can be used to carry the battery. You are now ready to perform a scan mission.
Capture your scan
-
Start your scan in the Emesent Commander app.
-
Turn on the GoPro MAX. This can be done as the Hovermap is starting to rotate.
-
Remove both the front and back lens caps.
-
Ensure the GoPro MAX is set to 360 Video by pressing the camera screen and then checking for the Sphere icon located at the bottom left corner, as depicted in the image below on the right. If not, tap it to switch to the correct mode.
-
3. Once the GoPro MAX has been set to the correct mode and the Hovermap scan has started, press the red Record button on the top face of the GoPro MAX.
4. Allow the Hovermap to remain still for at least 10 seconds (about five slow green pulses) while its initializing the scan.
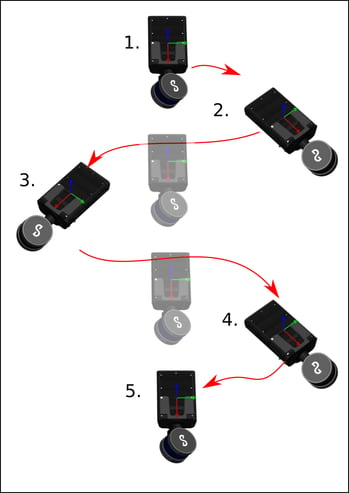
5. To stimulate the IMU on the Hovermap and camera to achieve an accurate time synchronization, rotate the Hovermap around the Z-axis to the sides by approximately 60 degrees, as shown in the following image. The rotation must generate a substantial angular motion (avoid slow rotations). A proper rotation process takes around 10 seconds.
The applied image mask blurs for either right-handed or left-handed operations. Switching hands during the scan might result in the operator not being blurred out in all extracted images. To avoid this, any accompanying individuals should walk on the opposite side of the operator while capturing. This will reduce the number of people appearing in the final image.
6. You’re now ready to start scanning. Keep the Hovermap held in fairly consistent position to help mask yourself in software processing later on.
7. When the scan is finished, stop the Hovermap scan in Commander and stop the GoPro recording.
8. Once the capture is completed, download the raw data to your device for processing in Emesent Aura.
-
-
Connect the GoPro MAX to your Windows device using the USB-C connector. Locate the data within the DCIM folder to offload the content.
-or- -
Insert a USB flash drive into the USB port at the back of the Hovermap unit to automatically transfer the data. The USB flash drive must be formatted in an exFAT file format.
-
To prepare for image extraction, begin by processing the raw point cloud data.
Refer to Aura user manual section 4.3 Process Workflow for instructions on processing the point cloud.
Once processed, the 360 images can then be automatically registered and aligned to the point cloud, ready for export and visualization.
Process raw point cloud
-
Download the raw scan data from Hovermap to your hard drive.
-
Copy the .360 video file(s) from your GoPro MAX into the same folder as the raw point cloud data (where the .bag and calibration files are located).
-
Launch Emesent Aura.
-
Go to the Process tab then click Process Scan.
-
Select the Process workflow then click Add Dataset.
-
In the Location field, enter the preferred name for the output folder. Emesent Aura will create this folder, which stores all the processed results and data, as a child directory within the raw scan folder.
-
Browse for the folder that contains the raw point cloud dataset to be processed. Select that folder.
-
Select the processing profile to use.
You can use the built-in profile that is automatically detected for the Hovermap hardware. Follow standard support escalation procedures for any issues.
If you are exporting to Cintoo, go the the Output tab in the Processing Settings panel then in Point Cloud - output file types, select the E57 format.
Extract 360 images
- Go to the Process Tab and select Process Scan.
- In the Configure New Scan Job panel, select the Extract 360 images workflow.
- Click Add Dataset.
- In the panel that displays, navigate to the same folder used in processing the raw point cloud data.
To reiterate, the .360 video file(s) should also be contained in the scan folder. If not, copy the video then click the Refresh Video button.
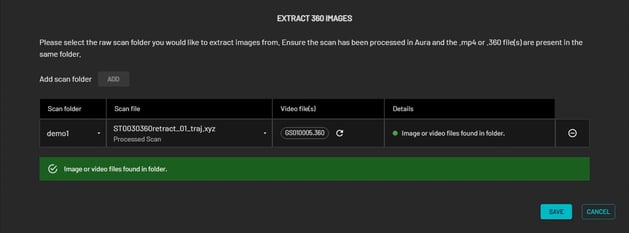
5. In the Location field, enter the preferred name for the output folder. Emesent Aura will create this folder, which stores all the processed results and data, as a child directory within the raw scan folder.
6. Click Save to return to the main panel.
7. Select one of the three built-in processing profiles for extracting 360 Images: Telescopic mount extended, Telescopic mount retracted, or 360-camera mount calibrated.
To learn more about which profiles to use and how to create a custom profile, refer to the Aura user manual section 4.1 Processing Profiles.
For more information, refer to the Aura user manual section 3.3.3 Processing Settings.
For instructions to create your own image mask, refer to the Aura user manual section 4.11 Creating a Custom Mask.
9. Click Start to begin processing. The Configure New Scan Job panel is replaced with the Starting Processing Job panel and shows a progress bar showing how far along you are in your processing job. In addition to the progress bar, the elapsed time of the processing job is shown to the right.

- Clicking View after 360 image extract processing job is complete.

- Or by opening up and existing frames.json file by either dragging and dropping it into Aura, or by opening the file from inside Aura. This file will be in the \Output\frames folder for 360 image extract jobs. Or in \IntermediateFiles\frame_extraction\frames for 360 colorization jobs. Processing Settings
Processing Settings

Video Time Range
- Video time start: The number of seconds from the beginning of the video and serves as the actual start time for frame extraction.
- Video time end: The number of seconds from the start of the video at which the frame extraction ends. Setting the value to 0 means the frame extraction will end at the end of the video.
- Frame step: A frame will be extracted whenever either the time, distance or angle relative to the last extracted frame exceeds the set threshold. Lowering the thresholds will generate more images that are spaced closer together. However, this will also increase in the amount of data to be processed and managed. It is recommended to use a combination of distance and angle only, to avoid extraction of repetitive, redundant frames when the camera is not moving.
Camera orientation override (degrees)
If you are extracting 360 images from a video captured using a color-calibrated 360 color mount, the Camera orientation override setting is not required and should be disabled in Processing Settings.
To capture panoramic images from a 360 video, the camera orientation needs to be set to align the camera virtually with the Hovermap to ensure the camera is facing forward along the x-axis. To do this, enable the Camera orientation override setting then input the angles (in degrees) for yaw, pitch, and roll.
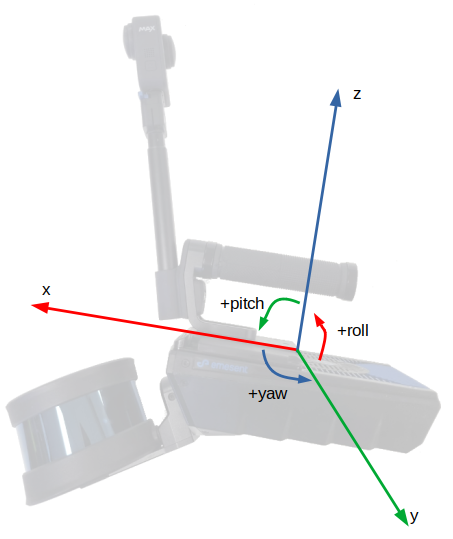
The camera already faces roughly in the same direction as the Hovermap but is slightly tilted down by 15 degrees. To align with the Hovermap, the camera should be virtually pitched upwards by 15 degrees.
- Roll : 0
- Pitch : -15
- Yaw : 0
The camera is directly attached to the Hovermap 100 via a standard camera mount
The camera is attached to the bottom side of the Hovermap facing forward.
- Roll : 180
- Pitch : 0
- Yaw : 0
The camera is attached upside down to the Hovermap ST/ST-X via an angled bracket (GoPro Hero colorization bracket)
The camera is attached to the bottom side of the Hovermap, facing forward and downward.
- Roll : 180
- Pitch : -20
- Yaw : 0
The angles provided above are precise for extracting images intended for export to third-party software. However, for colorization, greater precision is required beyond these specified angles. This feature is currently not supported in Emesent Aura.
Image Masking
This feature is essential for blurring or blacking out the operator from 360 images when they are imported into third-party tools. Three pre-built templates are available specifically designed for use with the fully extended handheld telescopic mount.
|
Operator Use |
Masking Result |
Profile |
|---|---|---|
|
Scanning using the right hand |
The left portion of the image is masked. |
[Built-in] GoProMax-extended-righthanded |
|
Scanning using the left hand |
The right portion of the image is masked. |
[Built-in] GoProMax-extended-lefthanded |
|
Scanning while holding the device close to, or in front of the operator |
The left and right edges of the image are masked. |
[Built-in] GoProMax-extended-centre |
|
Custom mask is supplied |
Custom |
Custom profile created |
Mask Template
You can apply a black or blurred (default selection) portion to the mask. For a customized mask, click the “+” button to define a mask using any third-party software (e.g., Photoshop). Assign a name to the custom template and load the PNG file generated externally. The following image lists the requirements for the mask file.

Failure to adhere to mask file requirements will result in the mask not being applied correctly.
Creating a customized mask
To create a custom mask, the following process is recommended:
-
Run image extraction once on a small subset of data. You can achieve this by setting a high Frame Extract Interval (e.g. Distance: 20 and Angle: 90) or specifying a low Video time end setting (e.g. 10 seconds). For Aura 1.5 and earlier versions, you can also use a Frame Interval of 250.
-
Open the folder that contains the extracted images, select a representative image, and open it using a third-party image editing software.
- In the editing software select the areas you want to mask out, and fill them with black (RGB: 0,0,0).
It is recommended to check for any black pixels in the unmasked parts of your image or to ensure that your image is properly masked, select all areas that are not meant to be masked and fill them with white.
If using Emesent Aura version 1.6 or earlier, ensure transparency is disabled and avoid using software that saves the image with transparency (e.g. MS Paint).
This section contains instructions for uploading images with associated point clouds using third-party software. The four platforms that have been officially tested to work with Aura for exporting point cloud 360 image data are Pointerra3D, Cintoo Cloud, Bently iTwin and Prevu3D.
Aura version 1.9 or later allows you to view geolocated 360 panoramic images alongside point clouds.
Prevu3D
Please link to the Prevu3D instructions for uploading scans.
Pointerra3D CORE
|
File format requirements |
Support for various file formats and sources (e.g. LAS/LAZ, PTS, E57, Geotiff, XYZ, PLY, SHP, DXF, KML, Geojson, ESRI GDB, OBJ, IFC, FBX, Cesium 3D Tiles, ECW, JPGs) |
|---|
-
Go to Core - Pointerra3D and log in to your Pointerra3D account.
-
Click the Upload button on the top right of the page to display the Upload data wizard.

write_global folder must be used for this, not the ones in any of the georeferenced write_global_xxx folders. 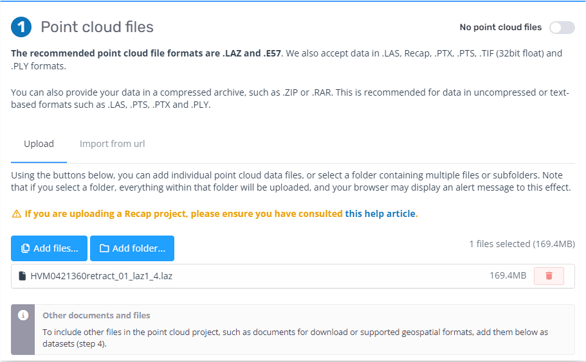
- or -
Select Let me select from a list of coordinate systems if the data is georeferenced. The Coordinate System should match the coordinate system described by the .prj file(s) in the write_global folder. Usually, this is a WGS84 UTM zone, with the Vertical Datum set to Ellipsoid.
Before importing into Pointerra, ensure the data is projected using an external tool. You can use third-party GIS software like QGIS or Global Mapper to re-project your data to a different coordinate system. Note that both the point cloud files and the frames_pointerra.csv (see below) must be re-projected the same way. Re-projection of the point cloud and images will come in a future version of Aura.

Source vertical units are in meters.
5. Enter any metadata information to help identify the scan (optional).
6. Click the 360 Photos button.

7. Enter a dataset name then under Source Files, click on the Upload tab.
8. Click Add files to attach the images and the frames_pointerra.csv file, which contains the spatial reference and file association.
It is recommended to manually select the files instead of adding a folder as there may be additional files in a folder that may confuse the system.

9. If your data is georeferenced, ensure the Same as point cloud option under Source coordinate system is selected.
10. Click Add.
11. Specify the destination of the point cloud and images in the Pointerra cloud folder structure.
12. Configure the email notifications (optional).
13. After completing the wizard, click the Begin Upload button.

14. Wait for the upload to be completed before closing the web browser.
15. You will be taken to a Jobs screen where you can track the progress of the processing job, when it is completed you receive a notification that it is available to view.

Cintoo Cloud
Import Scans
|
File format requirements |
E57, traj (.xyz), .jpeg |
|---|

2. Click the Indoor Mobile Scanner tab.

3. Select Emesent Hovermap as the source Device / Format.

5. You may modify the Positions sampling value as required.
For example, a value of 1/4 creates 1 scan location for every 4 panoramic images included in the scanning path. The number of 3D scans and the average distance between each one is indicated in Cintoo Connect and will be added to your scan count.
6. Click Import.
7. Check the Messages tab from time to time to see if the process is running smoothly.
8. Your new 3D scans will appear in your Cintoo Cloud project.
Import 360 images
Importing the 360° images to Cintoo requires an additional step. The images are geolocated within the cloud and are presented as the same coordinate system that is available to the 360 scans.
The 360° images do not count as scans in your scan count.
The maximum number of 360 images that you can upload to Cintoo Cloud is limited to the number of scans that you subscribed to. For example, if you have a subscription for 5,000 scans, you can upload up to 5,000 additional 360° images.
360° images are 2D only, so you cannot use them to add annotations (which are linked to a 3D point) or to make measurements. They are used for display only.
1. Using Cintoo Connect, go to the Terrestrial Laser Scanner tab then click Select input files.

2. Navigate to the output folder that was created during the Emesent Aura 360 image extraction step (it will be inside the second output folder from the active scan directory).
For example: C:\..\Output\frame_extraction\frames\
3. Select the frames_cintoo.csv file and click Import. The import and upload process will start automatically.
The frames_cintoo.csv file already contains the correct column headings for importing into Cintoo.

- Download and install iTwin Capture Import and Upload Tool (available from Bentley)
- Download and add Emesent template for uploading the point cloud (available from Bentley)
- Download and add Generic Mobile Mapping template for uploading the 360 images (or Panoramas as Bentley calls them) https://kb.orbitgt.com/_media/237/desktop_ext/mapping/manage_import/mobile_mapping_generic.zip
Import Emesent Point Cloud
1. Click the Resources button then select Create Mapping Resource.
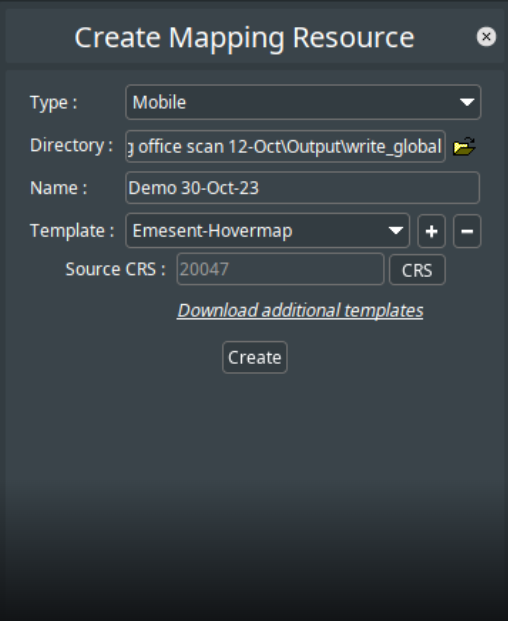
Directory: Choose the write global output for your point cloud
Name: Enter a name for your resource
Template: Select Emesent-Hovermap
CRS: Select the appropriate CRS for your dataset
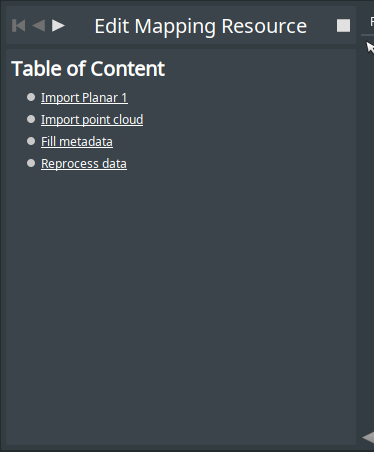
4. In the Edit Mapping Resource panel, click Import point cloud.
5. Click Select Files then browse for the point cloud generated using Emesent Aura.
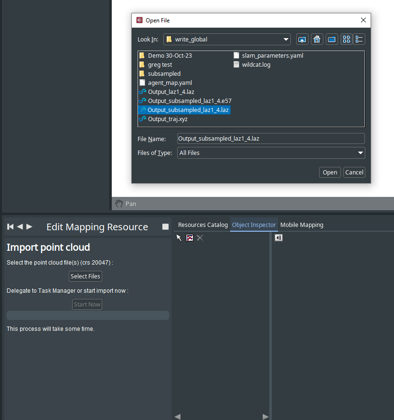
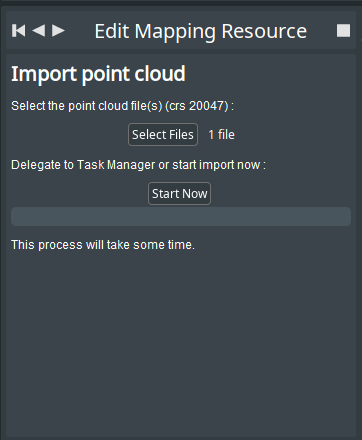
7. Wait for the dataset to load.

Import 360 images
1. Click the Resources button then select Create Mapping Resource.
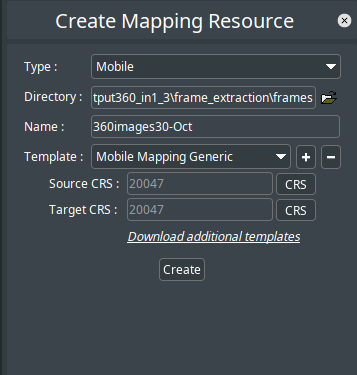
2. Specify the following settings:
Type: Mobile
Directory: Enter the frames directory from your 360 image output (that includes all the images)
Name: Enter a name for your resource
Template: Select Mobile Mapping Generic
Source / Target CRS: Select the appropriate CRS for your dataset
3. Click Create.
4. In the Edit Mapping Resource panel, click Import Panorama 1.
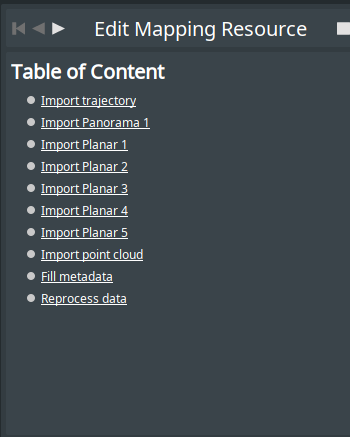
5. Click Choose File then browse for frames_bentley.csv file located in the frame_extraction folder generated during the image extract process in Emesent Aura.
6. Click Open File Location then copy all the images from the frame_extraction folder into this folder.


7. Click on the Mobile Mapping tab at the bottom window then click on one of the capture points to view the corresponding 360 images.
